This one stumped me for a bit and I was blaming it on there being no logs or something else. However, this is a DNS issue (what isn’t?). If you’re able to connect to RTMT via IP and after you select the logs you want get this error just add the target devices to your Windows hosts file and you should be good to go.
Category / Writings
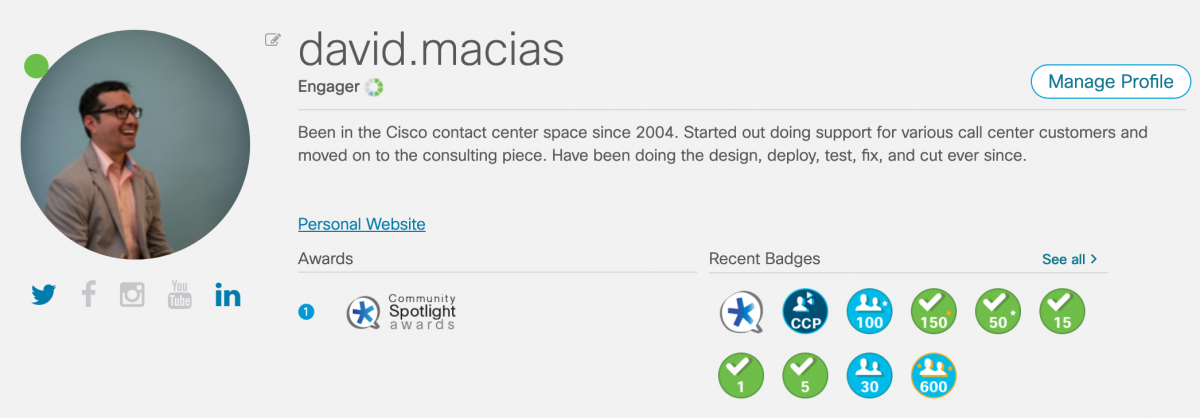
It’s nice to be recognized
I got a nice surprise in my inbox today. An email from Cisco letting me know that I was the first ever winner of the English Community Developer of the Month. Per Cisco the Community Spotlight Awards:
… recognizes members whose significant contributions designate leadership and commitment to their peers within their respective communities, including the Cisco Learning Network (CLN) and Cisco Community. Spotlight Awards Program is designed to recognize and thank individuals who help make our communities the premier online destination for Cisco enthusiasts.
I get a cool badge to show off too.

2020 Cisco Forums Profile
You can find current and past winners here or try to spot me in the picture below.
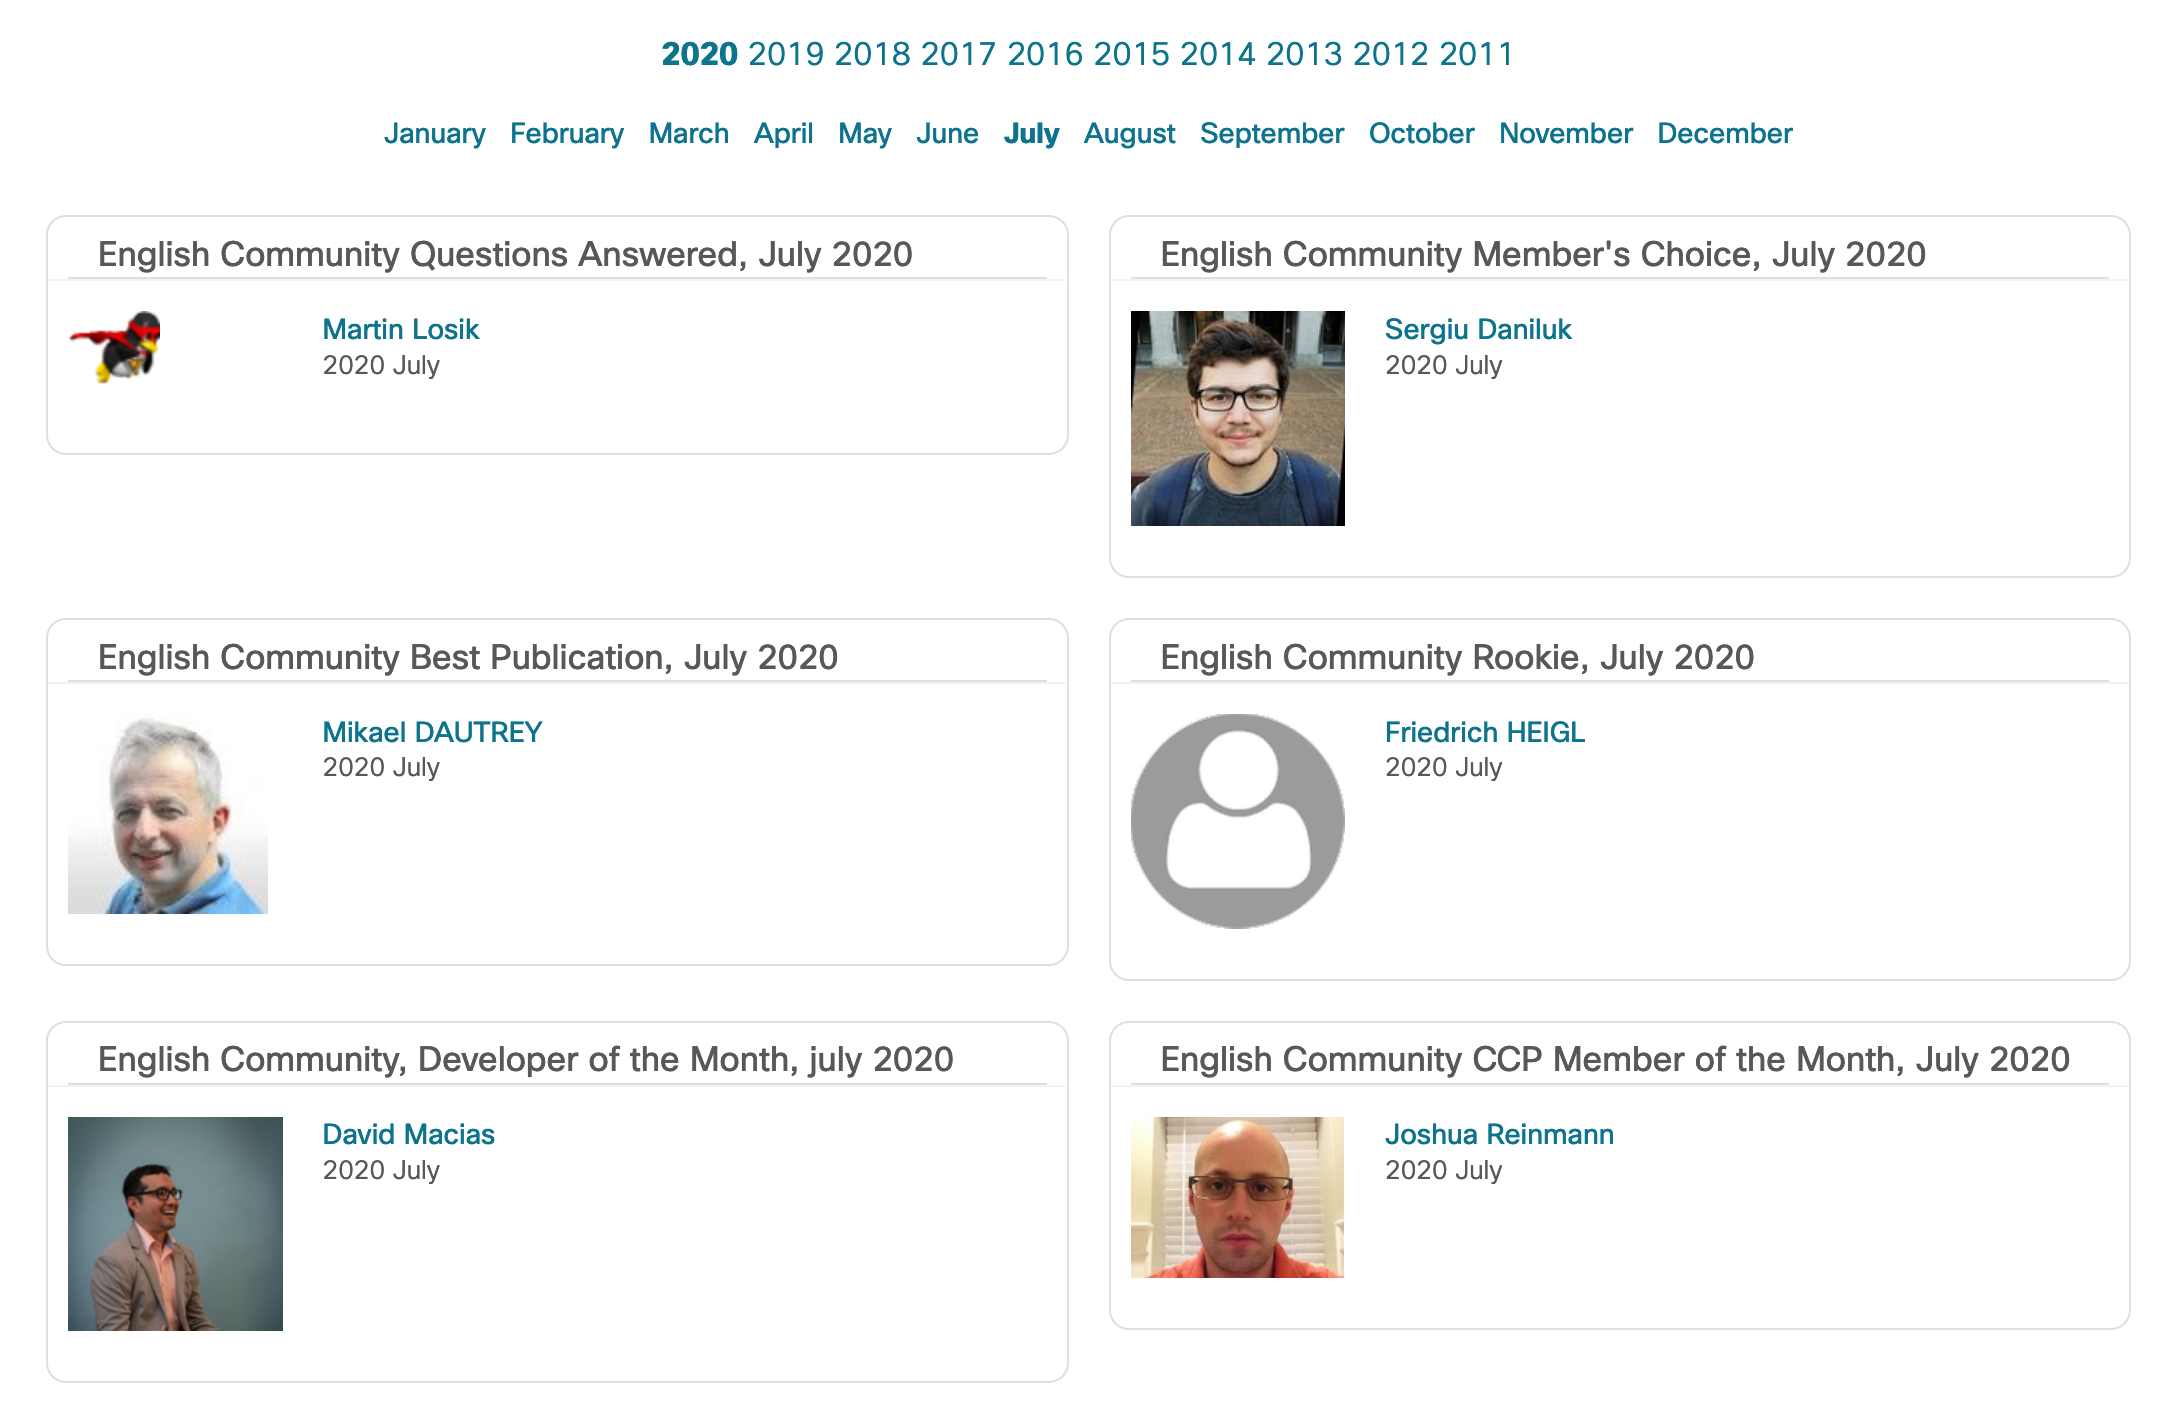
Current Spotlight Winners
Looking back through my blog posts in 2008 I talked about getting my first star due to my contributions in the Cisco NetPro forums and how happy I was about it. In that blog I have a picture of my profile showing a total of 103 posts made with 8 questions resolved. That number, 12 years later, has ballooned to 3030 posts and 208 solutions.
I encourage anyone starting out or a seasoned veteran to contribute in the various Cisco Communities it’s a great way to network with your Cisco peers and try to tackle some very interesting technical problems while you procrastinate from your not as interesting technical problems.
~david

Serverless Development with Firebase Emulator
I’m getting more and more into serverless development. Trying to avoid handling any sort of hardware sounds like a dream come true. No more handling security patching, load balancing, etc. However, one of the biggest things I struggle with is how to do local development efficiently without having to deploy your code to the cloud every time? Google’s serverless offering, Firebase, released a very cool tool this year which allows you to emulate most their services locally. Here are some of my learnings so far. These should be specifically relevant if you’re doing any React development with Firebase.
Setting Up Your Local Development
Prerequisites:
- We won’t be using the node.js server, but use node to install components and to develop our React app.
- Firebase account.
- Firebase CLI a key way to do that is using the command
npm install -g firebase-cli - Optional but recommended create-react-app installed npm install -g create-react-app
- Optional Your favorite IDE. I’m a sucker for VS Code.
Project Setup
Setting up your project. From the Firebase console, Add project:
- Choose a name.
- Choose your Google Analytics setting, not relevant for this.
- Create project.
- Add an app to get started and choose Web.
- Choose a name, I generally use the same name as the project and set up Firebase Hosting.
- Click on Database and create a Cloud Firestore database. Choose to start in test mode. Choose your favorite/closest region.
Local Setup
- Create a folder where you’ll be doing your development, this will be your root folder. I give this folder a project relevant name.
- First make sure you login with the below command and use the Google account associated with the Firebase console above.
-
firebase login
-
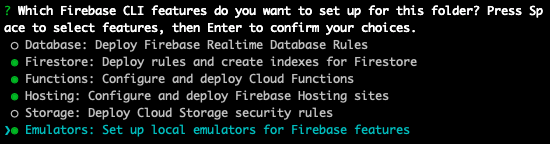
- Initialize your project with the command below. Make sure to choose the following features and be sure to select the Firestone project we created earlier during the project setup. Choose all the other defaults presented and choose the following emulation settings.
-
firebase init
Choose your Firebase services you’ll be using.

Firebase cli emulator settings.
-
Of most importance here is that you take a look at your firebase.json file which has been generated by the initialization. It should look very much like this. Pay close attention to the emulators and hosting sections as these will play an important role later. One thing to watch out for at this point is to ensure the ports you’ve asked the emulator to use are actually open. On the next step we will be able to confirm if they are opened or not, but this is the file you use to change them if you get an error. Here’s what it should look like if you’re following along.
{
  "firestore": {
    "rules": "firestore.rules",
    "indexes": "firestore.indexes.json"
  },
  "functions": {
    "predeploy": [
      "npm --prefix \"$RESOURCE_DIR\" run lint"
    ]
  },
  "hosting": {
    "public": "public",
    "ignore": [
      "firebase.json",
      "**/.*",
      "**/node_modules/**"
    ],
    "rewrites": [
      {
        "source": "**",
        "destination": "/index.html"
      }
    ]
  },
  "emulators": {
    "functions": {
      "port": 5001
    },
    "firestore": {
      "port": 8080
    },
    "hosting": {
      "port": 5000
    },
    "ui": {
      "enabled": true
    }
  }
}
- Finally it’s time to take a look at what we have so far. We’re going to start the emulator and see what we get with the out of the box setup for a Firebase project. If you get any errors it’s more than likely that you have a port conflict. I have a port conflict and moved Function from 5001 to 5080. If you need to to the same go back to your firebase.json file and find a free port and try again.
-
firebase emulators:start
-
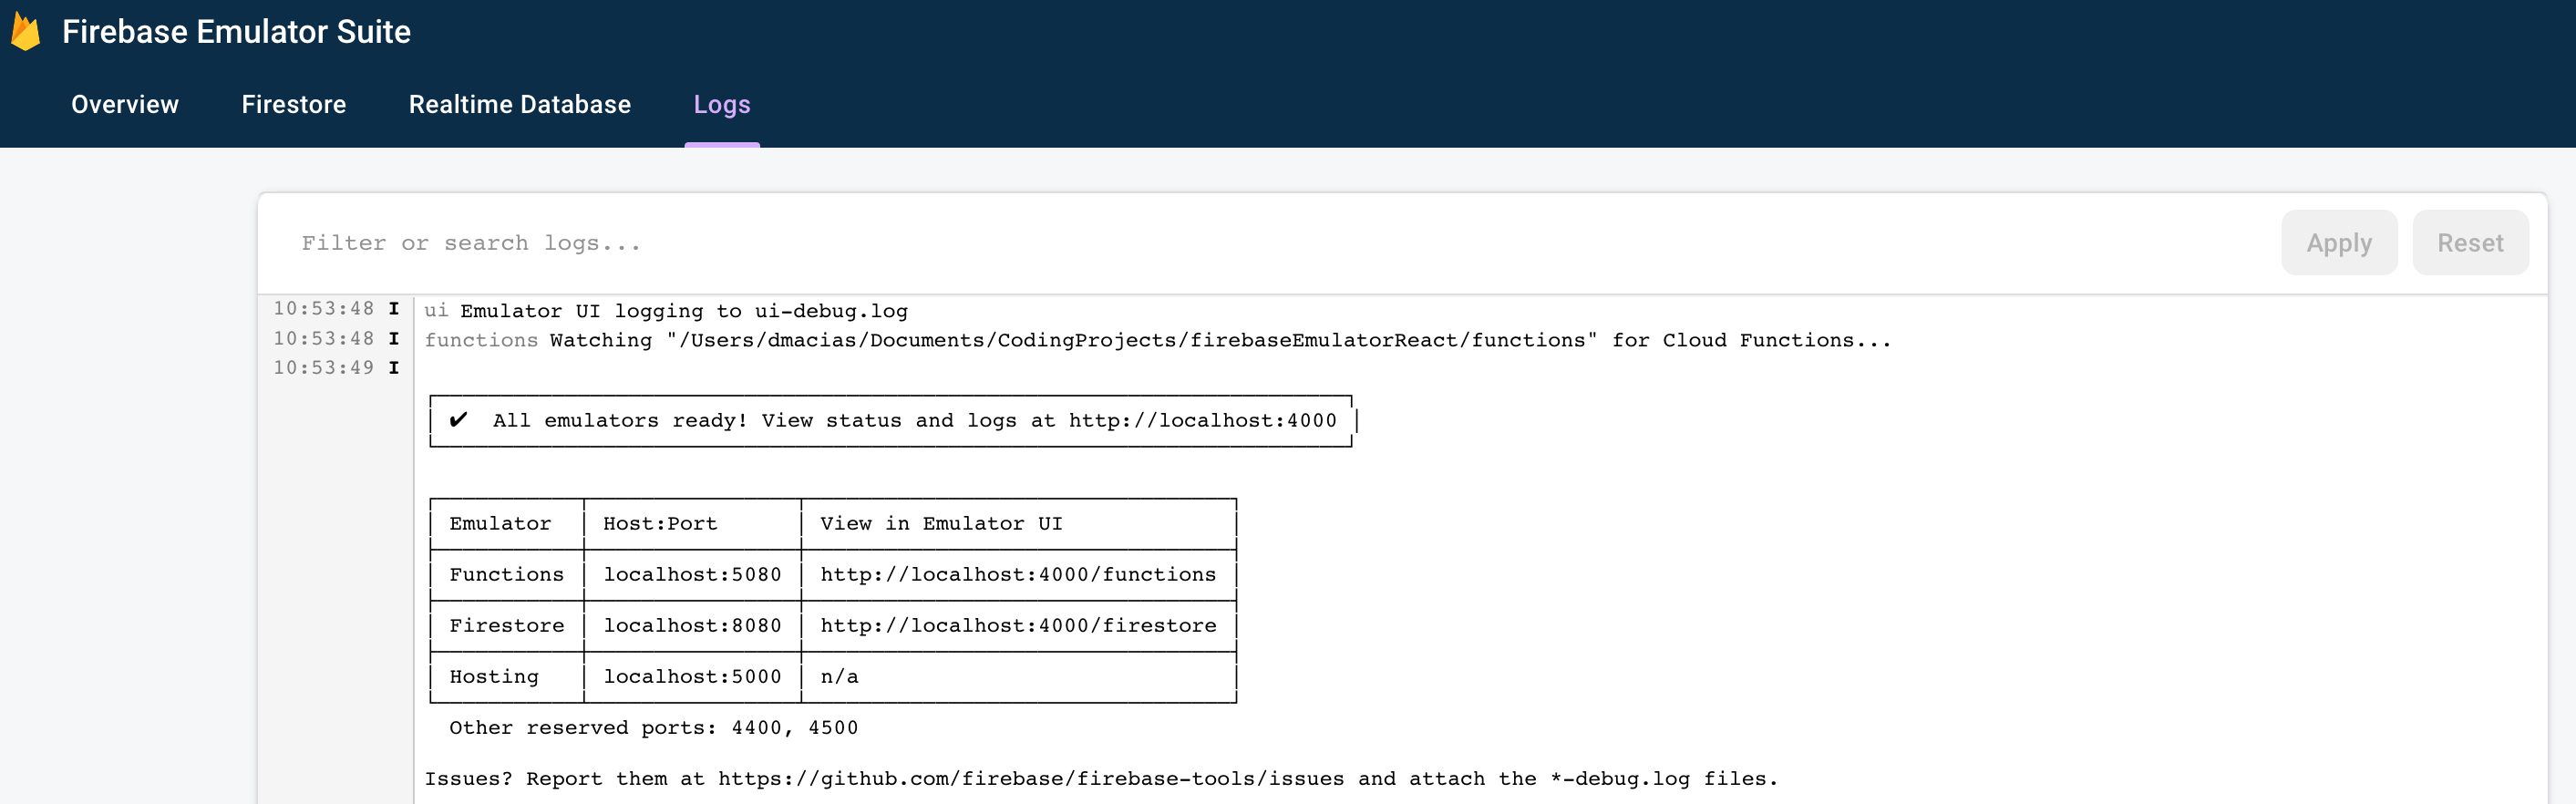
If everything worked you should see the following.
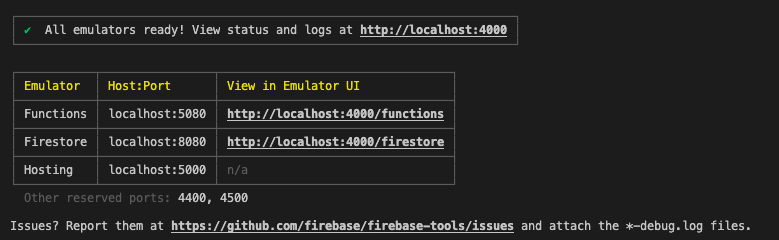
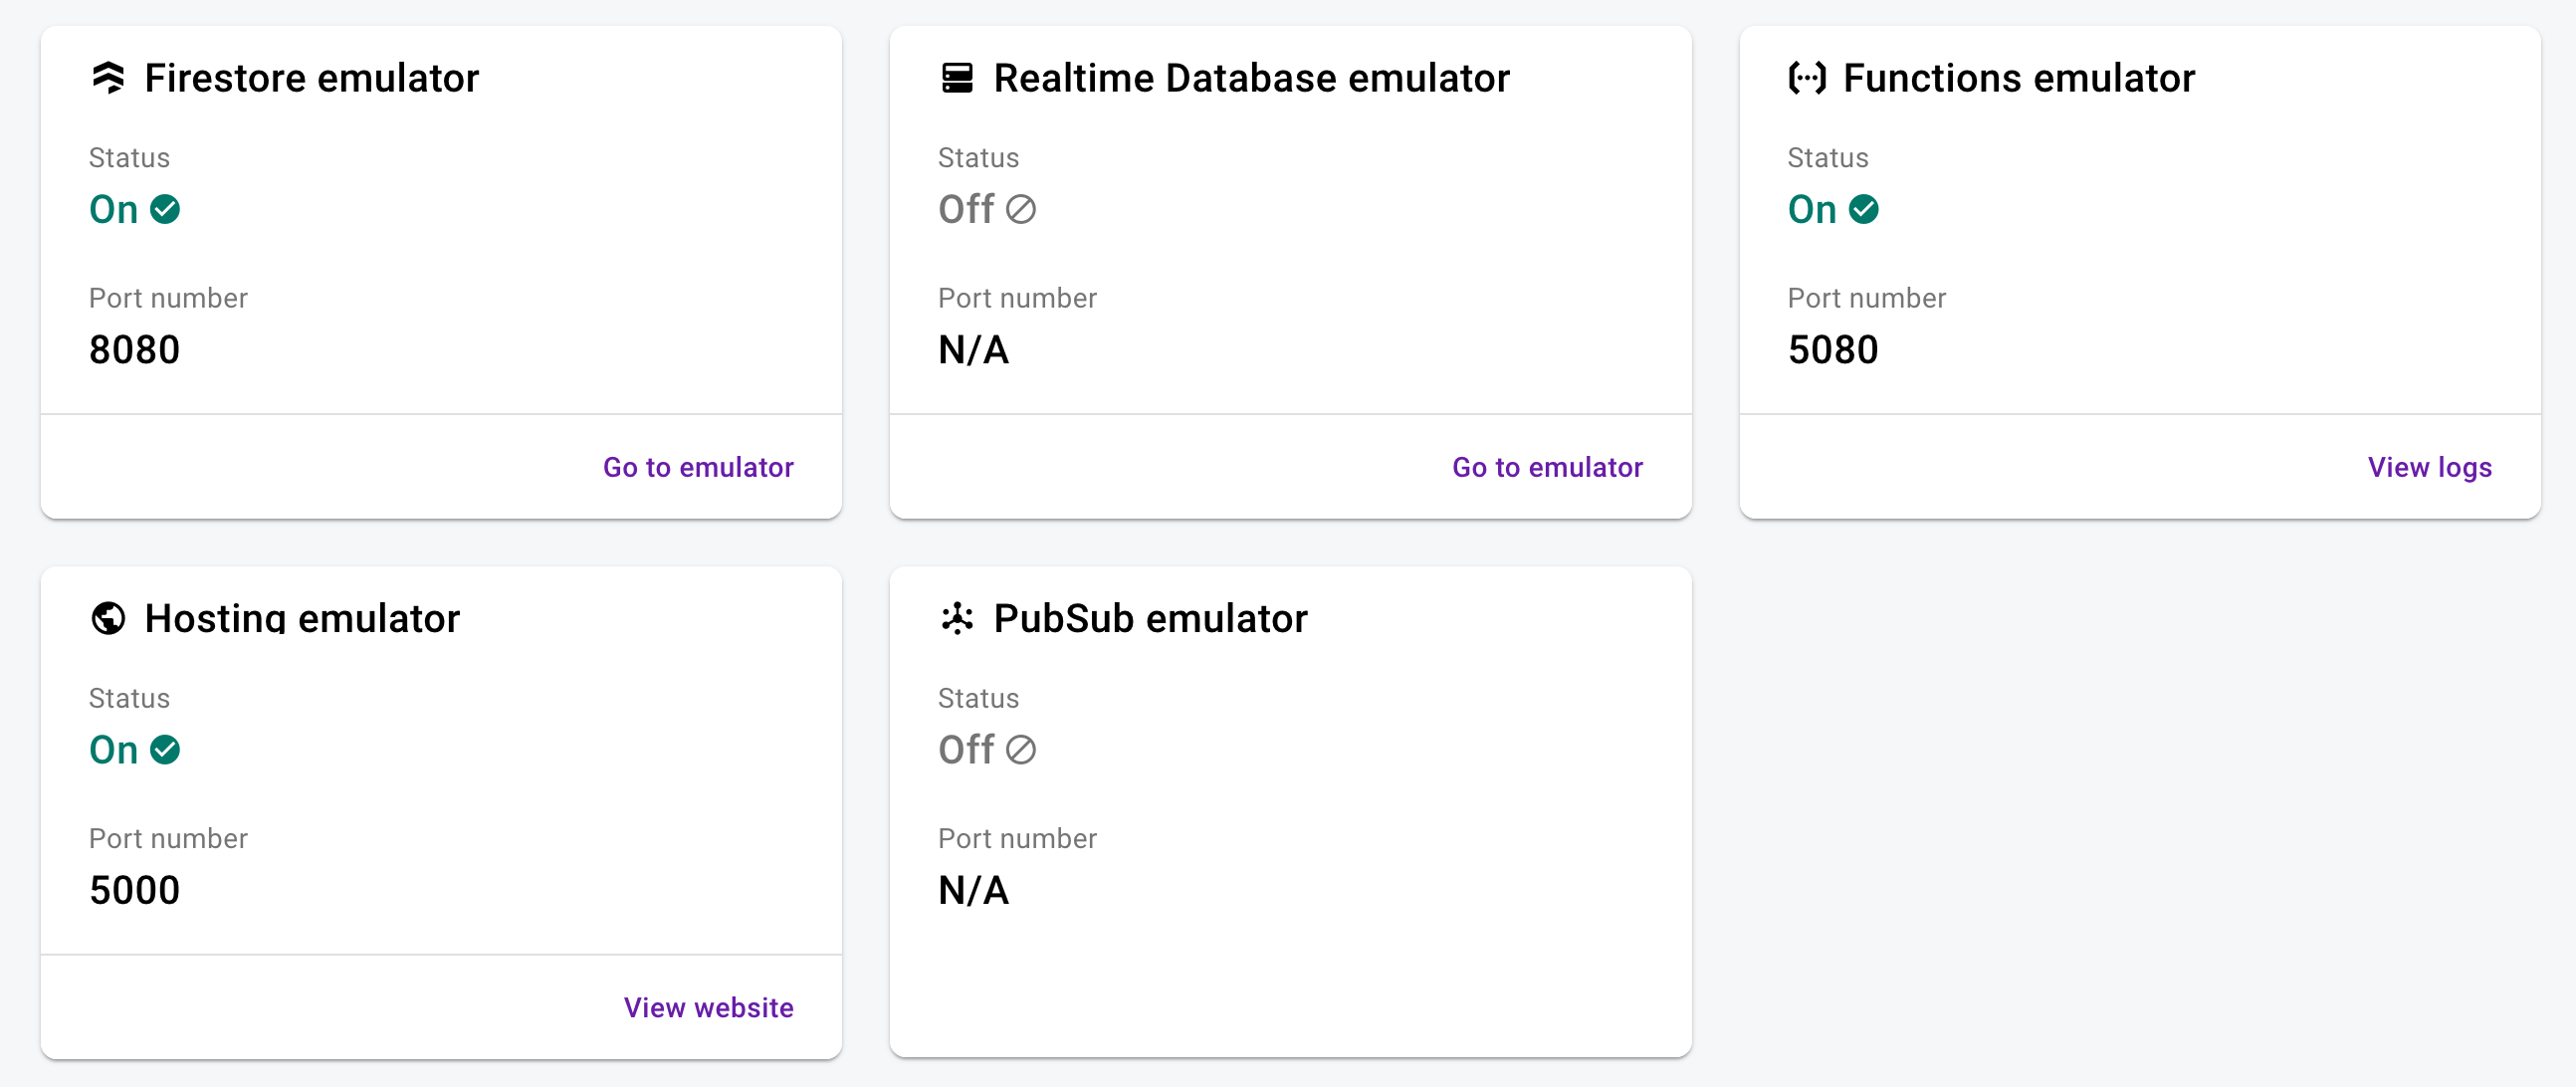
Firebase emulator running
At this point let’s stop for a second and break down what we have available to us. First, going to http://localhost:5000 will show you Firebase Hosting’s emulation. Next, going to http://localhost:4000 gives you a nice dashboard of all your emulated services and their status. As well as links to the relevant logs and details for those services. Finally, a log window with a very handy search feature to be able to do faster troubleshooting.
Firebase emulator UI
Firebase emulator log UI
If you’ve gotten this far you’ve setup a project through the Firebase console. You’ve setup your local dev environment. You’ve emulated Firebase for local test. Now we’re going to go through a very simple exercise where we’re going to use the most popular services for Firebase and show what you can and can’t emulate.
React Development Part 1
We are going to create a simple React application that allows a user to register, login, and then see the registration details they entered. This exercise will walks us through a few things:
- Hosting: For the React application
- Functions: API for registration and login
- Firestore: Database for user information
- Authentication: Firebase user management
First there are a few things we need to setup.
- In the Firebase console for your project select Authentication and “Setup sign-in method”. You’re going to want to setup Email/Password provider. This will allow users to use those details to authenticate.
- In your terminal go to the root of your project and create a new create-react-app (CRA) app. I like to use view as my root React folder, but you can choose whatever you want. You’ll want to end up with the following folder structure.
create-react-app view
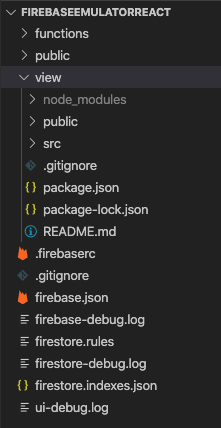
Default Firebase and CRA file structure
At this point you have a CRA app inside your Firebase, but when you go to your Hosting URL you are still going to see the default Firebase website.
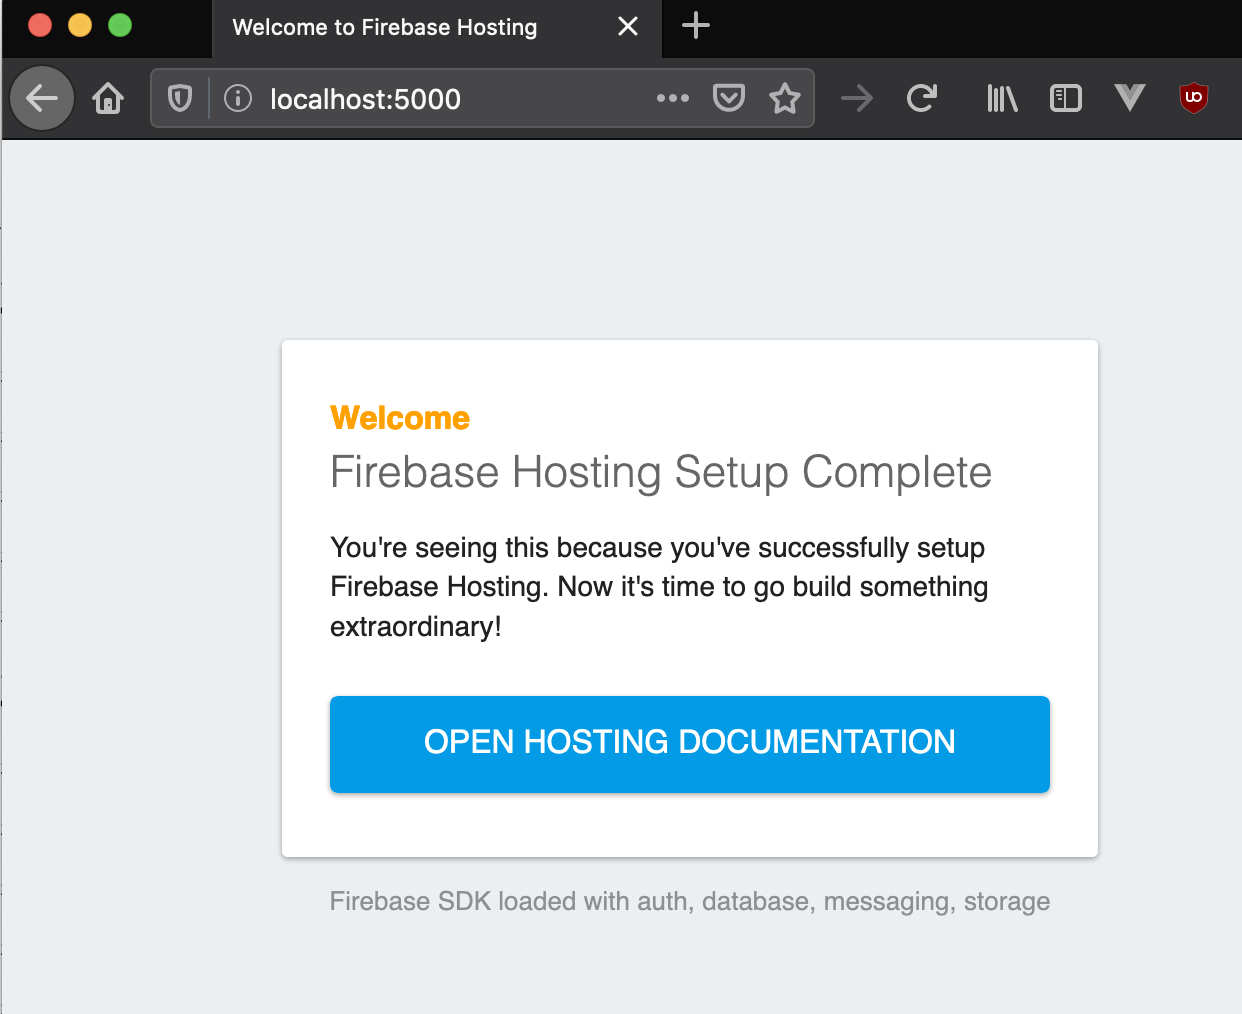
Firebase default Hosting webpage
Go back to your firebase.json and change your hosting path to view/build and then restart your Firebase emulator and you should now see your CRA app.
...
"hosting": {
"public": "view/build",
...
CRA default webpage
I will pick up the rest of the exercise on a follow up blog post as this is getting very lengthy.
~david
Another round of simple things you can do to create a better call center.
Back in September 2019 I talked about some minor and inexpensive things you can do to improve your customer service. This topic comes up often as many customers want to make incremental improvements without breaking the bank. The focus on this follow-up post is to try and provide another round of simple things which will yield improvements. Use these tips and the ones in my previous post before making any huge investments in your customer service strategy.
Have consistency across all your inbound numbers. This one is specifically important for healthcare. If I call your pulmonology department or I call my PCP, it’s ideal to have the same menu structure and same get out mechanisms. Trying to remember what options work for my pediatrician and for my neurologist creates unnecessary friction which really shouldn’t be there. If you absolutely have to have different flows, use this opportunity to compare and contrast which flows behave better and use data to use the best flow in as many departments as possible.
Have your agents live where the information is found. There’s nothing worse than hearing agents banging away a novel on their keyboard when they are talking to you. Surely I’m not asking a question which they have never heard before and surely they don’t have to type these many words for every call, right? CTI connectors for CRMs/ERPs are getting cheaper and cheaper and there are plenty of tools available which allow keyboard shortcuts and templating. If your agents are repeatedly typing out the same phrases this is an easy win for automation and get immediate returns.
Agent training and retraining. The best run call centers have a lot of communication between agents, supervisors, management. There is constant reminders about the work they do, why they do it, and how to do it better. Training and refreshers happen constantly and they expand beyond what to say to the customer, but also how to better navigate tools, how to deal with tough calls, and how to improve their writing. All of these things create a better experience for everyone around.
Collect some information. Every call center dreams of 100% deflection. Bots, virtual agents, etc., all with a single purpose to prevent the caller to talk to a human and have a computer answer their question. However, not all call centers even have any type of self service, but even if you don’t you should still have your customers provide you with some piece of information. It can be something simple like their zip code or what state they are calling from or more complex like their customer or account number. Either way, training your callers to have some information to give you does a few things: paves the way for adoption of self service to be easier, makes you seem like you’re more advanced than you really are, and give some extra data which you can later use for analysis. What data you ask for is certainly depended on the call center, but in my opinion asking anything from the customer is better than nothing.
This is getting longer than I expected, I’ll work on releasing part 3 of this at a later point.
Be well,
~david
Correlate Nuance Call Logs and CVP Logs
During development, when you’re making a handful of calls for testing, it’s always easy to see your call traverse various systems. You can look at router logs for ICM troubleshooting, VXML debugs for the gateway, activity logs for CVP, and call logs for Nuance. However, once you go into production trying to correlate your activity logs with Nuance call logs becomes very painful. You can narrow your call logs pretty close based on the time of the call and then you have to look at the content and match up what CVP received from Nuance to find the exact log you need. Thankfully there’s a better way.
On the first audio element your call encounters add a Local Hotlink. Below you’ll see the details. The most important part is the External URI:
http://IPofMediaServer/en-us/grammar/paramGram.xml?SWI.appsessionid={CallData.UniqueCallID};SWI.appstepid=1
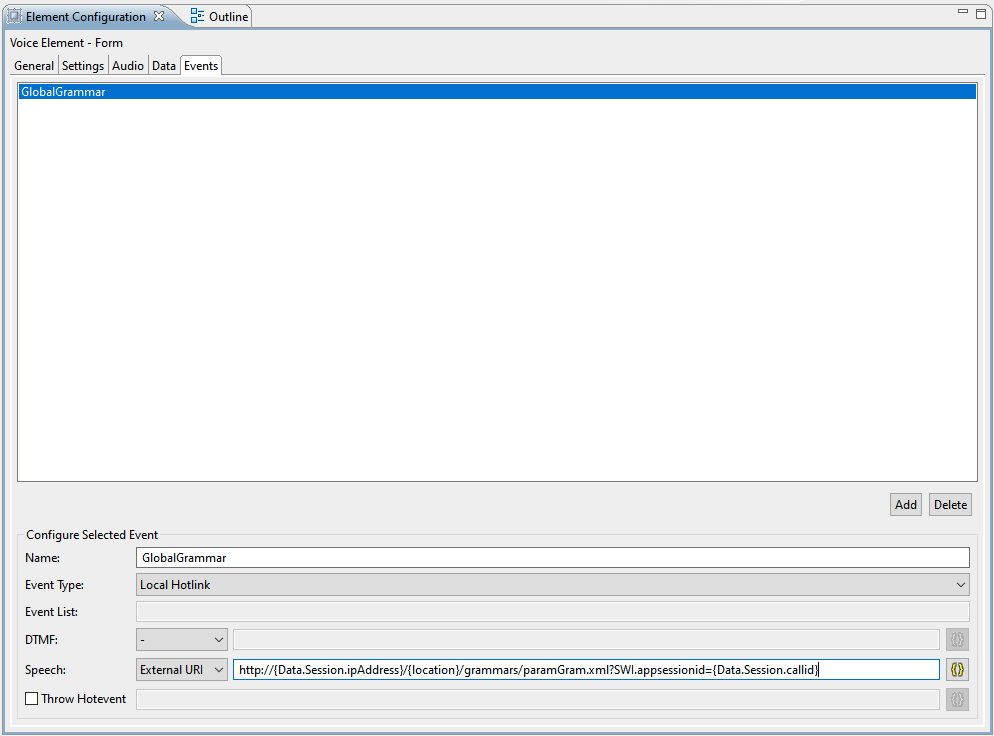
CVP Studio Audio Element Configuration
We have a parameter grammar with the only purpose of attaching the CVP call ID to the logs. The parameter grammar is pretty generic and it really doesn’t matter what you see in the values.
<?xml version=”1.0″ encoding=”ISO-8859-1′?>
<SWIparameter version=”1.0″ id=”my_parameter_grammar” precedence=”1″ ignore_unknown_parameters=”1″>
<parameter name=”swirec_application_name”>
<value>MyApp</value>
</parameter>
</SWIparameter>
The logs will then go from this:
23-NUAN-30-15-NUANCE01-813C33A-AC5D11EA-82A0A22E-A1298902@172.1.1.18-LOG
To this:
23-NUAN-30-15-NUANCE01-813C33A-AC5D11EA-82A0A22E-A1298902@172.1.1.18-722BA95BB43D11EAA713A22EA1298902-LOG
Additionally, utterances will also include the call ID making it super easy to find the logs you’re looking for. Finally, the call logs will include the call ID inside the log itself in this format:
SESN=722BA95BB43D11EAA713A22EA1298902
I want to thank the totally awesome Janine Graves for this awesome tip. If you’re looking for any CVP training she is the go to person in the world.
~david
Tip to search multiple Cisco CVP activity log errors quickly
We’ve been chasing a Nuance issue and as part of the process I’m monitoring the activity logs for certain errors to see if they are related to the issue we’re chasing or something else. I have multiple applications across over a dozen CVP servers and going one by one using Notepad++ is time consuming. Since the Cisco life is a Windows world here’s a quick way to do this and save you a ton of time.
There are tools out there like PowerGREP which do something similar, but my personal choice is to use Sublime Text. From there you go to Find > Find in Files.
- In Where add the locations you want to search and separate them by a comma:
\\server1\c$\cisco\cvp\VXMLServer\applications\YourApp\logs\ActivityLog,\\server1\c$\cisco\cvp\VXMLServer\applications\YourOtherApp\logs\ActivityLog,\\server2\c$\cisco\cvp\VXMLServer\applications\YourApp\logs\ActivityLog,\\server2\c$\cisco\cvp\VXMLServer\applications\YourOtherApp\logs\ActivityLog
2. In Find, make sure to select Regular expression and enter:
(?=.*06\/11\/2020.*error\.noresource$)|(?=.*06\/11\/2020.*Hotevent_Error_NoResource$)\w+
3. Click Find and watch all matches appear.
The expression above is looking for two different types of errors. error.noresource and Hotevent_Error_NoResource. It’s looking for this information only for the date of 06/11/2020, to ensure we only get the most recent logs. Finally, since we know this error is always at the end of the line we use the $ to anchor that string at the end of the line.
I hope this helps someone else do their work faster.
~david
CVP and Nuance Input Troubleshooting
Recently we encountered an issue where if you had to enter a long input and it took you longer than 10 seconds you would get a nomatch error as the result for your form. This happened even if you were in the middle of entering DTMF. Here’s the process we used to troubleshoot the issue. Which by the way has not yet been solved, but I will post an updated once it does.
First, let’s see the parameters for the VXML form:
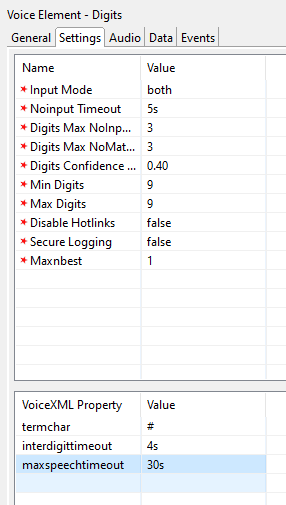
Cisco CVP Voice Element Settings
Next, let’s look at a snipped of the VXML browser logs. For debugs I used:
#debug voip ccapi inout
#debug ccsip message
#debug voip rtp session named
#debug voip application vxml def
#debug voip application vxml dump
#debug mrcp all
Notice the lines in bold. These are the parameters I want to highlight from the Nuance point of view.
<vxml xmlns=”http://www.w3.org/2001/vxml” version=”2.1″ application=”/CVP/Server?audium_root=true&calling_into=S031_MerchantIVR”>
<property name=”termchar” value=”#” />
<property name=”interdigittimeout” value=”4s” />
<property name=”maxnbest” value=”1″ />
<property name=”maxspeechtimeout” value=”30s” />
<property name=”confidencelevel” value=”0.40″ />
<property name=”timeout” value=”5s” />
<form id=”audium_start_form”>
<block>
<assign name=”audium_vxmlLog” expr=””” />
<assign name=”audium_element_start_time_millisecs” expr=”new Date().getTime()” />
<goto next=”#start” />
</block>
</form>
To see all the communication between the voice browser and Nuance use the “mrcpv2” filter.
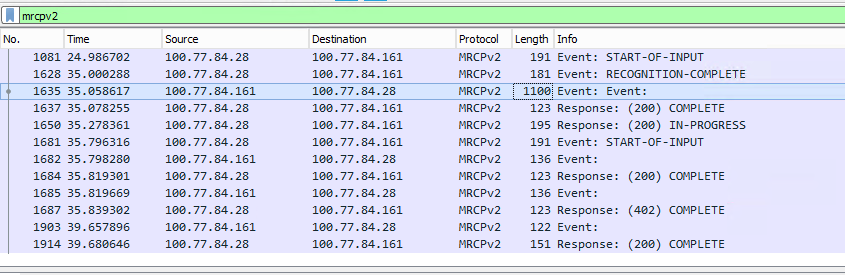
Wireshark MRCPV2 Capture
If you want to narrow down to packets which define the grammar properties to Nuance use the following filter “mrcpv2.Event-Line contains “DEFINE-GRAMMAR”” From there we find the packet which matches the above debugs and CVP Studio screenshot:
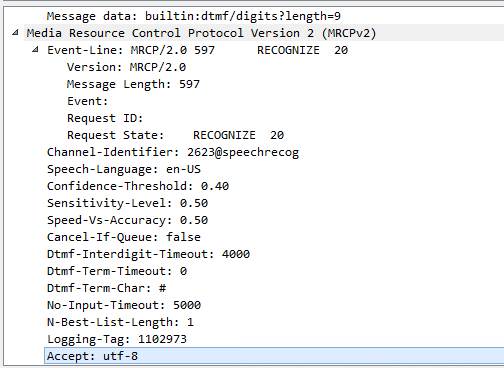
Wireshark MRCPV2 Packet Grammar Definition
In the above picture you’ll see that interdigittimeout corresponds to Dtmf-Interdigit-Timeout. Timeout corresponds to No-Input-Timeout and finally maxspeechtimeout corresponds to recognition-timeout which is NOT present in the MRCP packet. What happens here is that Nuance then uses it’s default timeout which is set to 10s. You can change this in your NSSserver.cfg by setting the following (in this case 22s):
server.mrcp2.osrspeechrecog.mrcpdefaults.recognition-timeout VXIInteger 22000
~david
A very old blog post
I wish I remember what inspired me to write this 16 years ago. It was a nice surprise to find something which had not been touched for so many years. I do remember always loving poetry and thinking I could do that. I don’t share the same sentiment today.
Banal Street
I began life with one step, one step in the wrong direction.
To the bar I went, encountered souls of plastic and porcelain.
Across the table behind the beer our eyes crossed.
A crooked smile and half hazard attempt to a wink.
Name?, she said.
Angel, yours?, I replied.
Marie.
Endless candid banter filled the sleepless night.
This must be love, she quipped.
Must be, I replied as I looked away.
The sun arose and our minds became heavy with the world.
A night of love had passed.
~david
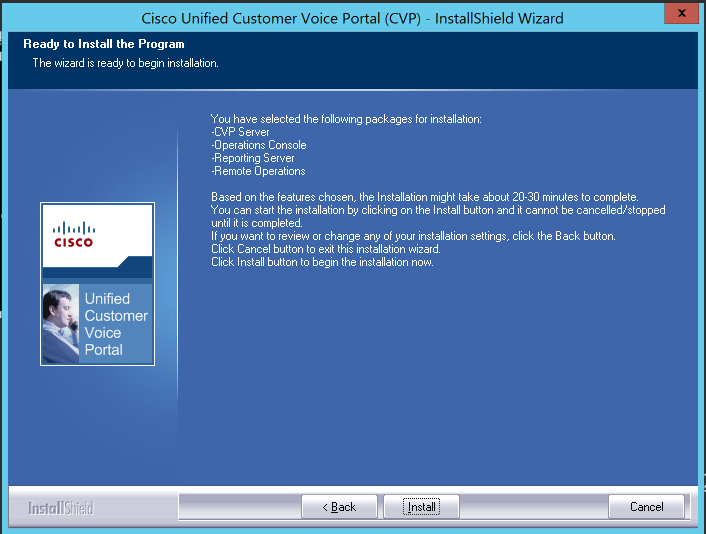
Cisco CVP Standalone Lab Installation
For this we’re using VMWare Fusion to install the OS, you should also have the CVP OVA and ISO to make your life easier.
File > Import. Choose OVA
Continue
Accept
There are 3 options at this point for the VM configuration:
Cisco Unified CVP Call Server-VXML Server
Guest OS: Microsoft Windows Server 2012 (64-bit)
CPU: 4 vCPU
Memory: 10 GB vRAM
Disk: 1 – 250 GB vHDD
Network: 1 vNIC VmxNet3
Cisco Unified CVP Operations Console
Guest OS: Microsoft Windows Server 2012 (64-bit)
CPU: 2 vCPU
Memory: 4 GB vRAM
Disk: 1 – 80 GB vHDD
Network: 1 vNIC VmxNet3
Cisco Unified CVP Reporting Server
Guest OS: Microsoft Windows Server 2012 (64-bit)
CPU: 4 vCPU
Memory: 6 GB vRAM
Disk: 1 – 80 GB vHDD
Disk: 2 – 438 GB vHDD
Network: 1 vNIC VmxNet3
Since this is a lab, but I still want things to look as close to production as possible I will be using the Reporting Server deployment option.
- Install Windows 2012. Ensure you have two drives and make sure the machine is on the network.
- Install IIS
- Give it an IP on the network.
- Disable IPv6
- Run Windows Update
- Disable Windows Update to run automatically
- Mount the CVP ISO, open a command prompt and run CVP\Installer_Windows\setup.exe labonly
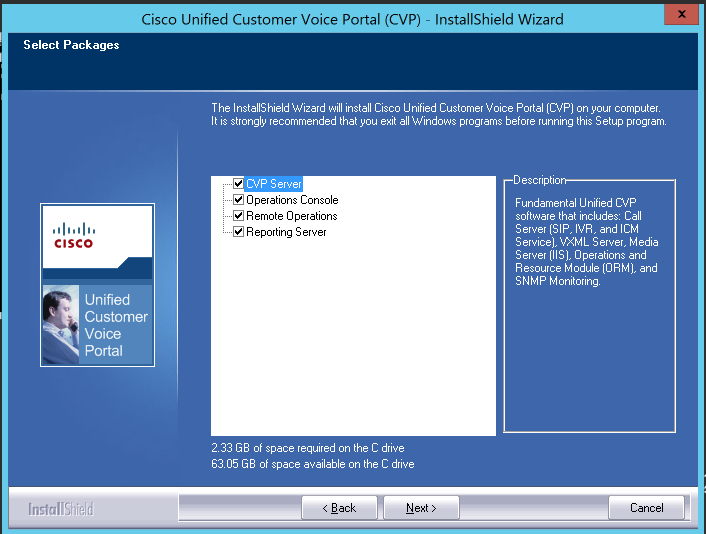
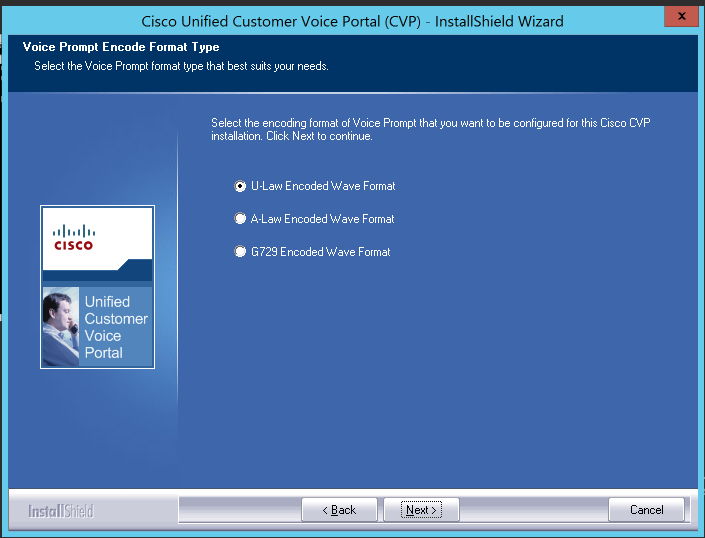
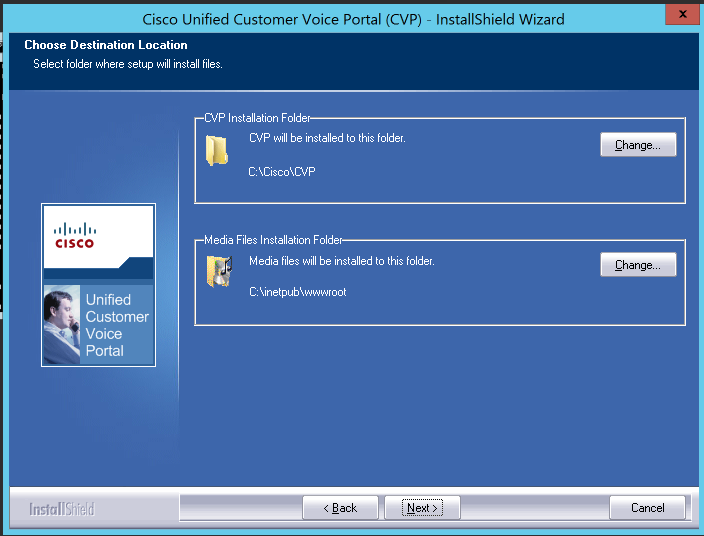
Fill out the X.509 Certificate information.
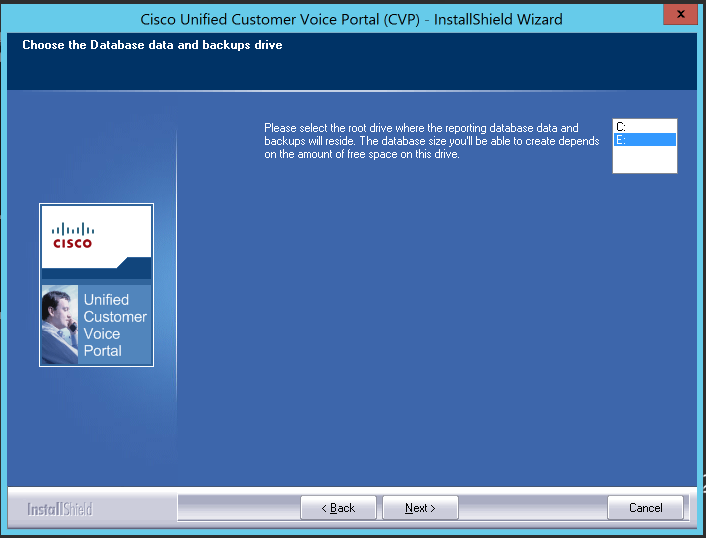
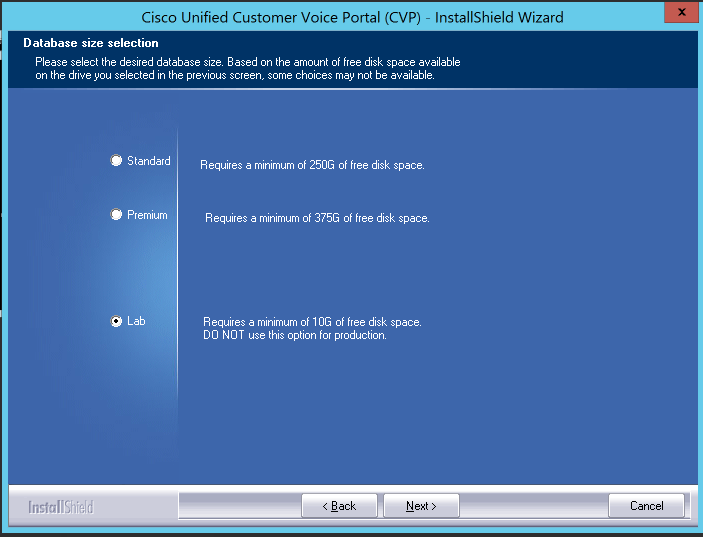

Choose your favorite secure password.
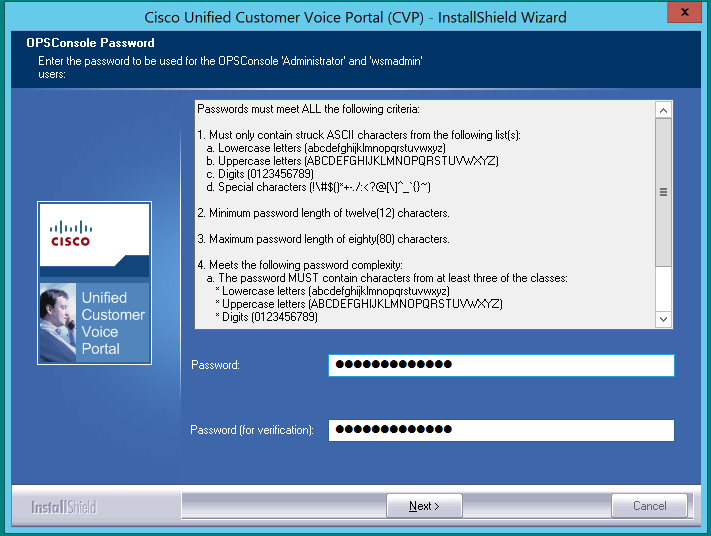
Finish and restart.
This is only one half of the equation, you’ll need need the voice piece in order to be able to get CVP to do anything.
~david
ASR TTS DNS error with Cisco CVP and VXML Gateway
I was struggling with setting up Nuance for one of my customers and while everything looked good on the Nuance side the connection between the gateway and Nuance failed right in the beginning. The very first thing is to setup some debugs on the gateway:
CCSIP SPI: SIP Call Message tracing is enabled (filter is OFF)
HTTP Client:
HTTP Client Main Process debugging is on
HTTP Client Sockets debugging is on
HTTP Client API Process debugging is on
HTTP Client Cache Module debugging is on
HTTP Client Messages debugging is on
HTTP Client Error debugging is on
HTTP Client Background Messages debugging is on
HTTP Client Cookie/Session debugging is on
MRCP:
MRCP client detail debugging is on
Next go follow the SIP trace and figure out where things start going wrong. We start with the initial invite for ASR.
3405261: Apr 14 23:51:30.451: //370879/B1BCCB67BB48/SIP/Msg/ccsipDisplayMsg:
Sent:
INVITE sip:asr@192.168.1.251:5060 SIP/2.0
Via: SIP/2.0/TCP 104.0.36.145:5060;branch=z9hG4bK8B21B80From: <sip:+11235551234@us-east-va.sip.flowroute.com>;tag=47F96D40-1629
To: sip:asr@192.168.1.251
We get an OK, but notice the Contact address.
3405262: Apr 14 23:51:30.599: //370879/B1BCCB67BB48/SIP/Msg/ccsipDisplayMsg:
Received:
SIP/2.0 200 OK
Via: SIP/2.0/TCP 104.0.36.145:5060;branch=z9hG4bK8B21B80
Contact: <sip:mrcpserver@NUANCE10:5060;transport=TCP>
To: <sip:asr@192.168.1.251>;tag=75547221From: <sip:+11235551234@us-east-va.sip.flowroute.com>;tag=47F96D40-1629
And then we get a failure.
3405264: Apr 14 23:51:30.639: %VOICE_IEC-3-GW: SIP: Internal Error (100, dns qry fail): IEC=1.1.128.7.51.0 on callID 370879 GUID=B1BCCB677DE111EABB48AD04394A93D1
Now after a bit of googling and reading Avaya documentation. The issue is that the Nuance Speech Server by default will use the hostname in its SIP header information and because DNS wasn’t working correctly the address mrcpserver@NUANCE10 doesn’t resolve. To fix fix DNS or open up your NSSserver.cfg and set the following:
server.mrcp2.sip.contact.useHostIPAddress VXIInteger 1
From this point forward Nuance will use the IP address for all SIP headers and you avoid DNS all together.
Remember, it’s always DNS. :)
~david
You must be logged in to post a comment.