Two Days of Innovation and Insights at Enterprise Connect 2024: A Personal Overview

I was saddened that I could only do 2 days at EC24, but those 2 days were jam-packed. Here’s recap of what I saw and some thoughts on the some specific vendor announcements I got a chance to hear on the stage and see on the expo floor.

Overall Recap

This year brought a nice change to some of the main stage sessions with both vendors and customers sharing the stage. This added a nice dynamic to the conversation and helped balance some things out. In one of the sessions while all the vendors were saying single vendor is best a customer said the total opposite. The flip side of this is that some times the stage looked like a public school classroom with the number of people on stage. There were too many panelist and not enough time to really dive deeper into any one topic. Maybe break up the sessions to separate topics to avoid this.

It was interesting to hear that large orgs have task forces convened around how AI could be applied to their business. Sounds like use cases are brought to them and they assess the merits of using AI and put together a plan. While this all sounds like a great idea, instead of jumping head first and sprinkling AI on everything, I do wonder how much education and knowledge these tasks forces actually have. Is AI consulting a thing now? I suspect it is.

Burnout was a bigger talking point than the crunch on the potential employee pool size. While no one outright said that jobs will be eliminated, the reality is that they will. If you can reduce workload by a percentage, then there’s no reason why you couldn’t reduce your workforce by a similar amount. While we talk about cross skilling and shifting agents to do other tasks, I wonder how much that really happens. I suspect it might be easier to just hire for the new role than try to train up. Of course this is not universal, but if even half of these AI promises come through we will see a large number of agent seats evacuated. The burnout message didn’t seem aligned with what I project how AI will impact employment in the next 5-10 years.

AI dominated every session I attended and while I understand why it really felt like the same use cases over and over again. While I am sure it’s hard to come up with truly revolutionary use cases it does feel very repetitive seeing the same use case over and over again from all the vendors. It was also interesting to not see Edify be an exhibitor I wonder if this is a signal to how they are doing business wise, anyone know?

Vendor Specific Recap:

Microsoft

Live Keynote Recap: https://www.linkedin.com/posts/dmacias_enterpriseconnect-activity-7178398994623078400-YD-c?utm_source=share&utm_medium=member_desktop

I was expecting MS to open the floor with Copilot, then go into the demos with more Copilot, and finally bring it home with Copilot. However, this was not the case. The first part of their keynote was focused on hybrid work, which is a message that Cisco has been carrying for a few years.  Intelligent recap for phone calls was very cool and then being able to have Copilot use other assets and share outputs from the conversation with others was very cool. The voice isolation demo was a bit rough. I wonder if this is because MS has to do it all on software (Teams) while Cisco demos this on hardware.

The new to me Teams Queue App was of most interest to me. This is the greatest thread to every CCaaS provider out there. The introduction of the Queues App is the first clear signal of a native contact center like feature and while the person who gave me the demo of this feature said 3 times that “this is not a call center”, it sure smelled like a call center to me. Having an agent and supervisor view, ability to queue voicemails, ability to monitor agents and take over calls, and access to raw data make this feature very compelling and a no brainier to deploy if you want to keep everything on Teams. If I was a vendor that has bolted on contact center functionality on top of Teams I would be worried. Now, I really don’t think we’re going to see a full fledged contact center from MS next year, but I do think in the next 5 years they will finally be there and would have done it incrementally anchoring everything around Teams.

Cisco

Live Keynote Recap: https://www.linkedin.com/posts/dmacias_entepriseconnect-activity-7178417256744329217-WOUg?utm_source=share&utm_medium=member_desktop

The items that stood out were dropped call detection and summarization. Not sure if this is based on conversation context or PSTN signaling. It was also interesting to see Cisco talking about going beyond LLMs to what they called real time media model (RTMM). In short, giving AI other dimensions to make decisions. Their noise suppression demo was much better’s than Microsoft’s, but their noise was being produced by toys which had repetitive audio which might be much easier to filter out as well as the fact that they own the hardware which could allow for better suppression all around. Finally, Cisco still has some of the most attractive hardware out there. Their designs are just slick and the release of the 9800 (https://www.webex.com/us/en/devices/phone-series/cisco-phone-9800-series.html) phone continues that trend.

Zoom

I was not there for the Zoom keynote, but I did sit down on one of the expo sessions and went to the floor to bug them about what all they were releasing. First, VM transcription feature was pretty cool. The ability to automatically crate tasks from the content and have the system automatically bring certain VMs to the top for immediate attention. One feature I had not seen before and I believe is new is email routing, which is something none of the other big players are doing natively. Finally, licensing seems very straightforward and easy to understand… looking at your MS.
VMware Fusion 12 and Big Sur

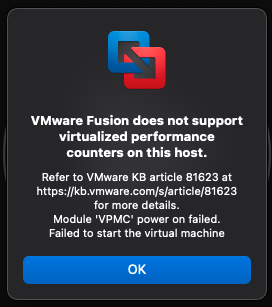
As many people are slowly upgrading to the latest MacOS version, Big Sur, there are a few of us who are running into some compatibility issues. For me the only one that has given me some grief is VMWare Fusion. Many in my industry run multiple VMs to be able to connect to various customer or just to be able to use some of the Cisco tools which do not support any other operation system other than Cisco. There are two issues which I needed to fix in order to get one of my VMs back. First, the error below “VMware Fusion does not support virtualized performance counters on this host.” This error prevented the VM from booting up.

VMware Fusion Performance Counters Error

VMware Fusion Performance Counters Error

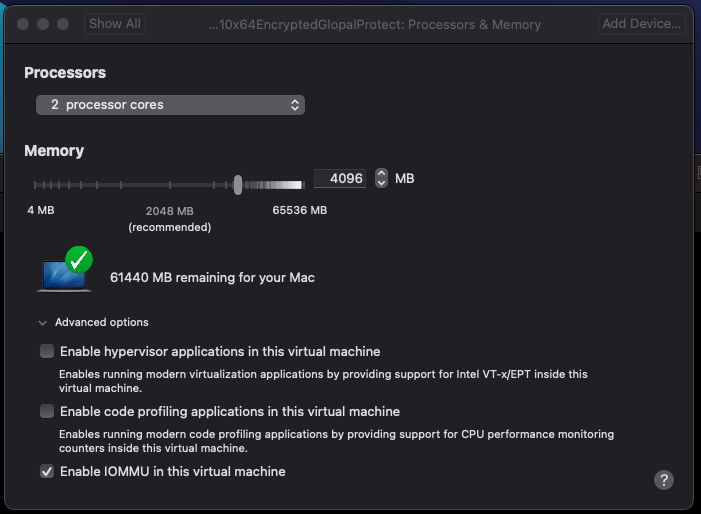
This can be resolved by going to Settings > Processor & Memory > Advanced options and unchecking “Enable code profiling applications…”

VMware Fusion Processor & Memory Settings

VMware Fusion Processor & Memory Settings

The second error was “You are running this virtual machine with side channel mitigations enabled.” This error could be ignored and didn’t seem to affect the VM at all, but it was still annoying. This kb had all I needed to get that message out of the way.

~david


Extending Your Call Center’s Life

While the CCaaS providers want you to think that everyone is fleeing to the cloud and the traditional on premise CC providers want you to think that the shift is very slow, the truth is somewhere in the middle. One thing we can be sure of is that all of our on premise customers are doing this:

4g04ry

Every vendor is playing defend and take over. The days of an Avaya IVR with a Cisco ACD are starting to go the way of the dinosaur. Really no one is interested in playing reach out and integrate, but this is where the most value is present and where I think we, as consultants, should be focusing our energy. Let’s look at a couple of scenarios where reach out and integrate make sense.

Scenario 1: You’re on an old ACD which, while still supported, your only upgrade path is to go cloud as the vendor has stopped on-premise development. You are not sold on going cloud and are considering replacing your current platform with another on premise solution.

Scenario 2: There is a worldwide state of emergency, let’s pretend a pandemic is happening, and you need to spin up small clusters of call centers quickly to handle increased demand due to new customer requests. You’re projecting that these call centers and agents might only be online for a maximum of a year so you want to avoid having to purchase perpetual licenses and new hardware to handle these new capacity long term.

Scenario 3: Business is absolutely booming and the two server solution you love has reached capacity. The only way to scale is to go to a completely different solution, but you absolutely love your current system and you don’t have enough data to make a decision to replace your system or not.

We are seeing a lot of requests coming in which fit the above 3 scenarios and we have spent a lot of time figuring out what the perfect reach out and extend strategy is for each request.  I would love to hear what other scenarios or interesting pairing others have run into or are currently working on. I’ll be posting more about one interested pairing we’ve made and the solution we’ve developed to increase the life of our customer’s call center.

~david

Do virtual agents need virtual breaks?

If you’ve been paying attention to the contact center world you would have noticed the rise of virtual agents. The term is a bit broad and confusing to be honest, but here’s my take on it. Virtual agents are just a rebranding of self service with a lot more personality and capabilities. For example, you could always make a payment online, but before the flow was:

  • For account information press 1. “1”
  • Please enter your account number. “1234”
  • To hear your balance press 1. “1”
  • To make a payment press 1. “1”

Now with virtual agents the flow is a lot more flexible:

  • What would you like to do? “I want to a pay my account.”
  • What’s your account number? “1234”
  • Would you like to pay your account in full? “yes”

Now with the rise of virtual agent services you can use speech, TTS, send out an SMS, process a credit card and integrate with a backend all within the same platform and under the same cost. The rise of these agents aligns perfectly with the proliferation of AI services such as DialogFlow, AWS Comprehend, and even MindMeld (RIP) which have removed a lot of the complexity in delving in to AI/Machine Learning. Additionally, the XaaS model where you don’t have to buy the cow, care for it, feed it. All you do is rent it when you want some milk.

The other huge benefit a lot of these virtual agents tout is the ability to be multichannel out of the box. You no longer have to build parallel logic for voice and SMS. You now have a single place for all your logic and can go to Facebook messenger or WhatsApp. While this is partially true, the customer experience across different channels does need to change and the reality is that you should be building semi-parallel logic depending on your channel.

Ultimately, I’ve started dabbling in this space and got my Inference certification. I’m looking forward to getting more and more exposure with this technology and get a deeper understanding how it really augments the contact center world I know and love.

~david


WireShark RTP Player

Troubleshoot RTP issues with WireShark when using Jabber or IP Communicator

This was an interesting one that I wanted to document. We have our agents and supervisors on either VDI Jabber or Windows Jabber or CIPC and we could not get silent monitoring to work. When the supervisor activated it everything looks correct, but there was no audio for the supervisor while the agent and caller had no issues. Supervisor could then barge in to the call and audio would work just fine. Here are the steps we took to troubleshoot this.

  1. Get the IP addresses of the agent and supervisor device. Then get a packet capture of both end points while performing silent monitoring.
  2. Using this filter get all the packets coming from the other device to your computer: ip.addr == {other parties IP}. You should see a good bit of UDP packets. At this point if you don’t see any packets coming from the other endpoint you know that more than likely the network or far end device configuration is at fault as your device didn’t send or receive any RTP.
Wireshark Packet Capture

Wireshark Packet Capture

3. Click click on any of the packets Decode As… Set Current to RTP.

WireShark Decode Packets

WireShark Decode Packets

4. All your previous UDP packets should now be RTP packets.

WireShark Decoded Packets as RTP

WireShark Decoded Packets as RTP

5. Go to Telephony > RTP Streams and Analyze the stream that is detected. You will then be able to Play Streams to confirm you get the expected audio.

WireShark RTP Stream Analysis

WireShark RTP Stream Analysis

6. Confirm audio stream is correct.

WireShark RTP Player

WireShark RTP Player

At this point we’ve confirmed our device is getting RTP, but our soft phone isn’t playing it. So a likely culprit could be the Windows firewall. Using your favorite text editor go to c:\Windows\System32\LogFiles\Firewall and open domainfw.log and publicfw.log. What you want to look for is the IP of the other device and see if you see any drops.

2020-01-01 12:03:48 DROP UDP {RemoteIP} {LocalIP} 17488 24576 200 – – – – – – – RECEIVE

If you look at the port this was received on you’ll notice that it is the RTP range Cisco recommends to have open. So at this point you can disable the firewall, which I don’t recommend, or create a new firewall rule and add UDP ports 16384-32767 as allowed.

~david

Windows ODBC Data Source Success

Windows ODBC Connection to CVP Reporting Database

This one took me a good bit of hours and googling with very little results. I wanted to post this for posterity and for anyone else out there trying to do the same thing. The end goal is to create a Windows ODBC Data Source connection to your Cisco CVP Reporting database.

First, a bit of a recap. Cisco’s CVP Reporting server utilizes IBM’s Informix database. It’s been like that for many years and to be honest it’s both great and terrible. It’s great because you don’t have to pay (directly) for a license to run the database. And horrible because it feels like Informix is just one step above using an sqlite database. Informix is used in Cisco CommunicationsManager (UCM), Contact Center Express (UCCX), Unity Connections (UCxN), and of course CVP Reporting.

On to the main course.

  1. You must obtain a free IBM account and go to this link. You must choose the SDK option and download the Informix Client SDK Developer Edition.
    • If you want to do this with ODBC x64 then download clientsdk.4.10.FC14.windows64.zip
    • For the x32 version download clientsdk.4.10.TC14.zip.
  2. Install either download, you can install them both too. They both work independently or side by side. Then reboot your computer.
  3. From there you must go to your CVP Reporting server and find your onconfig file. It should be in c:\db\Informix\etc. Open the file and find the following two lines. Make note of the values you see.
    • DBSERVERNAME
    • NETTYPE
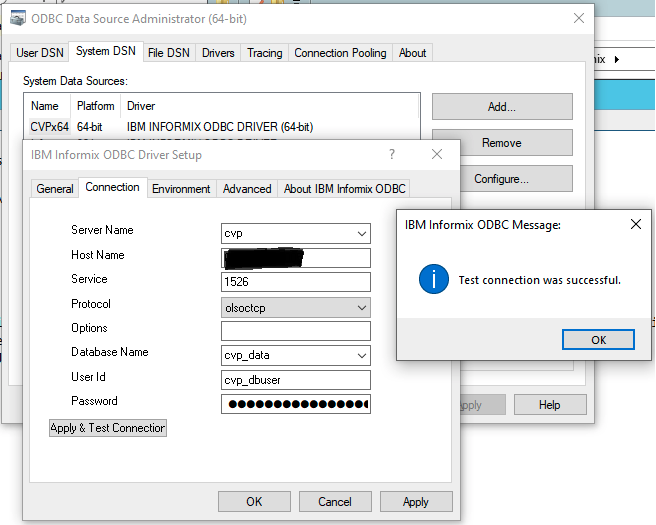
  4. Open ODBC Data Source Administrator on your local machine. Go to System DSN > Add…
  5. Choose IBM Informix ODBC Driver > Finish.
  6. General > Data Source Name > Give it any name
  7. Connection > Server Name > The value of DBSERVERNAME in the onconfig file.
    1. Host Name: IP, FQDN, or hostname of server
    2. Service: 1526
    3. Protocol: The value of NETTYPE in the onconfig file.
    4. Database Name: cvp_data
    5. User Id: Generally cvp_dbuser but you an connect with any valid user.
    6. Password: Your password.
  8. Environment > Client Locale > EN_US.UTF8
    • Database Locale: EN_US.UTF8 If you can’t set this value, hit apply to close the ODBC properties and then set this property.
  9. Go back to the Connection tab and Apply & Test Connection and give it a minute or two and you should see:
Windows ODBC Data Source Success

Windows ODBC Data Source Success

Hope this helps.

~david

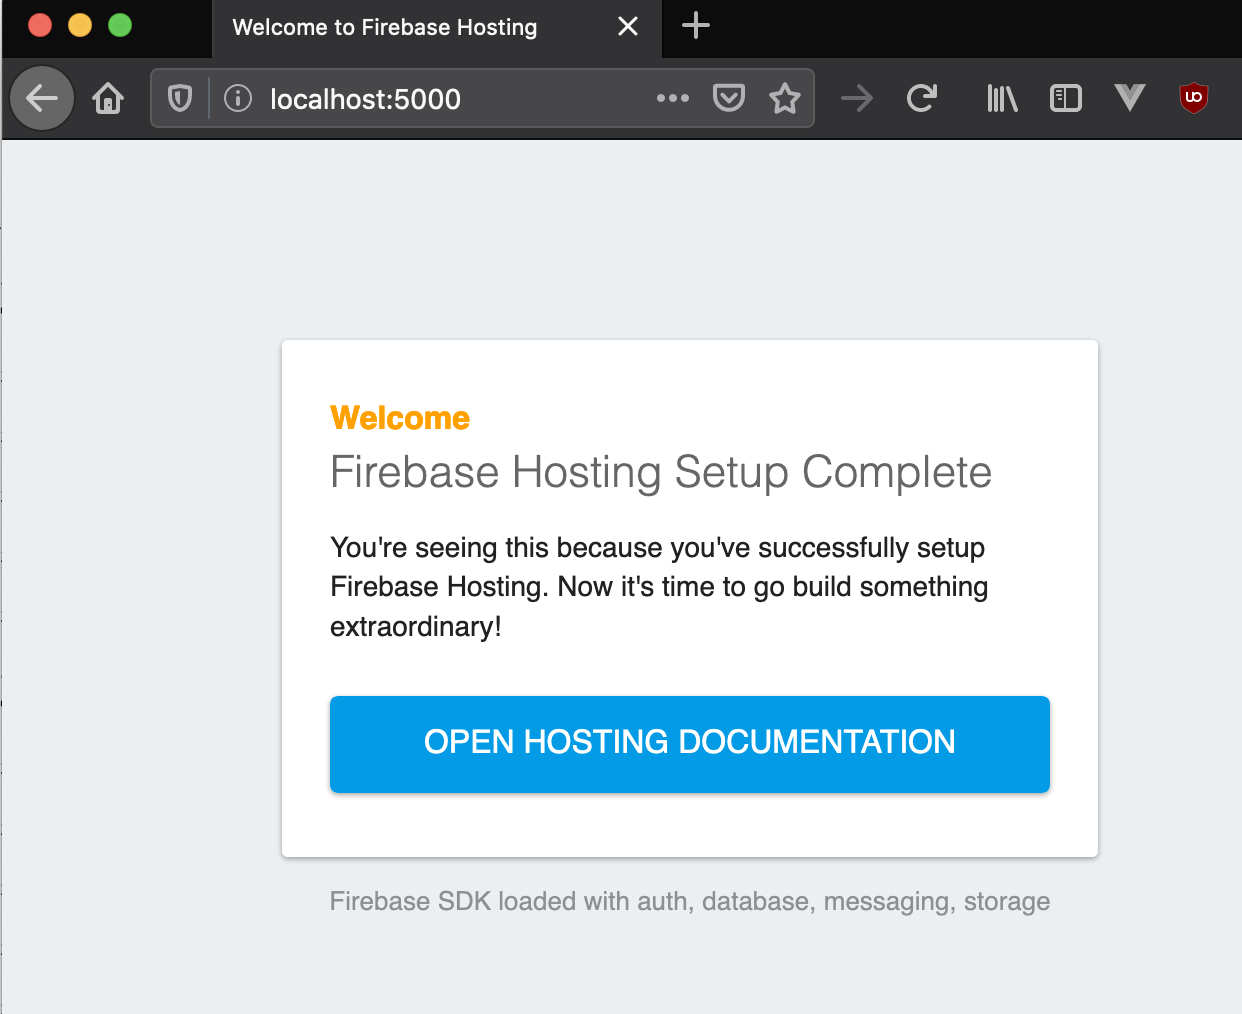
Firebase default Hosting webpage

Serverless Development with Firebase Emulator

I’m getting more and more into serverless development. Trying to avoid handling any sort of hardware sounds like a dream come true. No more handling security patching, load balancing, etc. However, one of the biggest things I struggle with is how to do local development efficiently without having to deploy your code to the cloud every time? Google’s serverless offering, Firebase, released a very cool tool this year which allows you to emulate most their services locally. Here are some of my learnings so far. These should be specifically relevant if you’re doing any React development with Firebase.

Setting Up Your Local Development

Prerequisites:

  • We won’t be using the node.js server, but use node to install components and to develop our React app.
  • Firebase account.
  • Firebase CLI a key way to do that is using the command npm install -g firebase-cli
  • Optional but recommended create-react-app installed npm install -g create-react-app
  • Optional Your favorite IDE. I’m a sucker for VS Code.

Project Setup

Setting up your project. From the Firebase console, Add project:

  1. Choose a name.
  2. Choose your Google Analytics setting, not relevant for this.
  3. Create project.
  4. Add an app to get started and choose Web.
  5. Choose a name, I generally use the same name as the project and set up Firebase Hosting.
  6. Click on Database and create a Cloud Firestore database. Choose to start in test mode. Choose your favorite/closest region.

Local Setup

  • Create a folder where you’ll be doing your development, this will be your root folder. I give this folder a project relevant name.
  • First make sure you login with the below command and use the Google account associated with the Firebase console above.
    • firebase login

  • Initialize your project with the command below. Make sure to choose the following features and be sure to select the Firestone project we created earlier during the project setup. Choose all the other defaults presented and choose the following emulation settings.
    • firebase init

      Firebase init cli

      Choose your Firebase services you’ll be using.

      Choose the Firebase services to emulate

      Firebase cli emulator settings.

Of most importance here is that you take a look at your firebase.json file which has been generated by the initialization. It should look very much like this. Pay close attention to the emulators and hosting sections as these will play an important role later. One thing to watch out for at this point is to ensure the ports you’ve asked the emulator to use are actually open. On the next step we will be able to confirm if they are opened or not, but this is the file you use to change them if you get an error. Here’s what it should look like if you’re following along.

{
  "firestore": {
    "rules": "firestore.rules",
    "indexes": "firestore.indexes.json"
  },
  "functions": {
    "predeploy": [
      "npm --prefix \"$RESOURCE_DIR\" run lint"
    ]
  },
  "hosting": {
    "public": "public",
    "ignore": [
      "firebase.json",
      "**/.*",
      "**/node_modules/**"
    ],
    "rewrites": [
      {
        "source": "**",
        "destination": "/index.html"
      }
    ]
  },
  "emulators": {
    "functions": {
      "port": 5001
    },
    "firestore": {
      "port": 8080
    },
    "hosting": {
      "port": 5000
    },
    "ui": {
      "enabled": true
    }
  }
}
  • Finally it’s time to take a look at what we have so far. We’re going to start the emulator and see what we get with the out of the box setup for a Firebase project. If you get any errors it’s more than likely that you have a port conflict. I have a port conflict and moved Function from 5001 to 5080. If you need to to the same go back to your firebase.json file and find a free port and try again.
    • firebase emulators:start

If everything worked you should see the following.

Firebase emulator running

Firebase emulator running

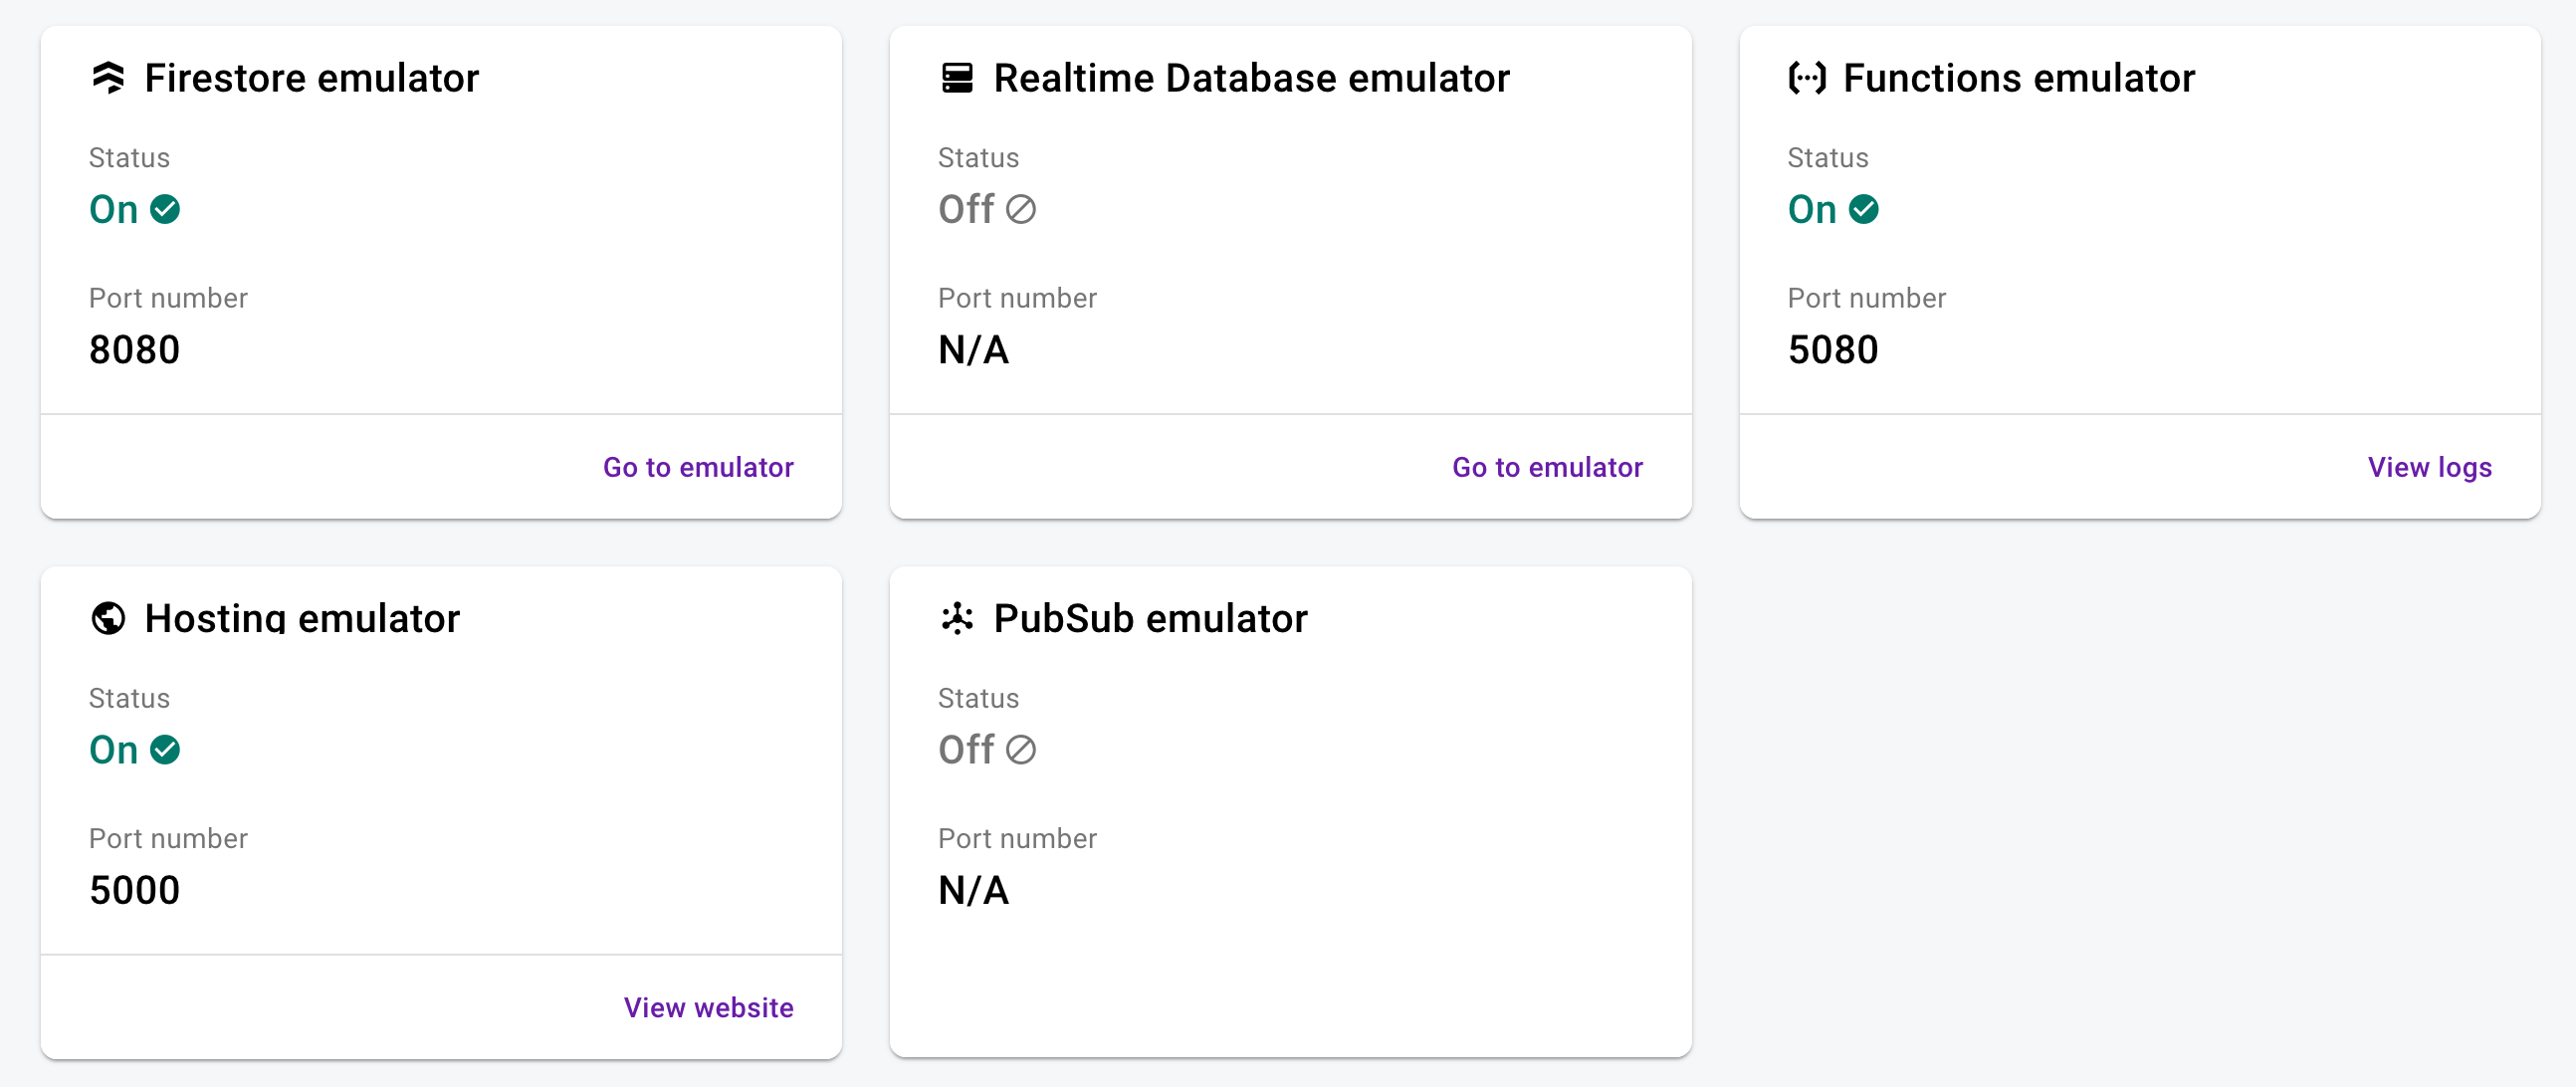
At this point let’s stop for a second and break down what we have available to us. First, going to http://localhost:5000 will show you Firebase Hosting’s emulation. Next, going to http://localhost:4000 gives you a nice dashboard of all your emulated services and their status. As well as links to the relevant logs and details for those services. Finally, a log window with a very handy search feature to be able to do faster troubleshooting.

Firebase emulator UI

Firebase emulator UI

Firebase emulator log UI

Firebase emulator log UI

If you’ve gotten this far you’ve setup a project through the Firebase console. You’ve setup your local dev environment. You’ve emulated Firebase for local test. Now we’re going to go through a very simple exercise where we’re going to use the most popular services for Firebase and show what you can and can’t emulate.

React Development Part 1

We are going to create a simple React application that allows a user to register, login, and then see the registration details they entered. This exercise will walks us through a few things:

  • Hosting: For the React application
  • Functions: API for registration and login
  • Firestore: Database for user information
  • Authentication: Firebase user management

First there are a few things we need to setup.

  1. In the Firebase console for your project select Authentication and “Setup sign-in method”. You’re going to want to setup Email/Password provider. This will allow users to use those details to authenticate.
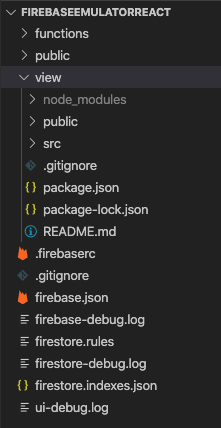
  2. In your terminal go to the root of your project and create a new create-react-app (CRA) app. I like to use view as my root React folder, but you can choose whatever you want. You’ll want to end up with the following folder structure.

create-react-app view

Default Firebase and CRA file structure

Default Firebase and CRA file structure

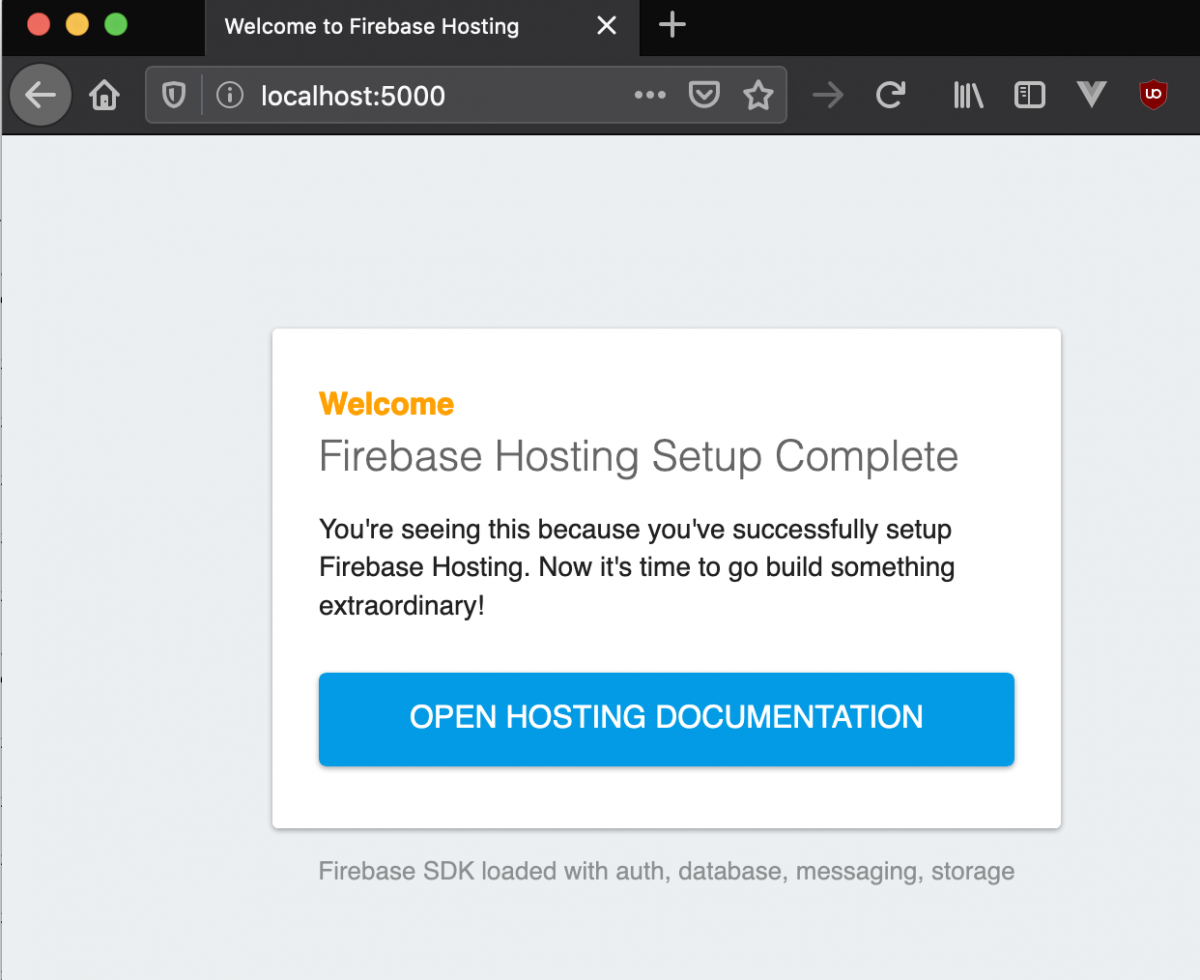
At this point you have a CRA app inside your Firebase, but when you go to your Hosting URL you are still going to see the default Firebase website.

Firebase default Hosting webpage

Firebase default Hosting webpage

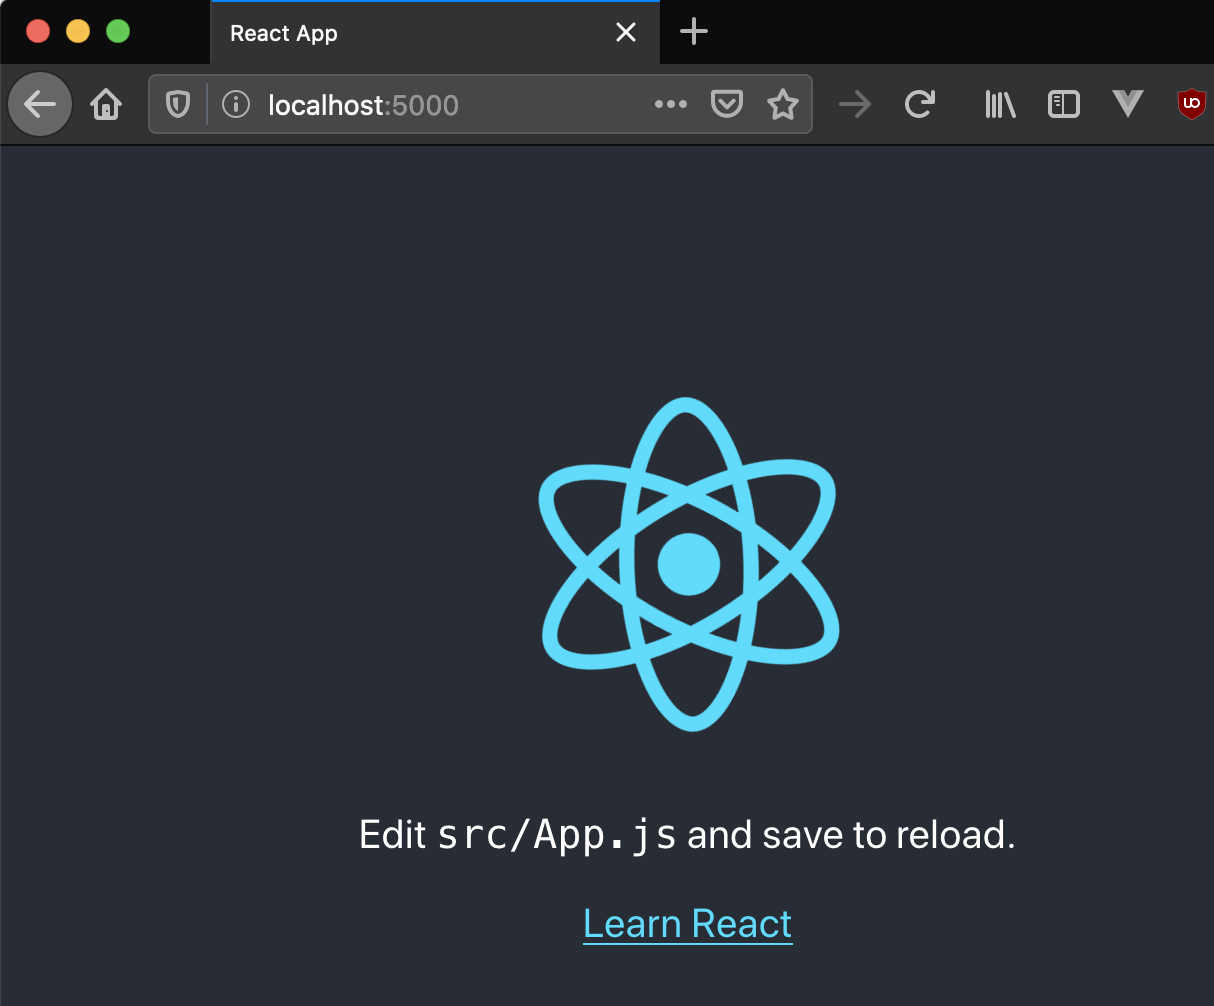
Go back to your firebase.json and change your hosting path to view/build and then restart your Firebase emulator and you should now see your CRA app.

...
"hosting": {
"public": "view/build",
...
CRA default webpage

CRA default webpage

I will pick up the rest of the exercise on a follow up blog post as this is getting very lengthy.

~david

Tip to search multiple Cisco CVP activity log errors quickly

We’ve been chasing a Nuance issue and as part of the process I’m monitoring the activity logs for certain errors to see if they are related to the issue we’re chasing or something else. I have multiple applications across over a dozen CVP servers and going one by one using Notepad++ is time consuming. Since the Cisco life is a Windows world here’s a quick way to do this and save you a ton of time.

There are tools out there like PowerGREP which do something similar, but my personal choice is to use Sublime Text. From there you go to Find > Find in Files.

  1. In Where add the locations you want to search and separate them by a comma:

\\server1\c$\cisco\cvp\VXMLServer\applications\YourApp\logs\ActivityLog,\\server1\c$\cisco\cvp\VXMLServer\applications\YourOtherApp\logs\ActivityLog,\\server2\c$\cisco\cvp\VXMLServer\applications\YourApp\logs\ActivityLog,\\server2\c$\cisco\cvp\VXMLServer\applications\YourOtherApp\logs\ActivityLog

2. In Find, make sure to select Regular expression and enter:

(?=.*06\/11\/2020.*error\.noresource$)|(?=.*06\/11\/2020.*Hotevent_Error_NoResource$)\w+

3. Click Find and watch all matches appear.

The expression above is looking for two different types of errors. error.noresource and Hotevent_Error_NoResource. It’s looking for this information only for the date of 06/11/2020, to ensure we only get the most recent logs. Finally, since we know this error is always at the end of the line we use the $ to anchor that string at the end of the line.

I hope this helps someone else do their work faster.

~david

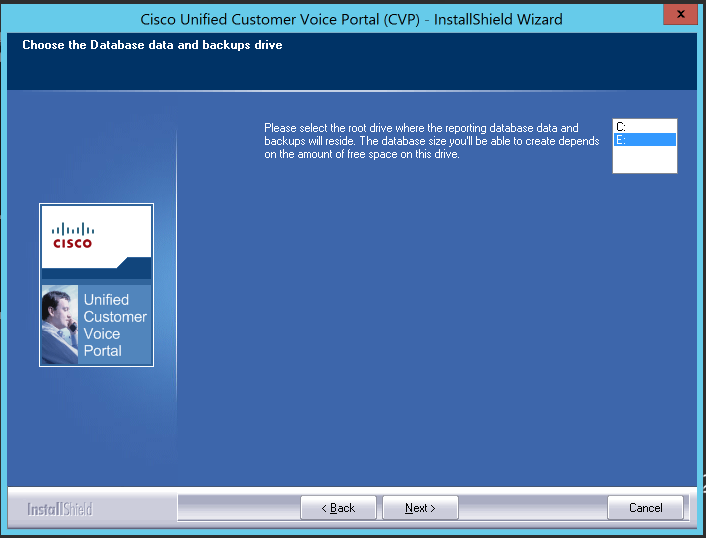
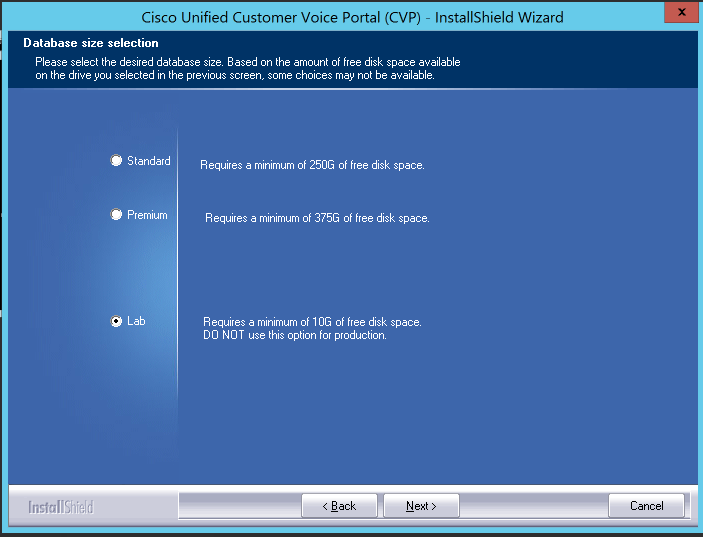
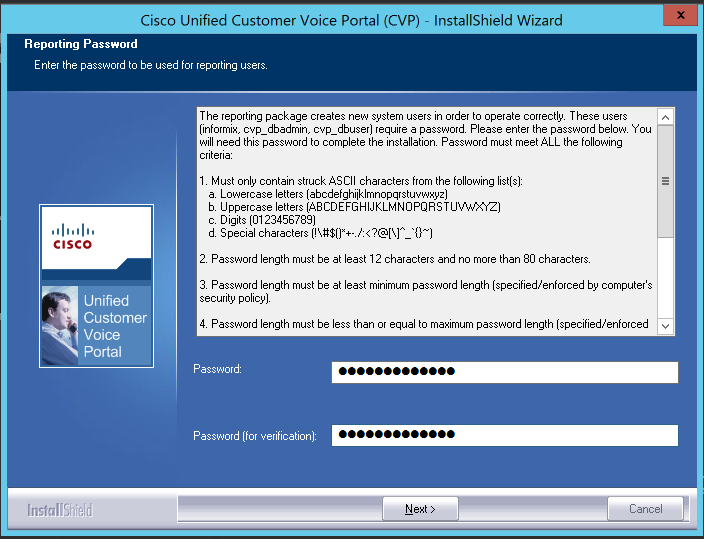
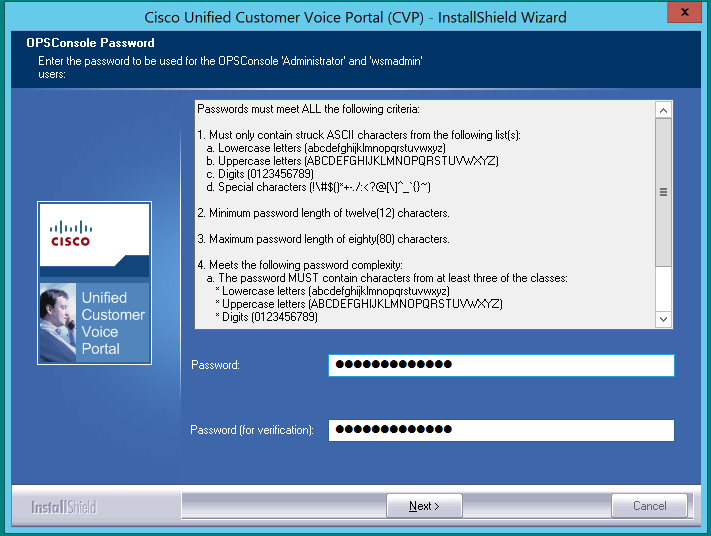
Cisco CVP Standalone Lab Installation

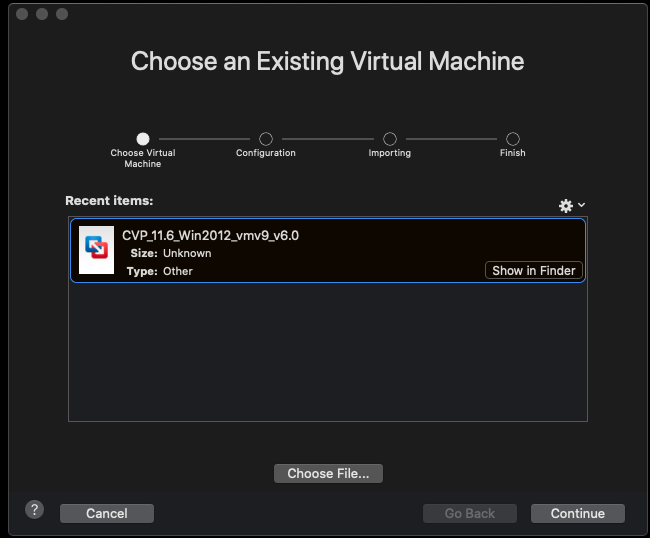
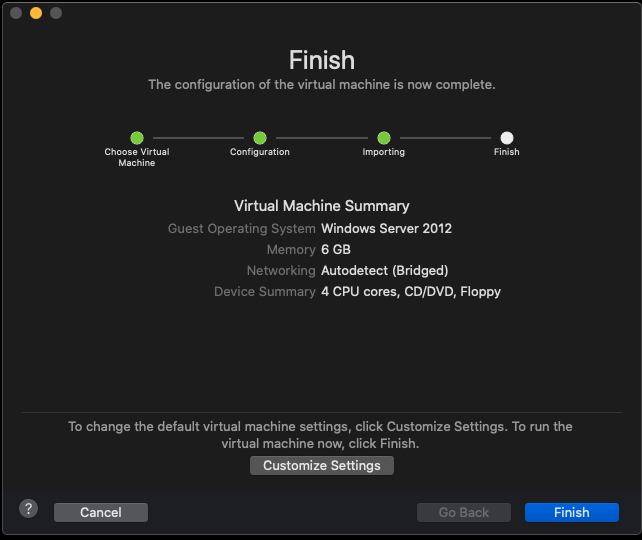
For this we’re using VMWare Fusion to install the OS, you should also have the CVP OVA and ISO to make your life easier.

File > Import. Choose OVA

Screen Shot 2020-02-09 at 7.40.27 AM.png

Continue
Accept
There are 3 options at this point for the VM configuration:

Cisco Unified CVP Call Server-VXML Server

Guest OS: Microsoft Windows Server 2012 (64-bit)
CPU: 4 vCPU
Memory: 10 GB vRAM
Disk: 1 – 250 GB vHDD
Network: 1 vNIC VmxNet3

Cisco Unified CVP Operations Console

Guest OS: Microsoft Windows Server 2012 (64-bit)
CPU: 2 vCPU
Memory: 4 GB vRAM
Disk: 1 – 80 GB vHDD
Network: 1 vNIC VmxNet3

Cisco Unified CVP Reporting Server

Guest OS: Microsoft Windows Server 2012 (64-bit)
CPU: 4 vCPU
Memory: 6 GB vRAM
Disk: 1 – 80 GB vHDD
Disk: 2 – 438 GB vHDD
Network: 1 vNIC VmxNet3

Since this is a lab, but I still want things to look as close to production as possible I will be using the Reporting Server deployment option.

Screen Shot 2020-02-09 at 7.45.39 AM.png

  • Install Windows 2012. Ensure you have two drives and make sure the machine is on the network.
  • Install IIS
  • Give it an IP on the network.
  • Disable IPv6
  • Run Windows Update
  • Disable Windows Update to run automatically
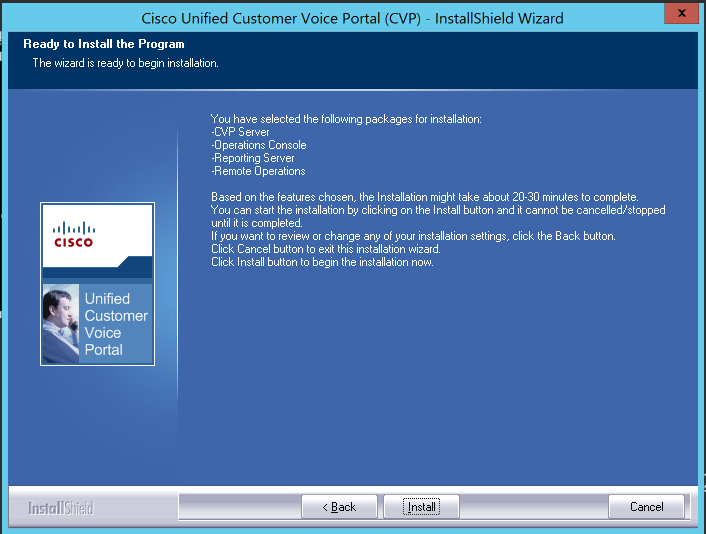
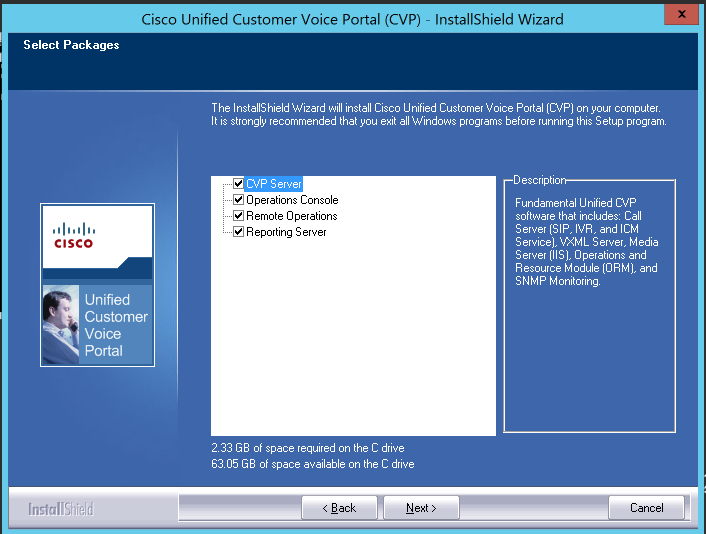
  • Mount the CVP ISO, open a command prompt and run CVP\Installer_Windows\setup.exe labonly

Screen Shot 2020-02-09 at 9.33.09 PM.png

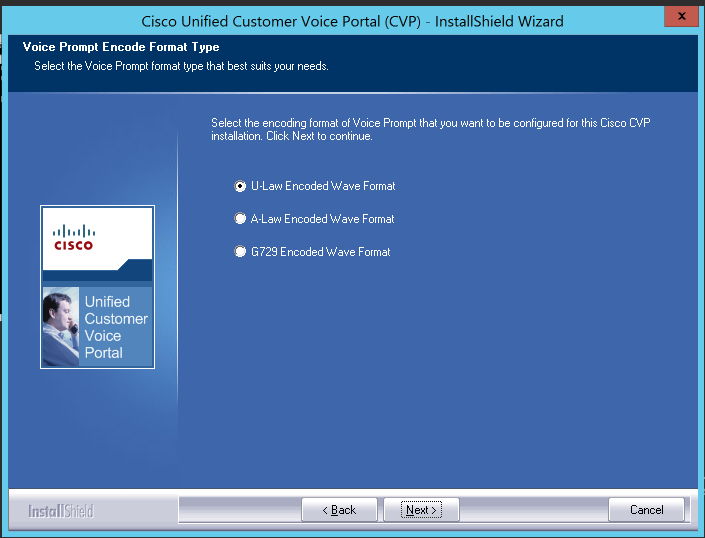
Screen Shot 2020-02-09 at 9.34.27 PM.png

Screen Shot 2020-02-09 at 9.57.51 PM.png

Fill out the X.509 Certificate information.

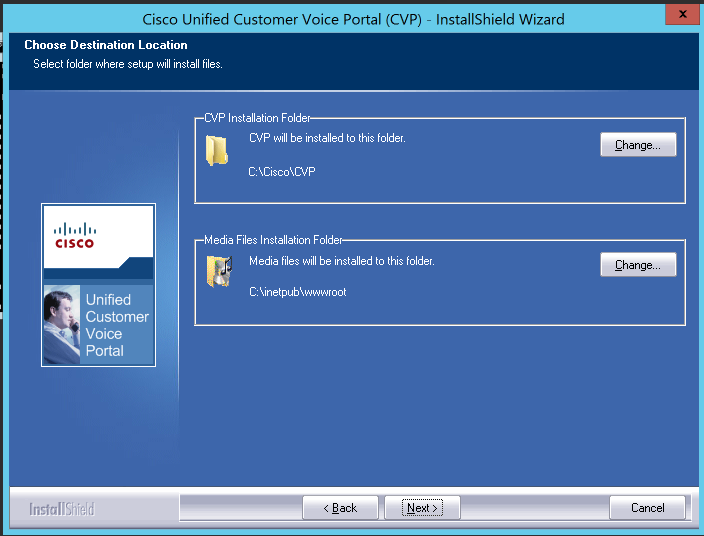
Screen Shot 2020-02-09 at 10.01.33 PM.png

Screen Shot 2020-02-09 at 10.01.46 PM.png

Screen Shot 2020-02-09 at 10.02.01 PM

Screen Shot 2020-02-09 at 10.05.39 PM.png

Choose your favorite secure password.

Screen Shot 2020-02-09 at 10.19.54 PM.png

Finish and restart.

This is only one half of the equation, you’ll need need the voice piece in order to be able to get CVP to do anything.

~david

Individual Component Installation of Nuance on Windows 2012 R2

I have done more Nuance installs in the last few weeks than I’ve done in my whole life. Recently I had to revisit installing Nuance without using the Nuance Portal and since it had been a few years since I had gotten around to it I figured I would document the process as a few things were murky in my mind. We’re going to be installing:

License Manger 11.7
Nuance Recognizer 10.2.8
Nuance Vocalizer (Enterprise) 6.0.7
Nuance Speech Server 6.2.9

This installation will work with UCCE/CVP 11.6 using VVB which means mrcp2 and the configuration is specific to mrcp2.

License Manager

First start with the License Manager as this components allows everything else to operate. The installation is pretty much a next, next, finish process. You will be asked to do a restart of the server.

The validation process is pretty straight forward. First, ensure that the Windows service was installed. It should not be running, but it should be set as automatic. Next open up the Licensing Tools program you just installed go to Start/Stop/Reread and hit Start Server. This will use a temp license to start up. The temp license is stored in C:\Program Files\Nuance\license_manager\license. Once you start the service confirm you see the Windows service as running. And that the output of Server Status is this:

——–
Status
——–
Flexible License Manager status on Tue 4/7/2020 13:17

[Detecting lmgrd processes…]
License server status: 27000@NUANCEHOST
License file(s) on NUANCEHOST: C:\Program Files\Nuance\license_manager\license\temp.lic:

NUANCEHOST: license server UP (MASTER) v11.7

Vendor daemon status (on NUANCEHOST):

swilmgrd: UP v11.7
Feature usage info:

Users of dummy: (Total of 1 license issued; Total of 0 licenses in use)

Go to Config Services tab to point to your license file. As a matter of practice I keep all licenses files in the same location to make it easy. Either restart the service or re-read the license file to ensure it reflects your entitlement correctly. From this point forward you need to make sure to have a proper license for each component otherwise the validation steps will fail.

Nuance Recognizer

This installer is very much like the licensing tool, which means it’s a next, next, finished process. You will have to perform a restart of the server once it’s done. Additionally, you will need to install the languages you want your recognizer to support. As an example, for en-us, there are two files you will need to install: NRec-en-US-10.0.2-10.2.0.x86_64-windows.zip and NRec-en-US-10.0.2-10.2.0-CumulativePatch-2_windows.zip.

The base installation of en-us is straight forward, but the patch is a bit more involved. First, unzip the patch to a temporary location make sure this temp location doesn’t have any spaces in the name otherwise the installer will fail. Second, open a command prompt as an administrator and cd to the temporary location of the patch. Ensure that “echo %SWISRSDK%” returns where the recognizer is installed for example C:\Program Files\Nuance\Recognizer. Also validate what version of nuance you’re running by running “nuance-version -p”. What you want to pay attention is the following:

Name: Nuance Recognizer
Location: C:\Program Files\Nuance\Recognizer\
Version:
Nuance Recognizer 10.2.8.2017022711 x86_64 – Package revision 17058

Name: Nuance Recognizer English en-US Language Pack
Location: C:\Program Files\Nuance\Recognizer\config\en.us\10.0.2
Version:
Nuance Recognizer en-US Language Pack – Rev. 10.0.2-10.2.0-15335

This tells us we have our base install and the language. Now run the install_cumulative_patch.bat and then validate it installed correctly by checking the Nuance version again. You should see this:

Name: Nuance Recognizer
Location: C:\Program Files\Nuance\Recognizer\
Version:
Nuance Recognizer 10.2.8.2017022711 x86_64 – Package revision 17058

Name: Nuance Recognizer English en-US Language Pack
Location: C:\Program Files\Nuance\Recognizer\config\en.us\10.0.2
Version:
Base: Nuance Recognizer en-US Language Pack – Rev. 10.0.2-10.2.0-15335
Cumulative Patch 2:
ELANGPACKS-36 Creditcard expiry date grammar – Extend default expiry year to be 25 years from now (parameter maxallowed changed to 300 months)
ELANGPACKS-39 Fixed @reject@, added @exh@ and removed #sil# from @noise
@ entries in system dictionary – all grammars recompiled with updated system dictionary
ENR-124 Added missing transcription ‘zed’ for letter z to system
dictionary

There are two ways to configure the recognizer service. The first is by editing Baseline.xml and the second it to use a user config which overwrites Baseline.xml. My preferred method is to use a user config file as it’s much easier to manage and it removes the monstrosity that is the Baseline files, but because that’s a whole other ball of wax we’re going to just do the direct edit to Baseline.xml. You must enter the licenses you have available in the value tags below in the following two lines:

<param name=”swirec_license_ports”>
<declaration group=”license” type=”int”
set_by=”default”>
<min_value>0</min_value>
</declaration>
<value>4</value>
</param>

<!– How many osr_swiep licenses will be checked out during SWIepInit() –>
<param name=”swiep_license_ports”>
<declaration group=”license” type=”int”
set_by=”default”>
<min_value>0</min_value>
</declaration>
<value>4</value>
</param>

The final step is ensuring you set the Recognizer to start as a service. Open up a command prompt again and cd to C:\Program Files\Nuance\Recognizer\Recognizer Service\amd64\bin. From there you need to decide what parameters you’ll set for the service. The below parameters are the default and should be used unless you know exactly what you’re doing.

C:\Program Files\Nuance\Recognizer\Recognizer Service\amd64\bin>nrs-win-service-
init.exe -i nrs-win-service.exe -servlet nrs -port 8200

From there start your service and then it’s time to validate everything worked as expected.

To validate that your recognizer is working as expected Nuance provides a small exe which allows you to test your config. You can find the utility at C:\Program Files\Nuance\Recognizer\samples\swirec_sample\SWIrecSample.exe. Using the command prompt run the utility piping the output to a log file:

SWIrecSample.exe > log.txt

You should see a lot of successful lines in the log file, here’s a small sample:

Function SWIrecInit returned SUCCESS.

Calling SWIepInit.

Calling SWIrecRecognizerCreate.

Function SWIrecRecognizerCreate returned SUCCESS.

Calling SWIrecSessionStart.

Nuance Vocalizer and Languages

Same thing as all the other installers, these are just a next, next, finished. Ensure you install the vocalizer first, restart, then languages and restart. The configuration is pretty straight forward too. As before having a user config is my preferred method however we’re going to stick with the basics and just update baseline.xml. Please note that this baseline.xml is different than the Recognizer Baseline.xml. Here are the two parameters you have to update based on your license entitlement:

<tts_license_ports>4</tts_license_ports>
<cpr_license_ports>4</cpr_license_ports>
<ssml_validation>warn</ssml_validation>

One thing to note is that the Vocalizer doesn’t need a Windows service to run, so don’t think you’ve done something wrong if you can’t see it in the services window. The validation process is two parts too. First run the nuance-version -p command and validate your voices are installed and recognized:

Name: Vocalizer for Enterprise en-US Zoe bet4 f8
Location: C:\Program Files (x86)\Nuance\Vocalizer for Enterprise\
Version:
Vocalizer for Enterprise 6.1.1.2013100217
Vocalizer for Enterprise Build ID 6.1.1.13275
Language: en-US
Voice: Zoe
Voice model: bet4
Coder: encrypt
Language version: 5.2.3.0000
Voice version: 5.2.3.13269

Name: Vocalizer for Enterprise
Location: C:\Program Files (x86)\Nuance\Vocalizer for Enterprise\
Version:
Vocalizer for Enterprise 6.0.7.2018052303
Vocalizer for Enterprise Build ID 6.0.7.18143

Next using the command line cd to C:\Program Files (x86)\Nuance\Vocalizer for Enterprise\common\speech\components and run the following command:

nvncmdline.exe -l en-us -n Zoe -s “Hello this is Zoe using text to speech.” -w –
o test.wav

Please note that you have to match the language and voice you have installed in the system. The good thing is that this command’s error outputs will tell you if there’s an issue with either the voice or the language not being detected. If the command runs successfully listen to test.wav to ensure it sounds like you expect it to.

Nuance Speech Server

The most important piece of this is that you install this component last as the installer detects the Recognizer and Vocalizer upon running. If you don’t install it last, then you will have to make some changes to your config to allow the Speech Server to know where to find the other components. The installer just like the others is just a next, next, finish installation. You will have to restart the server upon completion. Additionally, you should install the Nuance Speech Server Client matching your Speech Server which will allow you validate your configuration. Once everything is installed ensure the service is started and set it to an automatic startup type.

Validation is similar to the Vocalizer. Nuance provides a client which is able to test the Speech Server. From the command prompt go to C:\Program Files (x86)\Nuance\Speech Server\Client\script. From there run the following command:

..\bin\client.exe -s localhost -p 5060 demoprompt.mrcp

The output will be in demoPrompt.log and should be a good bit of SIP messaging and SSML. The most likely error you will see is that your service is not started or that you don’t have a valid license. Here’s a sample of the output:


INVITE sip:mresources@localhost:5060 SIP/2.0
Via: SIP/2.0/TCP NUANCEHOST:49474;branch=z9hG4bKf529526265c4fb15
Max-Forwards: 6
To: MediaServer <sip:mresources@localhost:5060>
From: clien_user <sip:clien_user@NUANCEHOST:49474>;tag=b5d67ee5
Contact: <sip:clien_user@NUANCEHOST;transport=TCP>
Call-ID: a385e9e251def062
CSeq: 1467710150 INVITE
Content-Type: application/sdp
Content-Length: 322

<?xml version=”1.0″?>
<speak version=”1.0″ xml:lang=”en-US” xmlns=”http://www.w3.org/2001/10/synthesis”>
<p>
<s>You have 4 new messages.</s>
<s>The first is from <say-as
interpret-as=”name”>Stephanie Williams</say-as>
and arrived at
<say-as interpret-as=”time”>3:45pm</say-as>.</s>

<s>The subject is <prosody
rate=”fast”>ski trip</prosody></s>
</p>
</speak>

Add your new ASR and TTS server to VVB and you should be good to go.

~david