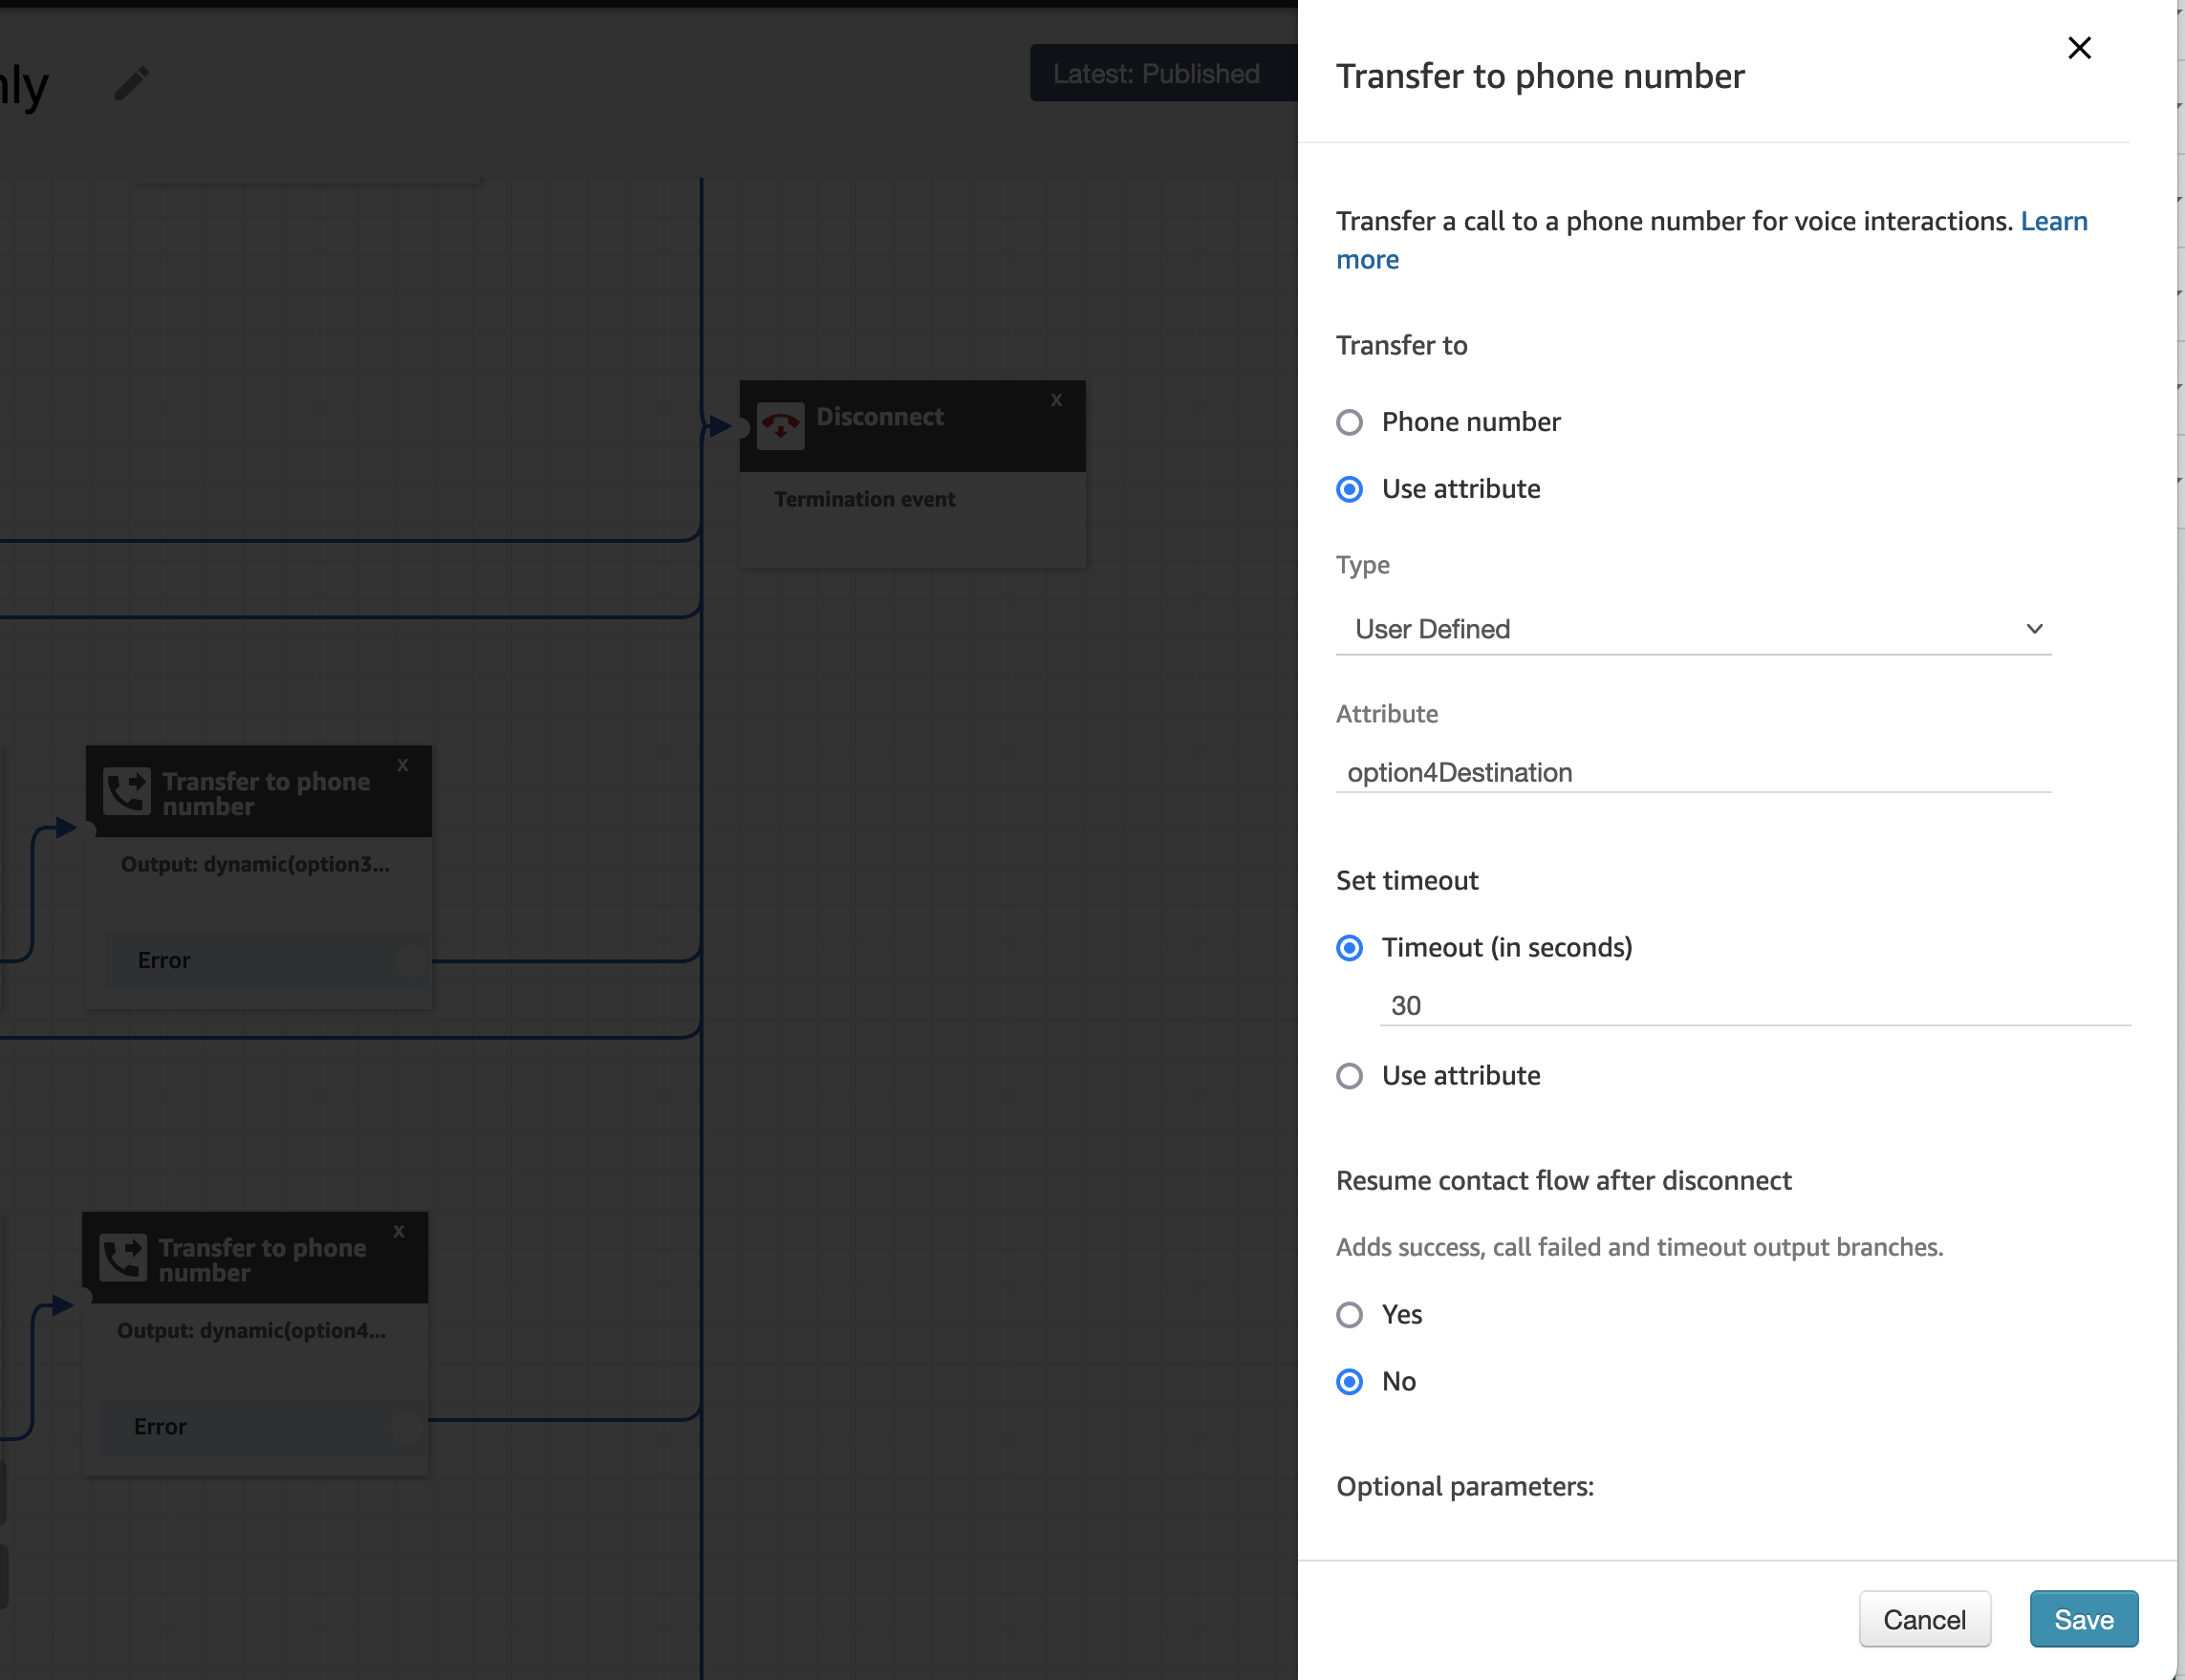
I wanted to document this specifically as I feel it’s the most complex flow you will see within UCCE. Before you go through this you will absolutely want to get familiar with the documentation as there are a lot of moving pieces. The diagram below comes straight from said documentation and should help you visualize what you see the logs doing.
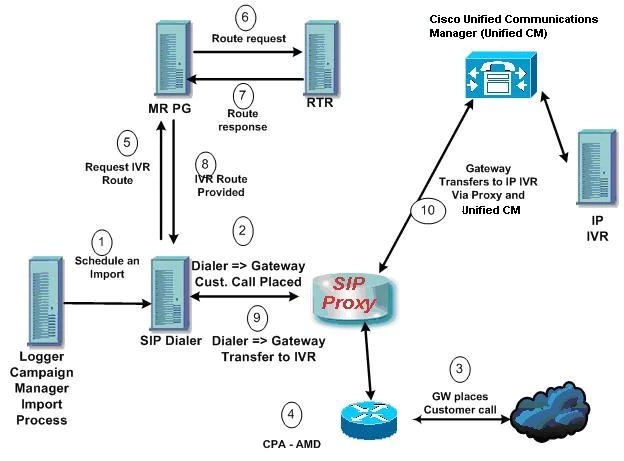
UCCE Call Flow Outbound Option with SIP Proxy
Ideally I would have had all the logs for all the devices at the same time, but unfortunately that wasn’t the case. You will notice that the timestamps jump around as some logs are from other time frames. However, I’ve tried to match up all unique identifiers across all the logs so you can follow it along. The unique identifiers you want to take note of are:
2145551234: Customer phone number campaign is going to dial.
016: The dialer port.
10241: Correlation ID of initial call to customer.
10242: Correlation ID of call to IVR.
1. An unattended IVR campaign starts. Customer records are delivered to the Dialer. (The ANI and the port are key to be able to trace what the dialer is doing.)
badialer:
10:55:33:059 dialer-baDialer Trace: (Customer) SetCallResults(): ID: [-2147483601 in DL_5008_5031], skill: [6924], result: [1] [DIAL_RESERVED], now: [Thu Mar 4 10:55:33 2021], callback: [Thu Mar 4 10:55:32 2021].
10:55:33:059 dialer-baDialer Trace: (CUSTMGR) SendRecord(): Send customer: [2145551234] record ID: [-2147483601], in: DL_5008_5031 to port: [016].
10:55:33:059 dialer-baDialer Trace: (IVR) Record available event, port: [016], phone: [2145551234].
10:55:33:059 dialer-baDialer Trace: (CPORT) SetState(): Port: [016], state: [PORT_DEVICE_ATTRIB].
2. The Dialer asks the SIP Proxy to forward an invite to an available gateway to start a call. (CUSP logs are a bit of a pain, I recommend you download them via FTP instead of doing it from the GUI. This is a great guide on log settings. Ultimately, here we want to make sure that the CUSP knows where to send the request.)
badialer:
10:55:33:059 dialer-baDialer Trace: (SIPDisp) Dial, port: [016], phone: [22222912145551234], lDialTimeoutSec: [32]
CPA parameters: AP: [2500], MinSP: [608], MinVSpeech: [112], MaxTA: [5000], MaxTone: [30000].
10:55:33:059 dialer-baDialer Trace: (IVR) Dialing, phone: [22222912145551234], port: [016], ring timeout: [32], state: [PORT_DEVICE_ATTRIB].
10:55:33:059 dialer-baDialer Trace: (CPORT) SetState(): Port: [016], state: [DIAL_CUSTOMER].
CUSP:
[REQUESTI.26] DEBUG 2021.03.04 14:27:34:468 nrs.FieldSelector - getUriPart: URI - sip:22222912145551234@{CUSP} part 6
[REQUESTI.26] DEBUG 2021.03.04 14:27:34:468 nrs.FieldSelector - Requested field 45
[REQUESTI.26] DEBUG 2021.03.04 14:27:34:468 nrs.FieldSelector - Returning key 22222912145551234
[REQUESTI.26] DEBUG 2021.03.04 14:27:34:468 nrs.XCLPrefix - Leaving getKeyValue()
[REQUESTI.26] DEBUG 2021.03.04 14:27:34:468 modules.XCLLookup - table=Prod-CCE-Table, key=22222912145551234
[REQUESTI.26] INFO 2021.03.04 14:27:34:469 modules.XCLLookup - table is Prod-CCE-Table
[REQUESTI.26] DEBUG 2021.03.04 14:27:34:469 routingtables.RoutingTable - Entering lookup()
[REQUESTI.26] DEBUG 2021.03.04 14:27:34:469 routingtables.RoutingTable - Looking up 22222912145551234 in table Prod-CCE-Table with rule prefix and modifiers=none
...
[REQUESTI.26] DEBUG 2021.03.04 14:27:34:470 loadbalancer.LBBase - Entering getServer()
[REQUESTI.26] DEBUG 2021.03.04 14:27:34:470 loadbalancer.LBBase - Entering initializeDomains()
[REQUESTI.26] DEBUG 2021.03.04 14:27:34:470 servergroups.ServerGlobalStateWrapper - Prod-CCE:{Gateway}:5060:2 numTries=1--->isServerAvailable(): true
[REQUESTI.26] DEBUG 2021.03.04 14:27:34:470 servergroups.AbstractNextHop - Entering compareDomainNames()
[REQUESTI.26] DEBUG 2021.03.04 14:27:34:470 servergroups.AbstractNextHop - Leaving compareDomainNames()
[REQUESTI.26] DEBUG 2021.03.04 14:27:34:470 servergroups.ServerGlobalStateWrapper - Prod-CCE:{Gateway0}:5060:2 numTries=1--->isServerAvailable(): true
[REQUESTI.26] DEBUG 2021.03.04 14:27:34:470 loadbalancer.LBBase - Leaving initializeDomains()
[REQUESTI.26] DEBUG 2021.03.04 14:27:34:471 servergroups.AbstractNextHop - Entering compareDomainNames()
[REQUESTI.26] DEBUG 2021.03.04 14:27:34:471 servergroups.AbstractNextHop - Leaving compareDomainNames()
[REQUESTI.26] DEBUG 2021.03.04 14:27:34:471 loadbalancer.LBBase - Server group dc-dialer.fqdn.tld selected {reSgElementQValue=1.0, reSgElementHost={Gateway}, reSgElementTransport=TCP, reSgElementPort=5060, reSgElementWeight=100, reSgElementSgName=dc-dialer.fqdn.tld}
[REQUESTI.26] DEBUG 2021.03.04 14:27:34:471 loadbalancer.LBBase - Leaving getServer()
3. The Gateway places the call (ccapi inout and ccsip mess are the debugs you need to enable to get relevant information. Biggest gotcha are dial peers not matching.)
Gateway:
2131549: Mar 4 10:55:33.260: //-1/xxxxxxxxxxxx/SIP/Msg/ccsipDisplayMsg:
Received:
INVITE sip:22222912145551234@dc-dialer.fqdn.tld SIP/2.0
Via: SIP/2.0/TCP {CUSP}:5060;branch=z9hG4bKPpG+UtfThNEwGF7BsjXL3Q~~23121513
Via: SIP/2.0/UDP {MRPG}:58800;branch=z9hG4bK-d8754z-400d871379428a5a-1---d8754z-;rport=58800
Max-Forwards: 69
To: <sip:22222912145551234@{CUSP}>
From: <sip:5551412012@{MRPG}>;tag=0e52a576
Contact: <sip:5551412012@{MRPG}:58800>
Require: 100rel
Remote-Party-ID: <sip:18885461234@{CUSP}>;party=calling;screen=no;privacy=off
Call-ID: 3d5bfc40-093d7432-4a122a63-e2664942
CSeq: 1 INVITE
Content-Length: 630
Session-Expires: 1800
Min-SE: 90
Allow: INVITE, ACK, CANCEL, OPTIONS, BYE, UPDATE, NOTIFY, PRACK, REFER, NOTIFY, OPTIONS
Content-Type: Multipart/mixed;boundary=uniqueBoundary
Supported: timer, resource-priority, replaces
User-Agent: Cisco-SIPDialer/UCCE10.0

2132806: Mar 4 10:55:36.362: //16876944/44B8C2C0A6A6/SIP/Msg/ccsipDisplayMsg:
Received:
SIP/2.0 180 Ringing
Via: SIP/2.0/UDP {PSTN}:5060;branch=z9hG4bK72D75B260F
From: <sip:18885461234@{PSTN}>;tag=4E815A86-1116
To: <sip:12145551234@{PSTN}>;tag=gK02b0b650
Call-ID: 44B9FBA8-7C4111EB-A6ACFA5D-15A1A7BA@{PSTN}
CSeq: 101 INVITE
Contact: <sip:12145551234@{PSTN}:5060>
Allow: INVITE,ACK,CANCEL,BYE,UPDATE
Content-Length: 236
Content-Disposition: session; handling=required
Content-Type: application/sdp
4. Voice Gateway does Call Progress Analysis and detects an answering machine. The Dialer is notified (I don’t think the above gateway debug levels will show you CPA information so I was not able to capture CPA from the gateway.)
baDialer:
10:58:41:845 dialer-baDialer Trace: (DDist) Softphone connection event: phone: [22222912145551234], result: [VOICE], port: [016], state: [DIAL_CUSTOMER].
10:58:41:845 dialer-baDialer Trace: (Customer) SetCallResults(): ID: [-2147483599 in DL_5008_5031], skill: [6924], result: [10] [VOICE], now: [Thu Mar 4 10:58:41 2021], callback: [Thu Mar 4 10:58:33 2021].
10:58:41:845 dialer-baDialer Trace: (IVR) Received telephony event port: [016], connection state: [20].
5. The Dialer asks the MR PG where the IVR is
baDialer:
10:58:41:845 dialer-baDialer Trace: (CPORT) SetState(): Port: [016], state: [TRANSFER].
10:58:41:845 dialer-baDialer Trace: (IVR) Transferring Customer port: [016], to IVR route point: [6515555678].
10:58:41:845 dialer-baDialer Trace: (CPORT) SetState(): Port: [016], state: [GET_TARGET].
6. MR PG forwards the request to the Router (It is important to note that up to this point everything that was happening was outside of the central controller.)
PIM:
14:23:09:556 PG2A-pim1 Trace: VRU->PG:REQUEST_INSTRUCTION(172 bytes):DID=570876 SendSeq#=1 TrkGrpID=200 TrkNum=1 SrvID=2 ANI=12145551234 DNIS=666666666610241 CorrID=10241 CallGUID=410885C97C5E11EBAABBFA5D15A1A7BA PstnTrkGrpID={Gateway} PstnTrkGrpChann#=2147483647 SIPHeader=f:<sip:12145551234@{Gateway}>;tag=4F3F6BE6-173D
14:23:09:556 PG2A-pim1 Trace: FromVRU_RequestInstruction:REQUEST_INSTRUCTION RCID=5001 PID=5001 DID=570876 DIDRelSeq#=1 CorrID=10241 CalledParty#= CallingParty#=12145551234 CallGUID=410885C97C5E11EBAABBFA5D15A1A7BA PstnTrkGrp(ID={Gateway} ,Chann#=2147483647) SIPHeader=f:<sip:12145551234@{Gateway}>;tag=4F3F6BE6-173D
14:23:09:556 PG2A-pim1 Trace: ProcessConnect:CONNECT RCID=5001 PID=5001 DID=570876 DIDRelSeq#=0 CRS(RtrDate=153464,RtrCID=18384) RCKSeq#=0 ErrorCode=0 TRTargetID=-1 CorrID=10242 EventSel=119 SvcType=4 NICCallID={PCID=5001,RCID=5001,Remote=0,0,DID=0x8b5fc,RemDID=0x0,Grp=0,Data=0,RtrData=0,CCID=x00000001/x00000000} PGCallID={N/A} OperationCode=CLASSIC OperationFlags=COOP_NONE NetworkTransferEnabled=F ECCPayloadID=1 Label(Type=8)=8888888881 NICCalledParty#=6515555678 SGSTID=-1 PQID=-1 SvcSTID=-1 AGSTID=-1 AGInfo=, MRDID=0 Interruptible=0 CallGUID=410885C97C5E11EBAABBFA5D15A1A7BA SIPHeader=f:<sip:12145551234@{Gateway}>;tag=4F3F6BE6-173D
rtr:
14:23:09:446 ra-rtr Trace: (1741 x 0 : 0 0) NewCall: CID=(153464,18384), DN=6515555678, ANI=2145551234, CED=, RCID=5003, MRDID=1, CallAtVRU=1, OpCode=0
7. Routing Script identifies the IVR and notifies the MR PG. (The script used here is the Hello World CVP script. Note that at this point we’re working with one corrID, but when the call goes to the IVR we will have a second corrID.)
rtr:
14:23:09:446 ra-rtr Trace: Script-Execute CID=(153464,18384) Default\\ZZZ_HelloIVR Start 1
14:23:09:446 ra-rtr Trace: Script-Execute CID=(153464,18384) Default\\ZZZ_HelloIVR Set Variable 2
14:23:09:446 ra-rtr Trace: Script-Execute CID=(153464,18384) Default\\ZZZ_HelloWorld Send To VRU 6
14:23:09:446 ra-rtr Trace: (1741 x 0 : 0 0) Customer (1) has no valid network vru defined - using default.
14:23:09:446 ra-rtr Trace: (1741 x 0 : 0 0) Customer (1) has no valid network vru defined - using default.
14:23:09:446 ra-rtr Trace: (1741 x 0 : 0 0) Correlation id for dialog is (10241).
14:23:09:446 ra-rtr Trace: (1741 x 10241 : 0 0) TransferToVRU: Label=6666666666, CorID=10241, VRUID=5000, RCID=5003 ECCPayloadID=1
14:23:09:446 ra-rtr Trace: (1741 x 10241 : 0 0) TransferConnect sent. Dialog pending.
PIM:
14:23:09:556 PG2A-pim1 Trace: PG->VRU:TEMPORARY_CONNECT(214 bytes):DID=570876 SendSeq#=1 Label=8888888881 CorrID=10242 RCK=18384 RCKDay=153464 RCKSeq#=0 CallGUID=410885C97C5E11EBAABBFA5D15A1A7BA SIPHeader=f:<sip:12145551234@{Gateway}>;tag=4F3F6BE6-173D
8. The MR PG forwards the route response to the Dialer
baDialer:
10:58:41:877 dialer-baDialer Trace: (IVR) MR target acqusition succeeded for port: [016], state: [GET_TARGET], target: [666666666610241].
10:58:41:877 dialer-baDialer Trace: (CPORT) SetState(): Port: [016], state: [TRANSFER].
10:58:41:877 dialer-baDialer Trace: (SIPDisp) Transfer, port: [016], phone: [666666666610241].
9. The Dialer notifies the voice gateway to transfer the call to the IVR
baDialer:
10:55:42:249 dialer-baDialer Trace: (RESIP) Adding message to tx buffer to: [ V4 {Gateway}:5060 UDP target domain={Gateway} mFlowKey=0 ]
10:55:42:265 dialer-baDialer Trace: (IVR) MR target acqusition succeeded for port: [016], state: [GET_TARGET], target: [666666666610241].
10:55:42:265 dialer-baDialer Trace: (CPORT) SetState(): Port: [016], state: [TRANSFER].
10:55:42:265 dialer-baDialer Trace: (SIPDisp) Transfer, port: [016], phone: [666666666610241].
10:55:42:265 dialer-baDialer Trace: (CLMGR) Agent event, agent: [111100208], ext: [5551510241], state: [TALKING].
10:55:42:265 dialer-baDialer Trace: (CLMGR_SIP) tOnBeginCallEvent(): Port: [003], ID: [38914319], device ID: [5551510241], IsReservationPort: [No].
10:55:42:265 dialer-baDialer Trace: (CLMGR) Agent event, agent: [111100208], ext: [5551510241], state: [TALKING].
10:55:42:281 dialer-baDialer Trace: (RESIP) Dialog::makeRequest:
...
10:55:42:281 dialer-baDialer Trace: (RESIP) SEND:
REFER sip:22222912145551234@{Gateway}:5060 SIP/2.0
Via: SIP/2.0/ ;branch=z9hG4bK-d8754z-5178e07be820b14e-1---d8754z-;rport
Max-Forwards: 70
Contact: <sip:5551412012>
To: <sip:22222912145551234@{CUSP}>;tag=4E816590-135
From: <sip:5551412012@{MRPG}>;tag=0e52a576
Call-ID: 3d5bfc40-093d7432-4a122a63-e2664942
CSeq: 3 REFER
User-Agent: Cisco-SIPDialer/UCCE10.0
Refer-To: <sip:666666666610241@{CUSP}>
Referred-By: <sip:5551412012@{MRPG}>
Content-Length: 0
10 The Gateway initiates the transfer to the SIP Proxy, and the SIP Proxy forwards the invitation onto Unified CVP.
Gateway:
2134751: Mar 4 10:55:42.320: //16876944/44B8C2C0A6A6/CCAPI/ccCheckClipClir:
In: Calling Number=12145551234(TON=Unknown, NPI=Unknown, Screening=Not Screened, Presentation=Allowed)
2134752: Mar 4 10:55:42.320: //16876944/44B8C2C0A6A6/CCAPI/ccCheckClipClir:
Out: Calling Number=12145551234(TON=Unknown, NPI=Unknown, Screening=Not Screened, Presentation=Allowed)
2134753: Mar 4 10:55:42.321: //16876944/44B8C2C0A6A6/CCAPI/ccCallSetupRequest:
Destination Pattern=6666666666....., Called Number=11102666666666610241, Digit Strip=FALSE
2134754: Mar 4 10:55:42.321: //16876944/44B8C2C0A6A6/CCAPI/ccCallSetupRequest:
Calling Number=12145551234(TON=Unknown, NPI=Unknown, Screening=Not Screened, Presentation=Allowed),
Called Number=11102666666666619114(TON=Unknown, NPI=Unknown),
Redirect Number=, Display Info=
Account Number=18885461234, Final Destination Flag=TRUE,
Guid=44B8C2C0-7C41-11EB-A6A6-FA5D15A1A7BA, Outgoing Dial-peer=2208
CUSP:
[REQUESTI.7] DEBUG 2021.03.04 14:27:39:643 nrs.FieldSelector - getUriPart: URI - sip:11102666666666610241@{CUSP} part 6
[REQUESTI.7] DEBUG 2021.03.04 14:27:39:643 nrs.FieldSelector - Requested field 45
[REQUESTI.7] DEBUG 2021.03.04 14:27:39:643 nrs.FieldSelector - Returning key 11102666666666610241
[REQUESTI.7] DEBUG 2021.03.04 14:27:39:643 nrs.XCLPrefix - Leaving getKeyValue()
[REQUESTI.7] DEBUG 2021.03.04 14:27:39:643 modules.XCLLookup - table=Prod-CCE-Table, key=11102666666666610241
[REQUESTI.7] INFO 2021.03.04 14:27:39:643 modules.XCLLookup - table is Prod-CCE-Table
[REQUESTI.7] DEBUG 2021.03.04 14:27:39:643 routingtables.RoutingTable - Entering lookup()
[REQUESTI.7] DEBUG 2021.03.04 14:27:39:643 routingtables.RoutingTable - Looking up 11102666666666610241 in table Prod-CCE-Table with rule prefix and modifiers=none
...
[REQUESTI.7] DEBUG 2021.03.04 14:27:39:644 loadbalancer.LBBase - Entering getServer()
[REQUESTI.7] DEBUG 2021.03.04 14:27:39:644 loadbalancer.LBBase - Entering initializeDomains()
[REQUESTI.7] DEBUG 2021.03.04 14:27:39:644 nrs.NRSRoutes - routes before applying time policies: [Ruri: dc1-cvp.fqdn.tld, Route: null, Network: Prod-CCE, q-value=1.0radvance=[502, 503]]
[REQUESTI.7] DEBUG 2021.03.04 14:27:39:644 nrs.NRSRoutes - routes after applying time policies: [Ruri: dc1-cvp.fqdn.tld, Route: null, Network: Prod-CCE, q-value=1.0radvance=[502, 503]]
[REQUESTI.7] DEBUG 2021.03.04 14:27:39:644 loadbalancer.LBBase - Leaving initializeDomains()
[REQUESTI.7] INFO 2021.03.04 14:27:39:644 loadbalancer.LBHashBased - list of elements in order on which load balancing is done : Ruri: dc1-cvp.fqdn.tld, Route: null, Network: Prod-CCE, q-value=1.0radvance=[502, 503],
[REQUESTI.7] DEBUG 2021.03.04 14:27:39:644 loadbalancer.LBBase - Server group route-sg selected Ruri: dc1-cvp.fqdn.tld, Route: null, Network: Prod-CCE, q-value=1.0radvance=[502, 503]
[REQUESTI.7] DEBUG 2021.03.04 14:27:39:644 loadbalancer.LBBase - Leaving getServer()
[REQUESTI.7] DEBUG 2021.03.04 14:27:39:644 nrs.XCLNRSShiftRoutes - Leaving ShiftRoutes.execute()
[REQUESTI.7] DEBUG 2021.03.04 14:27:39:644 loadbalancer.LBFactory - Entering createLoadBalancer()
[REQUESTI.7] INFO 2021.03.04 14:27:39:644 loadbalancer.LBFactory - lbtype is 5(weight)
[REQUESTI.7] DEBUG 2021.03.04 14:27:39:644 loadbalancer.LBFactory - Leaving createLoadBalancer()
[REQUESTI.7] DEBUG 2021.03.04 14:27:39:644 loadbalancer.LBBase - Entering getServer
rtr:
07:55:48:615 ra-rtr Trace: (1743 x 10241 : 0 0) TransferToVRU: Label=6666666666, CorID=10241, VRUID=5000, RCID=5003 ECCPayloadID=1
07:55:48:615 ra-rtr Trace: (1743 x 10241 : 0 0) TransferConnect sent. Dialog pending.
07:55:48:709 ra-rtr Trace: (1743 585271 10241 : 0 0) RequestInstr: CID=(153465,18384), CallState=1
07:55:48:709 ra-rtr Trace: (585271 585271 10241 : 0 0) Dialog initiating 2nd phase of transfer.
07:55:48:709 ra-rtr Trace: (585271 585271 10241 : 0 0) Correlation id for dialog is (10242).
07:55:48:709 ra-rtr Trace: (585271 585271 10242 : 0 0) TransferToVRU: Label=8888888882, CorID=10242, VRUID=5000, RCID=5006 ECCPayloadID=1
07:55:48:709 ra-rtr Trace: (585271 585271 10242 : 0 0) TransferConnect sent. Dialog pending.
07:55:48:802 ra-rtr Trace: (585271 585272 10242 : 0 0) RequestInstr: CID=(153465,18384), CallState=1
07:55:48:802 ra-rtr Trace: (585271 585272 10242 : 0 0) Dialog resuming (Request Instruction received.) status (0)
07:55:48:802 ra-rtr Trace: Script-Continue CID=(153465,18384) Default\\ZZZ_HelloIVR Send To VRU 6
07:55:48:802 ra-rtr Trace: Script-Execute CID=(153465,18384) Default\\ZZZ_HelloIVR Set Variable 7
07:55:48:802 ra-rtr Trace: Script-Execute CID=(153465,18384) Default\\ZZZ_HelloIVR Run External Script 8
07:55:48:802 ra-rtr Trace: (585271 585272 10242 : 0 0) Skipping the VRU verification because of Peripheral's ClientType is DBCT_MEDIA_ROUTING
07:55:48:802 ra-rtr Trace: (585271 585272 10242 : 0 0) Runscript sent. ECCPayloadID = 1 Dialog pending.
07:55:54:366 ra-rtr Trace: (585271 585272 10242 : 0 0) CallEventReport: CID=(153465,18384),Event=DISCONNECT, DlgEnds=1, FromVRU=0, CallState=2, Cause=NORMAL
07:55:54:366 ra-rtr Trace: (585271 585272 10242 : 0 0) Dialog received event report 6 from NIC during RunScript.
07:55:54:570 ra-rtr Trace: (585271 585272 10242 : 0 0) CallEventReport: CID=(153465,18384),Event=DISCONNECT, DlgEnds=1, FromVRU=0, CallState=22, Cause=NORMAL
07:55:54:570 ra-rtr Trace: (585271 585272 10242 : 0 0) Dialog (callstate:22) received event(6)(Call disconnected. (Event has dialog end set.))
07:55:54:570 ra-rtr Trace: (585271 585272 10242 : 0 0) Dialog resuming (Call disconnected. (Event has dialog end set.)) status (3)
07:55:54:570 ra-rtr Trace: Script-Continue CID=(153465,18384) Default\\ZZZ_HelloIVR Run External Script 8
07:55:54:570 ra-rtr Trace: (585271 585272 10242 : 0 0) Dialog aborted and was deleted.
07:55:54:570 ra-rtr Trace: (585271 585272 10242 : 0 0) Dialog sending release call to VRU
07:55:54:570 ra-rtr Trace: (585271 585272 10242 : 0 0) Deleting Dialog.
From this point forward it’s just an inbound CVP call.
~david


You must be logged in to post a comment.