This one took me a good bit of hours and googling with very little results. I wanted to post this for posterity and for anyone else out there trying to do the same thing. The end goal is to create a Windows ODBC Data Source connection to your Cisco CVP Reporting database.
First, a bit of a recap. Cisco’s CVP Reporting server utilizes IBM’s Informix database. It’s been like that for many years and to be honest it’s both great and terrible. It’s great because you don’t have to pay (directly) for a license to run the database. And horrible because it feels like Informix is just one step above using an sqlite database. Informix is used in Cisco CommunicationsManager (UCM), Contact Center Express (UCCX), Unity Connections (UCxN), and of course CVP Reporting.
On to the main course.
- You must obtain a free IBM account and go to this link. You must choose the SDK option and download the Informix Client SDK Developer Edition.
- If you want to do this with ODBC x64 then download clientsdk.4.10.FC14.windows64.zip
- For the x32 version download clientsdk.4.10.TC14.zip.
- Install either download, you can install them both too. They both work independently or side by side. Then reboot your computer.
- From there you must go to your CVP Reporting server and find your onconfig file. It should be in c:\db\Informix\etc. Open the file and find the following two lines. Make note of the values you see.
- DBSERVERNAME
- NETTYPE
- Open ODBC Data Source Administrator on your local machine. Go to System DSN > Add…
- Choose IBM Informix ODBC Driver > Finish.
- General > Data Source Name > Give it any name
- Connection > Server Name > The value of DBSERVERNAME in the onconfig file.
- Host Name: IP, FQDN, or hostname of server
- Service: 1526
- Protocol: The value of NETTYPE in the onconfig file.
- Database Name: cvp_data
- User Id: Generally cvp_dbuser but you an connect with any valid user.
- Password: Your password.
- Environment > Client Locale > EN_US.UTF8
- Database Locale: EN_US.UTF8 If you can’t set this value, hit apply to close the ODBC properties and then set this property.
- Go back to the Connection tab and Apply & Test Connection and give it a minute or two and you should see:
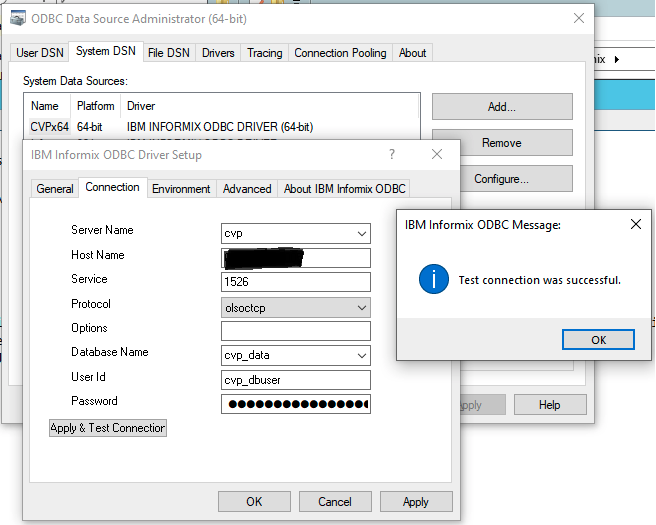
Windows ODBC Data Source Success
Hope this helps.
~david
Well written! I’ve used this ODBC connection in the past to create an excel spreadsheet that queried the callback database on the CVP reporting server on one tab, then pull the TCD records from UCCE on another to create custom Courtesy Callback reporting. Also used it in conjunction with PowerBI to do similar scenarios. Cisco posted an article and a means to obtain the driver specific to Cisco Unity several years back in a forum which turned me on to the same for CVP Report server. Hit me up and I’ll share a spreadsheet with you as a demo.
Hope you’re doing well!