Microsoft Azure and Laravel 5.1 from Scratch

While most people use AWS, I like to use Azure and there’s just not a lot of information relating Azure and Laravel, so figured this might be useful for others. This assumes a level of comfort with Linux and Azure.

  • Login: https://portal.azure.com/#
  • Click on Virtual machines (classic) and search for Ubuntu. My preference has always been Ubuntu server 14.04 LTS, select this.
  • Select deployment model: Resource Manager and click Create.
  • Give your VM some basic information: Name, User name, Authentication Type (SSH public key is my preference). Create a new resource group, I always use the same name as the VM and Location. I usually do the A1 Standard size.
  • Click ok to choose the defauls under Settings.
  • Click OK on summary and your VM will start deploying, this will take about 10-15 minutes to complete.
  • Once running, click the VM, Public Ip address/DNS name label, All Settings, Configuration, and give it a DNS name. I do this to not have to deal with IP addresses and use actual names.

At this point, I created a CustomScript Extension using this https://azure.microsoft.com/en-us/documentation/articles/virtual-machines-linux-script-lamp/ and http://tutsnare.com/how-to-install-laravel-on-ubuntu-lamp/ and http://tecadmin.net/install-laravel-framework-on-ubuntu/ This will install everything you need. The script is below. To run the script through the CLI you need to use this command: azure vm extension set -c "./public_config.json" <yourresourcegroup> <yourvm> CustomScriptForLinux Microsoft.OSTCExtensions 1.4
If you want to run the script manually, just SSH into your VM and go through every step below starting at "sudo apt-get -y".

  • SSH into your machine.
  • Instal composer: curl -sS https://getcomposer.org/installer | php
  • Move composer globally: sudo mv composer.phar /usr/local/bin/composer
  • Install Laravel: sudo composer create-project laravel/laravel /var/www/laravel 5.1.*
    • sudo mkdir laravel/app/storage
    • sudo chown -R www-data.www-data /var/www/laravel
    • sudo chmod -R 755 /var/www/laravel
    • sudo chmod -R 777 /var/www/laravel/app/storage
  • Create VirtualHost and use sample below: vim /etc/apache2/sites-available/yourhost.com.conf
  • Enable your site config: sudo a2ensite yourhost.com
  • Reload Apache: sudo service apache2 reload
  • Disable default site: sudo a2dissite 0000-default
  • Reload Apache: sudo service apache2 reload
  • Open VM firewall: sudo iptables -A INPUT -p tcp –dport 80 -j ACCEPT
  • Restart VM: sudo shutdown -r now
  • In Azure Portal Network Security Group find "inbound security rules" and add a rule for port 80.
  • Go to your http://yourhost.com Welcome!

Azure LAMP install script:
#!/bin/bash
# set up a silent install of MySQL
dbpass="YourPasswordHere"

export DEBIAN_FRONTEND=noninteractive
echo mysql-server-5.6 mysql-server/root_password password $dbpass | debconf-set-selections
echo mysql-server-5.6 mysql-server/root_password_again password $dbpass | debconf-set-selections

# install the LAMP stack
sudo apt-get -y install apache2 mysql-server php5 php5-mysql php5-curl

#install extensions
#installing json extension
sudo apt-get install php5-json
#installing unzip extension
sudo apt-get install unzip
#installing curl extension
sudo apt-get install curl
#installing openssl extension
sudo apt-get install openssl
#installing mcrypt extension
sudo apt-get install php5-mcrypt
#enable mcrypt extension
sudo php5enmod mcrypt
#installing git
sudo apt-get install -y git-core
#enable mod rewrite extension
sudo a2enmod rewrite

# write some PHP
echo \<center\>\<h1\>My Demo App\</h1\>\<br/\>\</center\> > /var/www/html/phpinfo.php
echo \<\?php phpinfo\(\)\; \?\> >> /var/www/html/phpinfo.php

# restart Apache
sudo apachectl restart

Yourhost.com.conf:
<VirtualHost *:80>
       
        ServerName laravel.example.com
        DocumentRoot /var/www/laravel/public

        <Directory />
                Options FollowSymLinks
                AllowOverride None
        </Directory>
        <Directory /var/www/laravel>
                AllowOverride All
        </Directory>

        ErrorLog ${APACHE_LOG_DIR}/error.log
        LogLevel warn
        CustomLog ${APACHE_LOG_DIR}/access.log combined
</VirtualHost>

For posterity.

This is case sensative.
public_config.json:{"fileUris":["/scripts/Laravel.sh"]’>/scripts/Laravel.sh"]’>/scripts/Laravel.sh"]’>https://<yourstorage>/scripts/Laravel.sh"], "commandToExecute":"sh Laravel.sh" }

Using git to push and pull repositories.

I’ve been trying to get more proficient with git and figured the only way to do that is to get my hands dirty and write some simple app(s) and push them to a production server. There are my notes, mainly for me to help me remember how this stuff works.

The very first time you do a git init to initialize your repository.

git init

You do this every time you want to add new changes to your reposiotry.

git add .

To see the status of things which are going to be added, removed.

git status

Once you’re happy with what you want to commit, leave your future self a little love note.

git commit –m “Doing something”

You only do this the first time to setup your remote repository destination.

git remote add origin git@github.com:dmaciasSS/myrepo.git

Then you do this every time you want to push your commit.

git push –u origin master

Now, let’s say I want to pull my repository to a new host e.g. production. If you’re using Laravel make sure you’re setting up your environment name in your vhost file first.

sudo git clone https://github.com/dmaciasSS/myrepo.git locaton/in/my/server

Laravel specific commands.

chown -R :www-data app/storage

chmod –R 777 app/storage

‘composer install’

php artisan cache:clear

Now, once you’ve cloned your repository you need to updated it every time you want to pull down any new commits.

sudo git pull origin master

composer update

php artisan cache:clear

~david

Connecting to AWS MySQL Server

I thought I had setup my connection setting correctly, but kept coming up with this error specially because of the SSH tunnel:

Long Message:
Communications link failure

The last packet sent successfully to the server was 0 milliseconds ago. The driver has not received any packets from the server.

Details:
   Type: com.mysql.jdbc.exceptions.jdbc4.CommunicationsException
   SQL State: 08S01

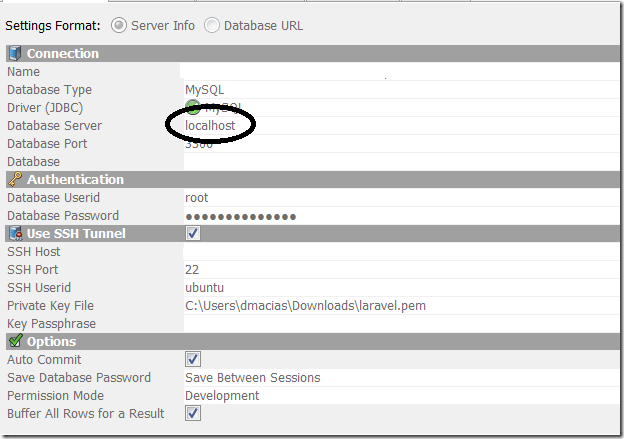
Turns out I had to set my Database Server to localhost and not to the address of the EC2 instance.

MySQL Connection Settings

Playing around with Twitter API using Tweepy

Yes, this is the kind of stuff I find myself doing when I’m bored.  Just a quick tutorial on using the Twitter python library called Tweepy.  Examples include authentication, print your statuses, and print your mentions.

First, you need to authenticate using OAuth as simple authentication has been disabled by Twitter.  I will not repeat what has already been done, so this is the best way to do it.  If you have no problems with that example, then at the end you will have a simple python script which allows you to update your status via the command line.  However, the most important piece is the authentication:

   1:  #!/usr/bin/env python
   2:   
   3:  import sys
   4:  import tweepy
   5:   
   6:  CONSUMER_KEY = 'Your stuff'
   7:  CONSUMER_SECRET = 'Your stuff'
   8:  ACCESS_KEY = 'Your stuff'
   9:  ACCESS_SECRET = 'Your stuff'
  10:   
  11:  auth = tweepy.OAuthHandler(CONSUMER_KEY, CONSUMER_SECRET)
  12:  auth.set_access_token(ACCESS_KEY, ACCESS_SECRET)
  13:  api = tweepy.API(auth)

This will allow you to authenticate against Twitter and be able to work with the API.  Now you can add to your python script the code below.

How about printing your status updates?

   1:  statuses = tweepy.Cursor(api.user_timeline).items()
   2:   
   3:  for status in statuses:
   4:          print " "
   5:          print status.text

How about printing your mentions?

   1:  mymentions= tweepy.Cursor(api.mentions).items()
   2:   
   3:  for status in mymentions:
   4:          print " "
   5:          print status.text


The Tweepy API reference has a ton of great information.  As well as the Twitter API wiki.

~david

Moving away from PHP 4 to PHP 5

So, by default the good folks at 1and1 give you support for php 3-5, however 4 is the default. So, recently one of the plugins I use in my site upgraded to php 5 which forced me to continue using an older version. However, since I’m always a big sponsor of upgrade to the latest and greatest especially when it comes to software, I decided it was time to make the move. Doing a little bit of google work, I ran into 1and1’s official FAQ on how to do this, which is found here. However, that was not the first link which showed up in google. This guy had a pretty good write up and discussion about this change and 1and1 in general. Thanks to that .htaccess change I’m now humming along with php 5.

cheers,

david

08/11/2008 edit: Funny, a day after I posted this PHP 4 support ended with the last release of the 4.4 branch. Perfect timing!

Sun buys MySQL

Well, this pretty much sums it up. Sun Microsystems has just purchased MySQL which is interesting considering how much Sun has pushed for PostgreSQL the past. Oh well, we shall see how it goes, MySQL has some issues which need to be addressed and hopefully this move helps MySQL more than helps Sun.

~david

PS: I love how the announcements has certain phrases in bold, I guess they are supposed to stand out:

it may take some time to digest what this means
This deal is about addition, not subtraction.
don’t
MySQL grew with LAMP and MySQL without LAMP at its core is simply unimaginable.
Sun is a safe haven for MySQL. Sun knows Open Source
add
together
our founders, Michael “Monty” Widenius and David Axmark
I can see their heritage being in good hands at Sun.
are
I cannot imagine a more ideal buyer from a founder perspective than Sun Microsystems.
congratulations, MySQL users, community members, customers, partners and employees

I feel all warm and fuzzy inside.

FreePBX and a Cisco 7940 Phone

So, it has been months since I posted something technical on my website. For the most part it has been music stuff as well as general updates on the overall infrastructure of the site. However, for the past month or so I’ve been working on getting a Cisco SIP phone working with FreePBX. However, the problem was that I was not able to receive inbound calls.

This was the not so descriptive error:

    -- Called 2000 
; my sip extension
    -- Got SIP response 400 "Bad Request" back from 192.168.1.102 
; sip reply
    -- SIP/2000-7b88 is circuit-busy 
; this cause the call to go straight to VM

Looking at the logs and googling for weeks on the problem, it was possible that the problem was the following:

    -- Executing NoOp("Zap/1-1", "Using CallerID 
""LastName FirstName   "" <11234567890>") in new stack

Please note the double quotes around my name.Now, after talking to X-Rob on the #freepbx channel, he pointed me to the extensions.conf file where the CallerID seems to be handled or generated.

I looked at the last commit X-Rob made and compared it to the previous one:

Revision 1891:

exten => s,n,GotoIf($["${AMPUSERCIDNAME:1:2}" = ""]?report)
exten => s,n,Set(CALLERID(all)="${AMPUSERCIDNAME}" <${AMPUSER}>)

Revision 1900:

exten => s,n,GotoIf($["x${AMPUSERCIDNAME:1:2}" = "x"]?report)
exten => s,n,Set(CALLERID(all)=${AMPUSERCIDNAME} <${AMPUSER}>)

However, this latest change still did not eliminate the double quotes from the CallerID.

So, I removed the quotes around the variable x and inbound calls finally worked! Looking at the logs however I do get an unknown name for the CallerID field, but at this point I don’t really care. I will try to work on the code and see if I can figure out the “correct” way to fix this issue, but for now I’m just happy I’m able to receive inbound calls.

Here is what the logs show with the “” removed from around the x:

    -- Called 2000 
; my sip ext againg
    -- SIP/2000-0e25 is ringing 
; my phone ringing
    -- SIP/2000-0e25 answered Zap/1-1 
; me answering the phone


Cheers