Troubleshooting UCCX Outbound Dialer Agent Based Preview Campaigns

It had been years, maybe 10 years, since I had done dialer campaigns on Cisco Contact Center Express (UCCX). I recently got a chance to do a deep dive to some SFDC integration I did and I wanted to capture how to track a call via the UCCX logs. What we will be coving is an UCCX outbound campaign that is agent based and preview. Next you need a CSV or use the API to load a new call list. Login the agent to Finesse and a preview call will be presented to the agent. If the agent accepts the preview and the customer is then dialed out. Otherwise the agent could end the call or schedule a callback if it was accepted. The steps below walk you through every single step.

Trace levels you should have set in UCCX Serviceability:
SS_OB: Debugging, XDebugging1, XDebugging2
SS_RM: Debugging, XDebugging1
SS_RMCM: Debugging

You’re going to need RTMT and Notepad++.

  • Start with getting the ANI of the record that you were going to dial and downloading the MIVR and JTAPI logs.
  • Using RTMT download the Cisco Unified CCX Engine and Cisco Unified CCX JTAPI Client logs from your server for the time frame needed.
  • Go to the logs downloaded MIVR directory and unzip all files and leave in place.
  • Open Notepad++ Find in Files, choose the location C:\YourServer\YourTimeStamp\uccx\log and search for the ANI sent to the dialer.
Notepad++ Search Settings

Notepad++ Search Settings

  • Start with any hits in your JTAPI folder. This will tell you the calls placed to your ANI and correlate it to an agent extension. The below example show 3 total calls made to that ANI by an agent. This is across 3 different JTAPI logs.
    CiscoJtapi041.log

17467378: Sep 07 13:53:41.861 CST %JTAPI-JTAPI-7-UNK:(P2-ccxrmcm)[pool-26-thread-1193][(P2-ccxrmcm) GCID=(1,15759614)->IDLE]Request: connect (CSFdavidmacias, 155551, 912145551234featurePriority=1)17467379: Sep 07 13:53:41.861 CST %JTAPI-PROTOCOL-7-UNK:(P2-1.1.1.30) [pool-26-thread-1193] sending: com.cisco.cti.protocol.LineCallInitiateRequest {sequenceNumber = 41195lineCallManagerID = 4lineID = 35553globalCallManagerID = 1globalCallID = 15759614callingAddress = 155551destAddress = 912145551234userData = nullmediaDeviceName = mediaResourceId = 0featurePriority = 1}

CiscoJtapi043.log

17485516: Sep 07 14:00:54.648 CST %JTAPI-JTAPI-7-UNK:(P2-ccxrmcm)[pool-26-thread-1196][(P2-ccxrmcm) GCID=(1,15759713)->IDLE]Request: connect (CSFdavidmacias, 155551, 912145551234featurePriority=1)17485517: Sep 07 14:00:54.648 CST %JTAPI-PROTOCOL-7-UNK:(P2-1.1.1.30) [pool-26-thread-1196] sending: com.cisco.cti.protocol.LineCallInitiateRequest {sequenceNumber = 41214lineCallManagerID = 4lineID = 35553globalCallManagerID = 1globalCallID = 15759713callingAddress = 155551destAddress = 912145551234userData = nullmediaDeviceName = mediaResourceId = 0featurePriority = 1}

CiscoJtapi046.log

17516022: Sep 07 14:15:45.225 CST %JTAPI-JTAPI-7-UNK:(P2-ccxrmcm)[pool-26-thread-1200][(P2-ccxrmcm) GCID=(1,15759923)->IDLE]Request: connect (CSFdavidmacias, 155551, 912145551234featurePriority=1)17516023: Sep 07 14:15:45.225 CST %JTAPI-PROTOCOL-7-UNK:(P2-1.1.1.30) [pool-26-thread-1200] sending: com.cisco.cti.protocol.LineCallInitiateRequest {sequenceNumber = 41258lineCallManagerID = 4lineID = 35553globalCallManagerID = 1globalCallID = 15759923callingAddress = 155551destAddress = 912145551234userData = nullmediaDeviceName = mediaResourceId = 0featurePriority = 1}

  • Next we need to see what the engine sees for that ANI on the same search you did before open the earliest MIVR log that shows the ANI in question. You need to find the record id for your specific call, this record id is how the outbound subsystem tracks the call. This means that while you start the search with your ANI, subsequent searching will be based on this record id. Below are two examples of how to locate the record id: 15541. Additionally, you see what was imported into UCCX. You can now validate that the data received by UCCX was the data you sent.

125439796: Sep 07 13:53:16.034 CST %MIVR-CFG_MGR-7-UNK: [MIVR_SS_OB_ReadContactsThread-750-0-ReadContactsThread] com.cisco.config.impl.ConfigManagerImpl ConfigManagerImpl-getAll():CIR[0]=ConfigImportRecord[schema=DialingListConfig#4,time=2024-03-05 13:53:13.0,recordId=15541,implClass=class com.cisco.crs.outbound.DialingListConfig,desc=,values=[15541, 30, 5008DM, Other.wav, Agent, 912145551234, , , 92, true, -1, true, -1, true, , 2024-03-05 19:53:13.0, 1, 0, 0, 0, 0, 0, 0, 0, 0, 0, false, 0, null, null, null],evalues=null]125439797: Sep 07 13:53:16.034 CST %MIVR-CFG_MGR-7-UNK: [MIVR_SS_OB_ReadContactsThread-750-0-ReadContactsThread] com.cisco.config.impl.ConfigManagerImpl ConfigManagerImpl-getAll():configObjs[0]=DialingListConfig[schema=DialingListConfig#4,time=2024-03-05 13:53:13.0,recordId=15541,desc=,recordID=0,dialingListID=15541,campaignID=30,accountNumber=5008DM,firstName=Other.wav,lastName=Agent,phone01=912145551234,phone02=,phone03=,gmtZonePhone01=92,dstPhone01=true,gmtZonePhone02=-1,dstPhone02=true,gmtZonePhone03=-1,dstPhone03=true,callbackNumber=,callbackDateTime=2024-03-05 19:53:13.0,callStatus=1,callResult=0,callResult01=0,callResult02=0,callResult03=0,lastNumberDialed=0,callsMadeToPhone01=0,callsMadeToPhone02=0,callsMadeToPhone03=0,numMissedCallback=0,retry=false,callsMadeToCallbackNum=0]

  • Next we want to find out who all was offered this call. Using Notepad++ Find in Files, same location, using a regular expression with your record id: associateContactToReservedAgent.*dlc:15541.
Notepad++ Search Settings Regular Expression

Notepad++ Search Settings Regular Expression

  • This will give you who the call was sent to and at what time. In my case you can match these 3 calls to the JTAPI calls above.

125443434: Sep 07 13:53:39.146 CST %MIVR-SS_OB-7-UNK: [MIVR_SS_OB_OutboundMgrMsgProcessor-192-0-OutboundMgrMsgProcessor] com.cisco.wf.subsystems.outbound.PreviewDialer PreviewDialer:associateContactToReservedAgent() rsrc:Rsrc Name:David Macias ID:dmacias IAQ Extn:155551 for contact:OutboundContactInfo: dlc:15541 (phoneNumber:912145551234 unformattedPhoneNumber:912145551234 timezone -360 callStartTime 0 answeringMachine false )

125505817: Sep 07 14:00:49.286 CST %MIVR-SS_OB-7-UNK: [MIVR_SS_OB_OutboundMgrMsgProcessor-192-0-OutboundMgrMsgProcessor] com.cisco.wf.subsystems.outbound.PreviewDialer PreviewDialer:associateContactToReservedAgent() rsrc:Rsrc Name:David Macias ID:dmacias IAQ Extn:155551 for contact:OutboundContactInfo: dlc:15541 (phoneNumber:912145551234 unformattedPhoneNumber:912145551234 timezone -360 callStartTime 0 answeringMachine false )

125632982: Sep 07 14:15:39.532 CST %MIVR-SS_OB-7-UNK: [MIVR_SS_OB_OutboundMgrMsgProcessor-192-0-OutboundMgrMsgProcessor] com.cisco.wf.subsystems.outbound.PreviewDialer PreviewDialer:associateContactToReservedAgent() rsrc:Rsrc Name:David Macias ID:dmacias IAQ Extn:155551 for contact:OutboundContactInfo: dlc:15541 (phoneNumber:912145551234 unformattedPhoneNumber:912145551234 timezone -360 callStartTime 0 answeringMachine false )

As you saw in the JTAPI logs and above, the same record was called multiple times. One likely reason is that an agent scheduled a callback, but how do we confirm this? This part is not as clean as I would like, but the following process should give you a decent idea if a callback was rescheduled or not.

#This is the original record being set. Notice the callbackDateTime.
125445090: Sep 07 13:53:43.726 CST %MIVR-CFG_MGR-7-UNK: [MIVR_SS_OB_SaveContactsMsgProcessor-198-0-SaveContactsMsgProcessor] com.cisco.config.impl.ConfigStubImpl configStubImpl-replace() exporting object: DialingListConfig[schema=DialingListConfig#4,time=2024-03-05 13:53:13.0,recordId=15541,desc=,recordID=0,dialingListID=15541,campaignID=30,accountNumber=5008DM,firstName=Other.wav,lastName=Agent,phone01=912145551234,phone02=,phone03=,gmtZonePhone01=92,dstPhone01=true,gmtZonePhone02=-1,dstPhone02=true,gmtZonePhone03=-1,dstPhone03=true,callbackNumber=,callbackDateTime=2024-03-05 19:53:13.0,callStatus=3,callResult=1,callResult01=1,callResult02=0,callResult03=0,lastNumberDialed=1,callsMadeToPhone01=1,callsMadeToPhone02=0,callsMadeToPhone03=0,numMissedCallback=0,retry=false,callsMadeToCallbackNum=0]
#Notice that the callbackDateTime is now set to 20:15:33. One thing to note is that while the time stamp says the server’s time zone it’s actually UTC and the callback will happen at 20:15:33 UTC.
125451126: Sep 07 13:54:33.558 CST %MIVR-CFG_MGR-7-UNK: [MIVR_SS_OB_SaveContactsMsgProcessor-198-0-SaveContactsMsgProcessor] com.cisco.config.impl.ConfigStubImpl configStubImpl-replace() exporting object: DialingListConfig[schema=DialingListConfig#4,time=2024-03-05 13:53:13.0,recordId=15541,desc=,recordID=0,dialingListID=15541,campaignID=30,accountNumber=5008DM,firstName=Other.wav,lastName=Agent,phone01=912145551234,phone02=,phone03=,gmtZonePhone01=92,dstPhone01=true,gmtZonePhone02=-1,dstPhone02=true,gmtZonePhone03=-1,dstPhone03=true,callbackNumber=,callbackDateTime=Tue Mar 05 20:15:33 CST 2024,callStatus=4,callResult=8,callResult01=8,callResult02=0,callResult03=0,lastNumberDialed=1,callsMadeToPhone01=1,callsMadeToPhone02=0,callsMadeToPhone03=0,numMissedCallback=0,retry=false,callsMadeToCallbackNum=0]
#Repeat of the above change.
125451194: Sep 07 13:54:33.853 CST %MIVR-CFG_MGR-7-UNK: [MIVR_SS_OB_SaveContactsMsgProcessor-198-0-SaveContactsMsgProcessor] com.cisco.config.impl.ConfigStubImpl configStubImpl-replace() exporting object: DialingListConfig[schema=DialingListConfig#4,time=2024-03-05 13:53:13.0,recordId=15541,desc=,recordID=0,dialingListID=15541,campaignID=30,accountNumber=5008DM,firstName=Other.wav,lastName=Agent,phone01=912145551234,phone02=,phone03=,gmtZonePhone01=92,dstPhone01=true,gmtZonePhone02=-1,dstPhone02=true,gmtZonePhone03=-1,dstPhone03=true,callbackNumber=912145551234,callbackDateTime=Tue Mar 05 20:15:33 CST 2024,callStatus=4,callResult=8,callResult01=8,callResult02=0,callResult03=0,lastNumberDialed=1,callsMadeToPhone01=1,callsMadeToPhone02=0,callsMadeToPhone03=0,numMissedCallback=0,retry=false,callsMadeToCallbackNum=0]
#Repeat of the above change.
125508618: Sep 07 14:01:06.354 CST %MIVR-CFG_MGR-7-UNK: [MIVR_SS_OB_SaveContactsMsgProcessor-198-0-SaveContactsMsgProcessor] com.cisco.config.impl.ConfigStubImpl configStubImpl-replace() exporting object: DialingListConfig[schema=DialingListConfig#4,time=2024-03-05 13:53:13.0,recordId=15541,desc=,recordID=0,dialingListID=15541,campaignID=30,accountNumber=5008DM,firstName=Other.wav,lastName=Agent,phone01=912145551234,phone02=,phone03=,gmtZonePhone01=92,dstPhone01=true,gmtZonePhone02=-1,dstPhone02=true,gmtZonePhone03=-1,dstPhone03=true,callbackNumber=912145551234,callbackDateTime=2024-03-05 20:15:33.0,callStatus=3,callResult=1,callResult01=8,callResult02=0,callResult03=0,lastNumberDialed=4,callsMadeToPhone01=1,callsMadeToPhone02=0,callsMadeToPhone03=0,numMissedCallback=0,retry=false,callsMadeToCallbackNum=1]
#New callbackDateTime set.
125514552: Sep 07 14:01:30.954 CST %MIVR-CFG_MGR-7-UNK: [MIVR_SS_OB_SaveContactsMsgProcessor-198-0-SaveContactsMsgProcessor] com.cisco.config.impl.ConfigStubImpl configStubImpl-replace() exporting object: DialingListConfig[schema=DialingListConfig#4,time=2024-03-05 13:53:13.0,recordId=15541,desc=,recordID=0,dialingListID=15541,campaignID=30,accountNumber=5008DM,firstName=Other.wav,lastName=Agent,phone01=912145551234,phone02=,phone03=,gmtZonePhone01=92,dstPhone01=true,gmtZonePhone02=-1,dstPhone02=true,gmtZonePhone03=-1,dstPhone03=true,callbackNumber=912145551234,callbackDateTime=Tue Mar 05 20:30:30 CST 2024,callStatus=4,callResult=8,callResult01=8,callResult02=0,callResult03=0,lastNumberDialed=4,callsMadeToPhone01=1,callsMadeToPhone02=0,callsMadeToPhone03=0,numMissedCallback=0,retry=false,callsMadeToCallbackNum=2]
#Repeat of the above change.
125514631: Sep 07 14:01:31.247 CST %MIVR-CFG_MGR-7-UNK: [MIVR_SS_OB_SaveContactsMsgProcessor-198-0-SaveContactsMsgProcessor] com.cisco.config.impl.ConfigStubImpl configStubImpl-replace() exporting object: DialingListConfig[schema=DialingListConfig#4,time=2024-03-05 13:53:13.0,recordId=15541,desc=,recordID=0,dialingListID=15541,campaignID=30,accountNumber=5008DM,firstName=Other.wav,lastName=Agent,phone01=912145551234,phone02=,phone03=,gmtZonePhone01=92,dstPhone01=true,gmtZonePhone02=-1,dstPhone02=true,gmtZonePhone03=-1,dstPhone03=true,callbackNumber=912145551234,callbackDateTime=Tue Mar 05 20:30:30 CST 2024,callStatus=4,callResult=8,callResult01=8,callResult02=0,callResult03=0,lastNumberDialed=4,callsMadeToPhone01=1,callsMadeToPhone02=0,callsMadeToPhone03=0,numMissedCallback=0,retry=false,callsMadeToCallbackNum=0]
#Repeat of the above change.
125635076: Sep 07 14:15:54.719 CST %MIVR-CFG_MGR-7-UNK: [MIVR_SS_OB_SaveContactsMsgProcessor-198-0-SaveContactsMsgProcessor] com.cisco.config.impl.ConfigStubImpl configStubImpl-replace() exporting object: DialingListConfig[schema=DialingListConfig#4,time=2024-03-05 13:53:13.0,recordId=15541,desc=,recordID=0,dialingListID=15541,campaignID=30,accountNumber=5008DM,firstName=Other.wav,lastName=Agent,phone01=912145551234,phone02=,phone03=,gmtZonePhone01=92,dstPhone01=true,gmtZonePhone02=-1,dstPhone02=true,gmtZonePhone03=-1,dstPhone03=true,callbackNumber=912145551234,callbackDateTime=2024-03-05 20:30:30.0,callStatus=3,callResult=1,callResult01=8,callResult02=0,callResult03=0,lastNumberDialed=4,callsMadeToPhone01=1,callsMadeToPhone02=0,callsMadeToPhone03=0,numMissedCallback=0,retry=false,callsMadeToCallbackNum=1]

  • So now how do you confirm that the record is complete and there will be no more callbacks. Let’s look at the log lines above and zero in on callStatus and callResult. Status (3:Closed, 4:Callback). Result (1:Voice, 8:Callback). You need to look at all the lines to get a picture if there will be another call or not. In our case the last log found has a status of close and a result of voice with no new records. Signifying that this is now close and done. I wish it was more clear, but this is the best I could find.

    125445090: …callStatus=3,callResult=1,callResult01=1…
    125451126: …callStatus=4,callResult=8,callResult01=8…
    125451194: …callStatus=4,callResult=8,callResult01=8…
    125508618: …callStatus=3,callResult=1,callResult01=8…
    125514552: …callStatus=4,callResult=8,callResult01=8…
    125514631: …callStatus=4,callResult=8,callResult01=8…
    125635076: …callStatus=3,callResult=1,callResult01=8…

    You can find all values here.

~david

Two Days of Innovation and Insights at Enterprise Connect 2024: A Personal Overview

I was saddened that I could only do 2 days at EC24, but those 2 days were jam-packed. Here’s recap of what I saw and some thoughts on the some specific vendor announcements I got a chance to hear on the stage and see on the expo floor.

Overall Recap

This year brought a nice change to some of the main stage sessions with both vendors and customers sharing the stage. This added a nice dynamic to the conversation and helped balance some things out. In one of the sessions while all the vendors were saying single vendor is best a customer said the total opposite. The flip side of this is that some times the stage looked like a public school classroom with the number of people on stage. There were too many panelist and not enough time to really dive deeper into any one topic. Maybe break up the sessions to separate topics to avoid this.

It was interesting to hear that large orgs have task forces convened around how AI could be applied to their business. Sounds like use cases are brought to them and they assess the merits of using AI and put together a plan. While this all sounds like a great idea, instead of jumping head first and sprinkling AI on everything, I do wonder how much education and knowledge these tasks forces actually have. Is AI consulting a thing now? I suspect it is.

Burnout was a bigger talking point than the crunch on the potential employee pool size. While no one outright said that jobs will be eliminated, the reality is that they will. If you can reduce workload by a percentage, then there’s no reason why you couldn’t reduce your workforce by a similar amount. While we talk about cross skilling and shifting agents to do other tasks, I wonder how much that really happens. I suspect it might be easier to just hire for the new role than try to train up. Of course this is not universal, but if even half of these AI promises come through we will see a large number of agent seats evacuated. The burnout message didn’t seem aligned with what I project how AI will impact employment in the next 5-10 years.

AI dominated every session I attended and while I understand why it really felt like the same use cases over and over again. While I am sure it’s hard to come up with truly revolutionary use cases it does feel very repetitive seeing the same use case over and over again from all the vendors. It was also interesting to not see Edify be an exhibitor I wonder if this is a signal to how they are doing business wise, anyone know?

Vendor Specific Recap:

Microsoft

Live Keynote Recap: https://www.linkedin.com/posts/dmacias_enterpriseconnect-activity-7178398994623078400-YD-c?utm_source=share&utm_medium=member_desktop

I was expecting MS to open the floor with Copilot, then go into the demos with more Copilot, and finally bring it home with Copilot. However, this was not the case. The first part of their keynote was focused on hybrid work, which is a message that Cisco has been carrying for a few years.  Intelligent recap for phone calls was very cool and then being able to have Copilot use other assets and share outputs from the conversation with others was very cool. The voice isolation demo was a bit rough. I wonder if this is because MS has to do it all on software (Teams) while Cisco demos this on hardware.

The new to me Teams Queue App was of most interest to me. This is the greatest thread to every CCaaS provider out there. The introduction of the Queues App is the first clear signal of a native contact center like feature and while the person who gave me the demo of this feature said 3 times that “this is not a call center”, it sure smelled like a call center to me. Having an agent and supervisor view, ability to queue voicemails, ability to monitor agents and take over calls, and access to raw data make this feature very compelling and a no brainier to deploy if you want to keep everything on Teams. If I was a vendor that has bolted on contact center functionality on top of Teams I would be worried. Now, I really don’t think we’re going to see a full fledged contact center from MS next year, but I do think in the next 5 years they will finally be there and would have done it incrementally anchoring everything around Teams.

Cisco

Live Keynote Recap: https://www.linkedin.com/posts/dmacias_entepriseconnect-activity-7178417256744329217-WOUg?utm_source=share&utm_medium=member_desktop

The items that stood out were dropped call detection and summarization. Not sure if this is based on conversation context or PSTN signaling. It was also interesting to see Cisco talking about going beyond LLMs to what they called real time media model (RTMM). In short, giving AI other dimensions to make decisions. Their noise suppression demo was much better’s than Microsoft’s, but their noise was being produced by toys which had repetitive audio which might be much easier to filter out as well as the fact that they own the hardware which could allow for better suppression all around. Finally, Cisco still has some of the most attractive hardware out there. Their designs are just slick and the release of the 9800 (https://www.webex.com/us/en/devices/phone-series/cisco-phone-9800-series.html) phone continues that trend.

Zoom

I was not there for the Zoom keynote, but I did sit down on one of the expo sessions and went to the floor to bug them about what all they were releasing. First, VM transcription feature was pretty cool. The ability to automatically crate tasks from the content and have the system automatically bring certain VMs to the top for immediate attention. One feature I had not seen before and I believe is new is email routing, which is something none of the other big players are doing natively. Finally, licensing seems very straightforward and easy to understand… looking at your MS.

Amazon Connect Quota Visibility

Not being able to see what your applied quota settings were has been a huge sore spot with Connect. We’ve resorted to keeping track of quotas on a spreadsheet and having AWS support provide updated numbers every 6 months. However, this is not scalable and generally a pain. I was very please when the following announcement was made, which states:

You can now view applied quota values for resources within each of your Amazon Connect instances using AWS Service Quotas. …

I immediately went to one of our Connect instances and was very disappointed at first. Because, the way AWS decided to present the applied quota as it’s not obvious. If you go to the Service Quotas > AWS Services> Amazon Connect. You see all applicable quotas for Connect. In this case let’s focus on Quick Connects. Notice that the “Applied quota value” is still the default.

Amazon Connect Service Quotas

Amazon Connect Service Quotas

If you click on the actual quota. You will still see the default at the top, but at the bottom right you’ll see the true applied number.

Quick Connects Per Instance Service Quota

Quick Connects Per Instance Service Quota

I’m happy this is here, but I wish AWS would just go the extra mile and not require us to click on the actual quote to see the true number. I’ve not validated this via the CLI, but I am hopeful it’s more obvious there.

~david

Read Only Script Editor Access in PCCE

This question came up this past week and I had a nagging suspicion it wasn’t the case and spent some time trying to get it to work. In the good old days of UCCE Config Manager had the Feature Control set capability which allowed users to have a limited view to the ICM Script Editor. This was great for those type of users who understood the scripting, but were not trained up enough to make changes.

The PCCE 11 documentation seems to hint at this being possible. You create a read-only Administrator and then you give them Script Editor access. I understand this is a huge leap, but it is not an unreasonable assumption. However, the 12.6 documentation removed that information as well removed the ability of having read-only administrator. It appears that your only option in CCE Admin > Users > Roles is to remove all access to Script Editor The following role:

Capture

Has this effect:

Capture1

If you add the Script Editor role again your user has full access to Script Editor again. So to summarize, it’s not possible to have a read only Script Editor user. I would love to be proven wrong. For now I hope this helps others out there looking for the answer.

~david

A Deeper Dive Into the Cisco Finesse Layout

I’ve been helping a customer migrate from Cisco’s Unified Contact Center Enterprise (UCCE) 11 to UCCE 12 and Amazon Connect. Depending on the complexity and needs of the business they might move to UCCE 12 or they might be moved to Connect. This has caused me to spend some time thinking of the most efficient way to migrate configuration between multiple environments and ensure everything is up to date.

One of the components which I’ve done a lot of work with, but never really looked at too closely is the Finesse layout. In this post we’ll break down what layouts are, how they work, and provide some interesting pieces of trivia around Finesse. This information is up to date as of Finesse 12.5. Make sure you reference the documentation for your specific version.

BACKGROUND

To start, the Finesse front end, what the agent and administrators see, are based on the OpenSocial specification. What this specification provides is a runtime environment where trusted and untrusted web components or gadgets can interact with the hosting platform, 3rd party services, or with other gadgets. Said differently, this specification sets the rules. It dictates how components will look, where they are placed, and what they can do. While the OpenSocial foundation no longer exists. At one point the foundation was moved under W3C where it was then set to inactive in 2018. The latest specification can be found living here.

An interesting bit of trivia. One of the original developers of OpenSocial was none other than MySpace. Remember them?

You will hear the word gadget multiple times and it is worth defining as it is a core block of Finesse. The best way to think about a gadget is as an application which can be embedded inside another application. If you’re familiar with widgets, you should consider gadgets to be very similar in nature. Now, something a lot of us fail to remember is that all of Finesse is actually one big gadget with a lot of smaller gadgets inside. While you can’t replace the whole gadget that runs on the Finesse server, you can add your own gadgets inside the Finesse gadget using a layout.

XML

The very first thing you need to understand is that like all things Cisco Contact Center Enterprise and Express you must be very familiar with working with XML. While XML has lost a lot of favor in the last few years, when it comes to desktop layouts, using XML makes a lot of sense. While editing a layout can be confusing, Cisco does a good job of assisting with basic syntax checking to catch simple errors. In an ideal world there would be a visualizer that previews the changes you’re making to your layout before saving them. Maybe one day.

The XML file loaded must conform to this schema. The schema is what dictates what tags your layout can have as well as naming conventions for components. 

The XML schema has the following elements defined. These are not in the order they appear in the schema, but I’ve ordered in a hierarchical way to better highlight their relationship. Additionally, there are other elements included in the schema which are not covered below. The list below shows the most important elements to read through to better understand a Finesse layout:

  • finesseLayout: Think of this as the outer boundaries of the whole desktop.
  • layout: The actual layout.
  • role: Role definition.
  • tabs: Grouping of tabs.
  • tab: Each single tab.
  • page: The grouping of gadgets within that page referenced by a tab.
  • columns: Grouping of columns.
  • column: Each single column.
  • gadget: The actual gadget URL.

Another interesting bit of trivia. The XML schema allows for three types of Finesse users: Agent, Supervisor, and Admin. While the desktop layout never references Admins the schema has an additional role that Cisco could later enable or currently uses for publicly restricted functions.

DESKTOP LAYOUTS

The layout is what dictates what will be loaded when an agent or supervisor login to Finesse. More importantly, it allows for the organization of different gadgets on the page to fit your contact center requirements. At its core the layout includes the following sections:

  • Horizontal Header: This section is the top bar across Finesse. And includes a Logo, Product Name, Agent State for Voice, State for Digital Channels, Dialer Component, and Identity Component. For most installations you’ll only ever see the logo, name, voice state, and identity components.
  • Alternate Hosts
  • Title and Logo in Header
  • Headless Configuration: If your gadget does not require a UI.
  • Customized Icons

Interesting tip: Most gadgets can be dragged and dropped and resized by agents, however out of the box this feature is disabled. To enable it look at the enableDragDropAndResizeGadget config key.

DEFAULT GADGETS

Out of the box you should see the following gadgets:

  • Call Control
  • Queue Statistics
  • Agent Call History
  • Agent State History
  • Customer Context
  • Team Data (Supervisor)

Additionally there are a good bit of disabled gadgets that you can use they all revolve around bringing CUIC data, specifically Live Data, to the agent desktop.

I hope to have time to dive deeper on this topic. There are so many little morsels of information every where you look, you just have to dig a little deeper to find them.

~david

2022 Cisco Designated VIP

I am pretty jazzed for making this awesome list for the second year in a row. The amount of brain power that you can find in the Cisco community forums is insane and being grouped with them is an honor. I really appreciate the recognition from Cisco.

As an added bonus I looked back for my very first post on the community forums. It happened on 02/14/2006, almost 16 years ago. I don’t remember the specific project I was working on, but it involved IPCC Express 3.x… :)

~david

How does Amazon Connect CCP Agent Login and Logout Work

I didn’t think a call center platform could make the topic of an agent login and logout interesting, but Amazon Connect has figured out a way to make me question my sanity with the design decision they have made.

We are going to do a deep dive into some of the uniqueness and outright strange behavior the CCP has when it comes to agent login and logout. This assumes you’re running the out of the box CCP, which means zero customization. Additionally, we’re going to be looking at 5 different screens at the same time to get an overall picture of what is going on and it’s impact to reporting. We will be looking at the Amazon Connect Dashboard, CCP, Real Time Agent reporting, Login/Logout report and Agent activity audit report.

Login to CCP

There are two ways that agents could login to CCP. The first is by logging into the Connect Dashboard (htts://<your-instance>.my.connect.aws/) then having agents launch CCP from there here’s what you need to know. The second way is to go to the CCP directly (https://<your-instance>.my.connect.aws/ccp-v2). Let’s walk through the first method step by step and see some of the reporting implications.

Step 1: A dashboard login:

  • Will show up in the Login/Logout report.
  • Will not show up in the Real Time Agent report.
  • Will not show up in the Agent activity audit report.

Why is this important? From the Dashboard to taking a call center call, the agent still needs to launch CCP and go into the Available state. I would argue that a better metric of login would be when the agent launches the CCP and not just logs into the Dashboard. The documentation for the Login/Logout report state this:

The Login/Logout report displays the login and logout information for the users in your contact center (for example, agents, managers, and administrators).

So the documentation is aligned with the behavior you see, but I would argue that, when it comes to agents, this report is misleading as an agent still has a few steps to follow before they are ready to take a call. Now, if you open the Agent activity audit report you will not see any data either which makes sense based on the Login/Logout report. Thankfully, both reports line up. Now, let’s get our agent from the Dashboard to CCP. By default the CCP should be in the Offline state.

Step 2: Launch CCP and:

  • The Login/Logout report doesn’t change as this is based on the Dashboard login.
  • You still will NOT show up in the Real Time Agent report.
  • You still will NOT show up in the Agent activity audit report.

Our agent has logged in to the Dashboard, launched CCP and is in an Offline state, but we’re still not seeing anything outside of the Login/Logout report. I would have expected the Real Time Agent report to show me the state of the agent, but that’s not happening. What’s even more infuriating is that if the agent changes states and then goes back to Offline, the Real Time Agent metrics have data about my agent. So why is Offline after login any different than going from one state to Offline state? To be fair, the agent will drop off from the statistics in about 3 minutes, however I think AWS should change this behavior and by default show any agent who is logged in and Offline to make things more consistent.

Logout of CCP

You would think that logout would be much easier, but there are still a few gotchas on this. The biggest thing to remember is that just closing the CCP window will not log you out. Another thing to consider is that a CCP logout will put you in Offline first then log you out. This is important to note if you have custom states you want to use for logout. However, if you are in the Dashboard and you launched the CCP and you logout from the Dashboard it will not properly log you out of the CCP. The CCP will eventually give you a login screen, but:

  • Real Time Agent metrics will still show you in the last state you were in.
  • Login/Logout report will show you logged out.
  • Agent Activity audit will still show you in the last state you were in.

Make it Better

Here are what I believe to be some simple suggestions to make this experience better. I hope that someone at AWS takes some of these and puts them in the next sprint.

  1. Offline state shows up in Real Time Agent metrics.
  2. The Routing Profile allows for configuring the default agent state upon login. This will put agents in any state when they first login.
  3. Dashboard or CCP logout behave the same way and reflect correctly across all reports.

Login and Logout at a Glance

Action Real Time Agent Login/Logout Report Agent Activity Audit
CCP Launch No Data Login time recorded either from Dashboard or CCP login No Data
CCP State Change State Data No Change State Data
Dashboard Logout Previous State Continues Logout time recorded No Data
CCP Logout Offline for about 3 minutes then stats disappear. Logout time recorded Offline State

~david

Obtained the AWS Solution Architect Associate Certification

I wanted to capture my experience working towards attaining the AWS SAA certification in hopes that this helps others on the same journey. This information is up to date as of 12/06/2021.

BACKGROUND

I first started working on getting the SAA back in middle 2020. I am the type that I like to  book the exam and then start planning for it. So, I booked the exam for August 19, 2020. At the time I used Adrian Cantril’s course. Which, I’ll be honest is great, very detailed. However, for me I was not ready for that type of detail and it was hard for me to focus and make time for the videos. I started strong, but started falling behind and was never able to catch up. On my first attempt I failed.

AWS SAA Failed Report

AWS SAA Failed Report

GETTING OVER THE HUMP

In the summer of 2021, on my city’s Slack, a few of us started talking about wanting to renew or pass an AWS certification. I put together a quick Google Sheet for people to talk about what they were trying to achieve and why. From there we had an initial meeting in early July and then decided to meet every Monday. One Monday in person and the next virtually via Webex. We ended with 4 total participants. 3 of us going for the SAA and 1 for Security. This was great as it created a constant reminder that I needed to study and stay with the group. I highly recommend to join or start a study group. The extra motivation helped me stay on track.

RESOURCES

As a group we talked about what resources worked best and compared notes about what we’ve checked out and what we liked/disliked about them. At the end of the day we all focused on a single primary resource. I personally supplemented my studies with a few other just to get multiple perspectives. Here’s what I used and in the order I used them:

A Cloud Guru (primary resource)

Tutorials Dojo Study Guide eBook (I printed this out and had it bound and would keep next to my bed to review the parts I felt that I needed further review)

Tutorials Dojo SAA Practice Exams

r/AWSCertifications

I enjoyed ACG’s video course. The videos were short and full of information and while the labs were ok, the gold was found in the videos alone. The TD eBook was good too, but I would skip it if you want to save money. Finally, the week before the exam I would go through practice exam question and read in detail the description for the questions I failed. Additionally, I would then go to the AWS documentation and get a bit more in depth to hopefully gain some new knowledge. I kept an eye on Reddit to see what others who had taken the test had to say about the topics covered. This allowed me to focus my studies. Personally, I feel that the practice exams was what got me to pass the exam. Not only because I was very used to the question style, but I was able to get a good feel for spotting the gotchas in the answers.

My exam had a lot of EFS, auto scaling, application and network load balancing. Good luck!

~david

PS: From our group all 3 passed the SAA and in a few days the last member of our study group will take the security exam and I’m sure will pass.

Adding Text to Speech to Your IVR Using SaaS (Google Cloud Functions)

I’ve been on a text-to-speech and speech-to-text kick lately. My last post talked about using AWS S3 and Amazon Transcribe to convert your audio files to text and in previous articles I’ve covered how to create temporary prompts using Poly so you can build out your contact center call flows. Well, now we’re going to expand our use case to allow a traditional on premise call center to leverage the cloud and provide dynamic prompts. My use case is simple. I want my UCCX call center to dynamically play some string back to my caller without having to use a traditional TTS service.

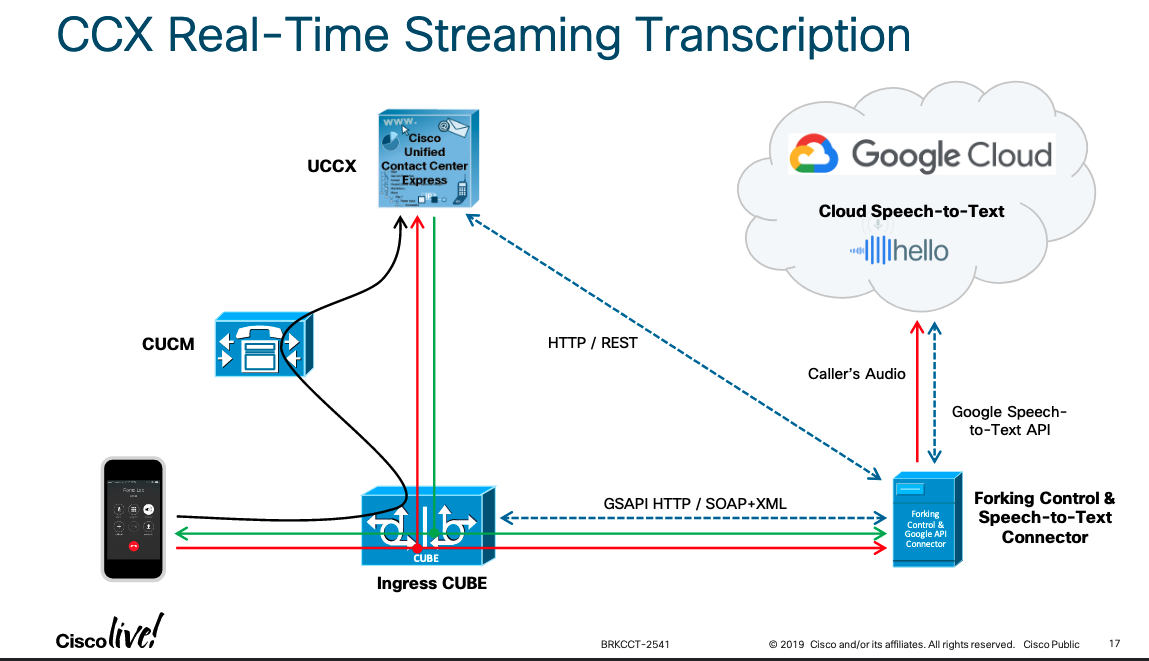
First, this is not new in any way and other people have solved this in different ways. This Cisco DevNet Github repo provides a method to use voicerss.org to generate TTS for UCCX. However, this process requires loading a jar file in order to do Base64 decoding. Then there’s this Cisco Live presentation from 2019, by the awesome Paul Tindall, who used a Connector server to do something similar. To be fair the Connector server allowed for a ton more functionality than what I’m looking for.

Screen Shot 2021-09-15 at 3.38.30 PM

Cisco Live Presentation

Second, I wanted this functionality to be as easy to use as possible. While functionality keeps getting better for on premise call center software there are still limitations around knowledge to leverage new features and legacy version that can’t be upgraded that makes it harder to consume cloud based services. I wanted the solution to require the least amount of moving parts possible. That means no custom Java nor additional servers to stand up.

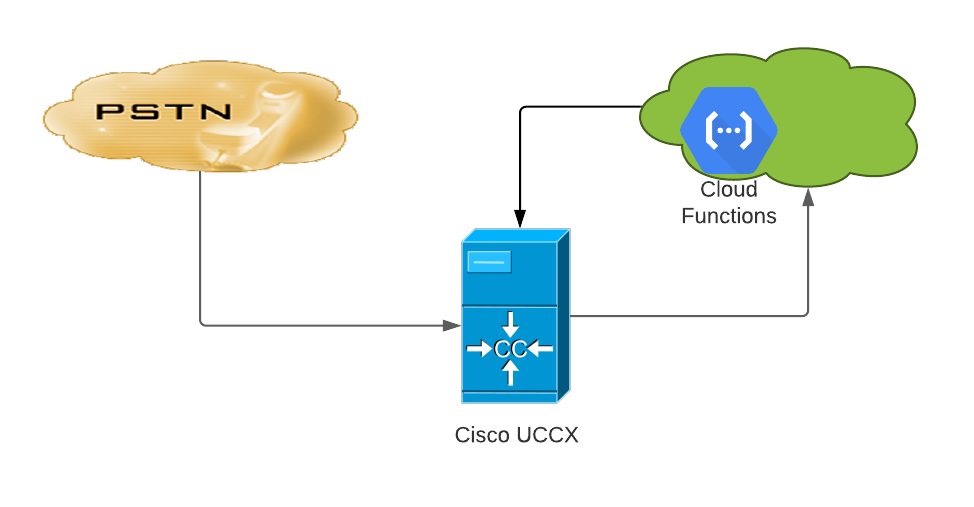
The solution I came up with leverages Google’s cloud (GCP) specifically Cloud Functions. However, the same functionality can be achieves used AWS Lambda or Azure’s equivalent. At a high level we have an HTTP end point where you pass your text string to and in return you will get a wav file in the right format which you can then play back.

Blank diagram

Flow Diagram

The URL would look something like this:

https://us-central1-myFunction.cloudfunctions.net/synthesize_text_to_wav?text=American%20cookies%20are%20too%20big

The Good Things About This

  • Pay as you go pricing for TTS. Looking at the pricing calculator a few hours of TTS a month would run under $2.00/month.
  • Infinitely scalable. If you’re handling 1 call or 100 calls your function will always return data.
  • Easy to use.

The Bad Things About This

  • There is a delay between making the request and getting the wav file. I’ve seen as long as 7 seconds at times. I would only use this in a very targeted manner and ensure it didn’t affect the caller experience too drastically.
  • Requires your on premise IVR to have internet access. Often time this is a big no no for most businesses.

Some initial testing with UCCX is showing some positive results. I’m going to investigate if there’s a way to accelerate the processing in order to keep the request and response in under 3 seconds as well as adding the ability to set language, voice, and even SSML via arguments. If you want to build this yourself here’s the code for the function.

def synthesize_text_to_wav(request):
"""Synthesizes speech from the input string of text."""
text = request.args.get('text')

client = texttospeech.TextToSpeechClient()
input_text = texttospeech.SynthesisInput(text=text)
voice = texttospeech.VoiceSelectionParams(
language_code="en-US",
name="en-US-Standard-C",
ssml_gender=texttospeech.SsmlVoiceGender.FEMALE,
)
audio_config = texttospeech.AudioConfig(
audio_encoding=texttospeech.AudioEncoding.MP3
)
response = client.synthesize_speech(
request={"input": input_text, "voice": voice, "audio_config": audio_config}
)

src_file_path = '/tmp/output.mp3'
dst_file_path = '/tmp/output.wav'

# make sure dir exist
os.makedirs(os.path.dirname(src_file_path), exist_ok=True)

# The response's audio_content is binary.
with open(src_file_path, "wb") as out:
out.write(response.audio_content)
print('Audio content written to file "output.mp3"')
AudioSegment.from_mp3(src_file_path).export(dst_file_path, format="wav", codec="pcm_mulaw", parameters=["-ar","8000"])
return send_file(dst_file_path

Be awesome!

~david

Contact Flow Block

Amazon Connect Contact Flow Editor Frustrations and Annoyances

The last few weeks have given me an opportunity to dig deeper into the AWS’s Amazon Connect solution. The purpose of this post will be to document some of my frustrations with the contact flow editor which I believe should be easy to fix. There are a few more frustrations which I don’t believe are easy, so I’ll save those for another post.

In the Contact flows screen there are a few things I would love to see. Firsts, make the Name, Type, and Description columns sortable. When there’s a very long list of flows this allows to quickly see specific groupings of flows together. Second, add an action menu at the end of the row which allows for a quick way to publish, duplicate, or delete a flow. This simple menu would save at least 2 extra clicks and covers some of the common actions one takes once inside the editor.

Amazon Connect Contact Flows Screen

Amazon Connect Contact Flows Screen

Let’s click on a specific contact flow and take it from the top down. Perhaps the most important thing here would be an auto save or confirmation that you might lose your changes if you try to navigate away from the editor screen. It’s very common that you have to go find a queue or prompt ARN, as they are not available in the editor, so if you browse away from the editor without saving you’ve lost your progress.

In an ideal world you would be able to easily switch from flow to flow without having to go back to the main contact flows screen. A drop down next to the flow name to quickly switch between flows would be great. This is specially useful when you want to copy and paste blocks between flows.

Contact Flow Editor Top Bar

Contact Flow Editor Top Bar

I’ve covered this one before, but it fits nicely with this post. You can save a flow or publish a flow and you can do both by using the publish button. However, the confirmation notification that you performed one or the other doesn’t confirm which one you did. This is minor annoyance as you can then move your eyes from the far left of the screen where the notification is found to the top right of your screen to see the Latest button label which will tell you the status of your current flow. It would be nice if the notification confirmed which action you took, I find myself  savings when I meant to publish and it always takes me a second to confirm which one I did.

Screen Shot 2021-06-23 at 6.07.16 AM

The workspace or the big white area with a grid where you place your blocks is the next focus. It’s nice to have infinite room to the right and bottom, but it would be nice if the same would be applied to the top and left. As your flow has more and more branching you find yourself scrolling further and further down, it would be nice if by default your start of the flow would be centered by default.

Remembering the zoom level or setting a default zoom level per flow will save a few clicks. As the flows gets bigger you start having to zoom in and out a lot more. When the flow is rather large, there’s very little reason why the default zoom level is the same as a flow which only has a few blocks. Below is the default view of two different flows. While this default view is useful for smaller flows, for bigger flows it’s not as useful and you immediately have to scroll around or zoom out to get to where you want to go faster.

Default View of Two Different Flows

Default View of Two Different Flows

One of the great things about contact flows is how many things you can do dynamically. However, you first have to bring in a lot of that data over to the flow. You do this with a Set contact attributes block. However, as you add more attributes it starts to become harder to find the right attribute you want to reference. Adding a way to sort or collapse every attribute details would make it much easier to find the attribute you’re looking for. This is specially important as the editor doesn’t tell you what attributes have already been defined. If that was the case this point might not be as important. Imagine having to scroll through a dozen of the aqua blocks below, having to  read each name to get to the one you want. Painful!

Amazon Connect Set Contact Attribute

Amazon Connect Set Contact Attribute

And finally, my biggest annoyance: block details. Block details are the configuration options each block has. You can get to them by clicking the top dark gray bar of any block.

Contact Flow Block

Contact Flow Block

There are two annoyances here. First, you can’t click on the workspace to close the block details. Even if you didn’t make a change you have to move your mouse to the far bottom left or right to click the cancel/x buttons. Heck, let me use the escape key to get out of there. So often I just need to see the configuration without making changes and having to cancel out every time takes unnecessary steps.

Contact Flow Configuration Details

Contact Flow Configuration Details

And finally, do not show me the details of a block that has nothing for me to configure. If by mistake I clicked on the gray bar of a terminate block. There’s nothing of value that this screen adds. Others might find the link to the documentation helpful, but I don’t. This annoyance would be lessen if I could quickly  escape from this screen, but since I’m being held captive by it and there’s no useful information displayed it just makes my blood boil.

Terminate Block Details

Terminate Block Details

I hope this post is not taken as me saying that Amazon Connect is not a good solution, far from it. This post is out there in hopes that someone at AWS who has the power to make things better sees what I believe are common frustrations.

~david